Who hasn't heard of coffee grounds and their use for garden plants?
This simple, free product, accessible to all, is one of the most popular tips on the internet… that wonderful world where, every couple of days, a new revolutionary practice or a grandmother's secret (that will yield a five-kilo courgette in just seventeen minutes or exterminate all slugs within a three-kilometre radius) pops up. All of this is quickly relayed by the entire internet community with the catchphrase "everything on the internet is true!" and the few rare individuals with a critical and scientific mindset are swiftly silenced by the spectre of conspiracy theories.
So let's dare to ask the uncomfortable question: is coffee grounds in the garden fact or fiction?
After all, its benefits in the garden have been discussed for quite some time, and it would be strange if it turned out that all of this was just nonsense...

Coffee grounds and their many uses in the garden
Coffee grounds: a good fertiliser, rich in nitrogen, phosphate... and everything else...
This is the first thing that comes up when discussing the benefits of coffee grounds in the garden: their nitrogen content.
Coffee grounds indeed contain between 2 and 3% nitrogen, which isn't too bad, but this nitrogen is not directly assimilable by plants. Coffee grounds must be composted to release their nitrogen.
The potassium (0.6%) and magnesium (0.3%) levels are not negligible, as well as phosphorus (0.05%) and copper (0.03%). These various elements are, on the other hand, immediately assimilable by plants and in amounts that can prevent deficiency risks.
However, the levels of manganese, zinc, calcium, and iron are far too low to be significant.
Also note that coffee grounds contain a good amount of organic matter but a Carbon/Nitrogen ratio of 24/1. This means there isn't enough nitrogen to allow for the decomposition of carbon. In practice, applying coffee grounds directly to the soil will result in nitrogen being drawn from the soil to initiate mineralisation. This nitrogen will therefore no longer be available to plants: they will be deficient, which is known as nitrogen hunger. The decomposition of this organic matter will also occur very slowly.
In summary, coffee grounds are rich in several elements necessary for plant growth, but not more, and often less, than another amendment like well-matured compost, for example. They should also be used sparingly to avoid nitrogen hunger.
Coffee grounds: an ally in the fight against "pests"?
The caffeine that persists in coffee grounds does indeed have a repellent, even biocidal effect on pest insects but also on other beneficial arthropods in the garden, especially earthworms.
It is quite an effective repellent against ants, and thus, by extension, can help prevent an aphid invasion later on. However, placing coffee grounds at the base of plants infested with aphids will be of no use, as they do not descend to the ground.
Molluscs, including slugs and snails, are not directly affected by coffee grounds. They may be physically disturbed by dry conditions if you surround your delicate plants with a "physical" barrier of coffee grounds. Like ash, this will not work in wet conditions.
In short, the effectiveness of coffee grounds in combating pests is weak and can be risky. An excessive application can have disastrous consequences for the fauna in your garden, as well as in the compost heap. So, caution is advised...

Coffee grounds: a solution against fungal diseases?
No scientific publication has been able to separate fact from fiction regarding this claim. For now, the results from field trials are inconclusive. But if this is indeed the case, one can assume that coffee grounds "will make no difference" between fungal contaminants and the beneficial soil flora. Once again, caution is warranted.
Coffee grounds: a boon for acid-loving plants?
Coffee grounds have a pH of around 6-6.5. One might assume that once on the soil, it will acidify for the benefit of our so-called "heather soil" plants.
In reality, like any organic amendment, there will be a slight acidification during decomposition and mineralisation. But the pH will rise again to approach neutrality.
So, a "drop in the ocean," coffee grounds will not acidify the soil.
Coffee grounds: a growth inhibitor?
Research is ongoing to determine whether a derivative of coffee grounds could one day serve as a non-selective herbicide (yes, again...). For indeed, coffee grounds can significantly slow down plant growth, even kill certain plants such as solanaceous plants like tomatoes, aubergines, and even potatoes.
For now, researchers have not been able to demonstrate which compound might have this inhibitory power but have already concluded that it is not caffeine.
Coffee grounds: a compost accelerator?
As mentioned earlier, in high doses, coffee grounds, or rather the caffeine it still contains, can kill worms, particularly compost worms that are so useful.
What happens is the opposite of what we hoped. We thought we were helping the composting worms by "boosting" them a bit, and instead, they die. It's all about dosage... If you really want to activate or accelerate compost, it's better to use an addition of comfrey leaves, nettles, or ferns, or even a bit of well-matured compost. This will be safer...
In conclusion
Some benefits of coffee grounds can be highlighted: a nutrient supply, a slight repellent effect, but they are unfortunately accompanied by far too many drawbacks to be used thoughtlessly. Like all amendments, in the end.
Coffee grounds are not a miracle product but just... coffee grounds. So don't expect to see your garden transform overnight into a plant paradise just because you've sprinkled coffee grounds everywhere. No, that’s nature's job and... the gardener's.
Who hasn’t heard of coffee grounds and their use for garden plants? This simple, free product, accessible to all, is one of the most popular tips on the internet… that wonderful world where, every couple of days, a new revolutionary practice or a grandmother’s secret (that will yield a five-kilo courgette in just seventeen minutes […]
Permaculture is on trend! It’s talked about almost everywhere: in gardening magazines, at plant fairs, on television… and many gardeners claim to practise permaculture.
Perhaps you yourself are tempted by a course on the subject... Good news: I have tested a permaculture course for you and here is my opinion!
1) Why I undertook a permaculture course?
When I decided to undertake a permaculture course, I was already convinced that it would constitute a personal and professional enrichment that would also benefit my everyday life. By choosing it well, I knew I could value it with my colleagues or future employers. I saw it as a real professional edge because I knew I could leverage it within the scope of my job as a landscape engineer.
From a personal perspective, I also hoped that this permaculture course would open up new avenues of reflection about myself, my way of thinking, consuming and living. I saw it as a unique opportunity to question myself and to focus on my life projects. I looked forward to asking all my questions and, above all, meeting people who, like me, want to learn more and take action.
And I was not disappointed! This course went beyond my expectations. I was pleasantly surprised by everything I could learn from the trainer or from the other participants. It was possible because I found a course that matched my expectations.
2) How I chose the theme of my permaculture course?
It is essential to research the course you choose. Indeed, the term permaculture is very broad. It can apply as well to a private garden as to a professional’s market gardens, to a house or even a business.
For my course, I chose a permaculture course dedicated to permaculture design. My aim was to create permaculture designs—whether gardens, projects or a house. As a landscape engineer, I value this additional asset in my professional activity: garden design. Permaculture design simply resonates with it.
There are other permaculture topics you can choose from depending on your profile and your projects:
- The professional market gardening in permaculture,
- Urban permaculture,
- Bioclimatic housing,
- Social permaculture: such as non-violent communication…
- Transition towns.
The chosen theme must suit your projects, your questions and your professional and/or personal circumstances.
When choosing your course, price is also an important criterion as few courses can be funded. I also advise you to beware of commercial sites or other scams that ride the permaculture wave. Many people take advantage of the enthusiasm to call themselves "permaculturist" and offer training when they are not at all qualified. Permaculture cannot be learned only from books; it is practised in the field and not on your own in a corner: it’s an open approach with others.
I can recommend two training sites that offer introductory courses, on-site workshops or certified permaculture courses: the Permaculture People's University and Brin de paille.
For my part, I chose the site of the Permaculture People's University, which lists numerous courses by date across France. Since my training could not be funded, I weighed the time involved, the money invested and the professional and personal return it offered me. Today, I am perfectly satisfied with the investment I made by undertaking this training.
3) How I chose the duration of my permaculture course?
There are several types of training according to their duration. I was able to start with talks or sessions of 2 or 3 hours that present the basics of permaculture. They are introductory and allow you to begin to explore this theme. You can ask questions of the speakers, usually well informed, and confirm that the topic interests you. I can recommend two sources for some of their permaculture talks and workshops in Paris: the Recyclerie and Acteurs du Paris Durable.
Then, it is possible to deepen the subject a little further for a weekend of on-site training. This very formative period—generally on the ground—is ideal for personal projects and the initiation of future professionals. In general, these weekends feature theoretical and practical parts. The on-site, hands-on approach is important, as are the exchanges with other participants.
Next, once the basics are well learned and your projects confirm your interest in permaculture, you can continue as I did with certified permaculture courses. This is a 10-day training. I would recommend it for future professionals in the field. In my case, my training was split into two five-day periods scheduled during school holidays: one in October and one in February. It was ideal for me since I work less during school holidays. This training was a gold mine for my own projects and my network. The permaculture topics could be explored in depth rather than skimmed. And what a pleasure to exchange with other participants who are on the same wavelength as you!
I would not hesitate to recommend these certified courses to people looking to orient themselves professionally in permaculture (future market gardener, designer in permaculture, facilitator in permaculture…). It is also possible for highly passionate individuals to follow this training who want to learn a great deal more.
Finally, there is the Applied Permaculture Diploma. This training is designed for future trainers. Very advanced, long in duration (minimum 2 years) and technical (preparing a substantial dossier), this diploma allows you to validate your field experiences and knowledge by a board of graduates. I would only recommend this course for those who also want to train permaculturists in certified permaculture courses.
4) How I chose my course: the importance of the trainer and the training setting
When you have chosen the duration of the course and its main theme, pay attention to the trainers!
Ensure that they have themselves completed a certified or diploma-bearing training, or that their experience or reputation attest to their professionalism. For example, certified permaculture courses are taught only by graduates (APD: Applied Permaculture Diploma) whereas introductory weekends may be taught by certified individuals (Certificate in Permaculture Design).
Moreover, each trainer always brings a different flavour according to their own background, affinities and desires. It’s up to you to study their profile to know if they will suit you.
During my certified permaculture course, I had the luck of having Sacha Guégan as trainer. I was drawn to his rigorous and Cartesian profile as a former automotive engineer. I learned that he had gained experience through a Professional Certificate in Agricultural Enterprise Management (BPREA) and 10 years of experience in applied permaculture, notably at the Bec Hellouin Farm, a French reference in permaculture. Finally, I verified that he earned his Applied Permaculture Diploma in 2015.
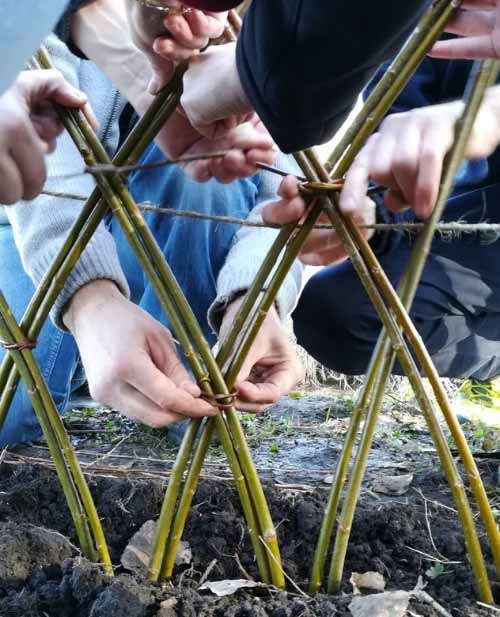
I completed my training on two sites: in the community gardens of Orry-la-Ville and at Pontarmé Castle. The training venue spoke to me immediately. The presence of a community garden was very appealing since I often work in that kind of context. I saw there the opportunity to go outdoors for field studies. And that is what we did, including weaving a living willow hedge, revisiting sowing techniques, and a wild-plant excursion… Even in the cold, we all enjoyed it. And what a pleasure to share moments when everyone’s smiles are on display!
5) How I made the most of my permaculture course?
I chose to value my training in all these ways: to enjoy it, to learn, to network, to receive feedback and external opinions on my projects. Even though I already knew some permaculture techniques, it was interesting to learn others’ approaches and their little personal tips.
I had the pleasure of meeting people who share my interest in societal topics such as climate warming, pollution, overconsumption… It was a real breath of fresh air to share and exchange with them. I loved this unique opportunity to meet these people. They were a source of inspiration for my own projects and gave me the drive to go even further.
Friendly, my training at the Clearing of the Sources was a real shared pleasure, filled with smiles, joie de vivre, deep reflections and learning. I would recommend it without hesitation!

6) And after my training?
Because the training was long, I was able to keep in touch with the other participants via Facebook and WhatsApp. Thanks to this, I extended my learning: I glimpse the others’ photos, their bibliographic resources and, above all, I love seeing everyone’s project progress. I’m delighted!
Even though I’ve finished my training, there’s still a lot to do: re-reading my notes, watching the documentaries that were recommended, and delving further into topics such as non-violent communication. My training remains a genuine gold mine that I still need to explore. For example, I still have many books to devour:
- "The Permaculture Guide to the Garden" by Carine Mayo from Terre Vivante Editions.
- "Permaculture – Healing the Earth, Nourishing People" by Perrine and Charles Hervé-Gruyer from Actes Sud Editions.
- "Permaculture in Practice" by Jessi Bloom and David Boehnlein from Ulmer.
- "The Forest Garden" by Martin Crawford from Ulmer editions
So don’t hesitate to take the plunge and train yourself!
Permaculture is on trend! It’s talked about almost everywhere: in gardening magazines, at plant fairs, on television… and many gardeners claim to practise permaculture. Perhaps you yourself are tempted by a course on the subject… Good news: I have tested a permaculture course for you and here is my opinion! 1) Why I undertook a […]
On 16 January 2018, the Eat Foundation published a report in the medical journal The Lancet that confirms what we had suspected for several years: for our health, to feed the world and the inhabitants of the planet, there is an urgent need to move to a plant-based diet.
Do you find this dull, or worry that it might be bad for your health? Do you think that becoming vegetarian, even a few days a week, means condemning yourself to tofu? Think again! When well planned, vegetarian (and vegan) diets are healthy and balanced. If you choose your vegetables well and cook them with a dash of ingenuity, they are rich in flavours... The other advantage is that it can be grown in the kitchen garden!

Legumes: essential proteins
"But where do you find the proteins?" is one of the most common questions. First of all, it's important to know that all vegetables contain protein, but it is mainly in legumes (lentils, beans, peas, broad beans…), and in oleaginous (walnuts, hazelnuts) that they are most present. Cereals also contain them, but they are a little more tricky to grow in the garden!
My selection:
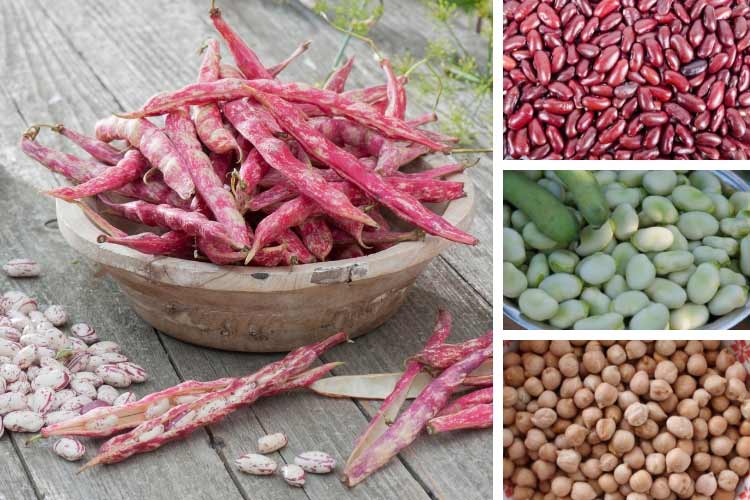
- Flambo dwarf shelling bean : this improved variety yields two to three successive harvests per year, from July to October. I really like its white beans speckled with pink and its very delicate flavour. They can be eaten fresh, dried or semi-dried. Once cooked, they lose their colour, but it's not a big deal—the pleasure also lies in shelling these little wonders! In cooking, it's very easy to prepare, with tomatoes, for example. You can also make delicious veloutés.
- Aguadulce long-pod broad bean : Early, very productive and vigorous, this broad bean produces spectacular pods that can reach 40 cm! They contain large fleshy seeds, tender to the bite. It's one of the first legumes harvested in the kitchen garden, as early as May if you sow it in February. Great in spring Buddha bowls, with radishes and young carrots, broad beans also allow you to prepare tapenades for dipping your breadsticks.
- Canadian Wonder red shelling dwarf bean : this red flageolet is an old variety also known as "Rooster's Kidney." Very productive, it also stores well when dried. It's a Mexican cuisine classic that remains the base of chili, even when it's "sin carne" (without meat). It can also be cooked as a patty and replace the steak in veggie burgers.
- Chickpea : it is a crop that many gardeners do not immediately think of. Yet chickpeas are easy to grow in warm, dry climates. They yield, in four months, round, beige seeds. Rich in protein (19 g / 100 g), chickpeas are widely used in vegetarian cooking, as is or mashed, with condiments and tahini for the indispensable hummus.
- Garden soybean : soybean is a well-known legume that grows in a mild climate, as simply as beans. The more experienced gardeners can turn its seeds into soy milk or tofu… but it is easier to grow it to enjoy greens, with the pod, as edamame.
Colorful vegetables, sweet taste, for vitamins and fun
In the pleasure of eating, presentation matters almost as much as taste. Crafting an appetising salad is a ritual for those who seek to eat mindfully. In winter, colour is also important, but the gentle flavours are particularly comforting—don’t deprive yourself!
My selection :
- Indigo Rose tomato : it’s a cocktail tomato with a bluish-purple skin, almost black, and pink to deep purple flesh. It owes its colour to the presence of anthocyanin, a pigment found in fruits such as blueberries or grapes and rich in antioxidants. When sliced, it adds depth to salads, especially if mixed with other distinctive varieties like Pineapple tomato. In the garden, it grows like any tomato and shows good vigour and frost resistance.
- Chioggia beetroot : early, this small round beetroot is very decorative. Sown from April to May, it is harvested from early summer and shows pink flesh striped with white and a sweet flavour. It’s the beetroot to eat raw, in carpaccio or grated, in salads!
- Butternut squash : one of my favourite squashes, not only because it does everything (purée, gratins, chips, soups), but especially because its sweet, mellow flavour is incomparable. If I love it so much, it’s also because it is particularly easy to cut, which is handy when you’re in a hurry! In the kitchen, in a cool climate, it’s not always the most productive, but its flavour more than makes up for this small drawback!
- Sweet potato : originating from South America, the sweet potato is a vegetable that loves warmth and regular watering… but it will reward your efforts with handsome orange-fleshed tubers, wonderfully comforting in the heart of winter! Depending on your soil and climate, you can plant it in the ground or in pots, from mid-May. In my garden, it does particularly well when slightly caramelised with honey and sprinkled with sesame seeds… but it can also be simply roasted in the oven!

Litlle extras and boosters
Last winter, I told you about "superfoods": chia seeds, pumpkin seeds, kale, goji berries... They are, of course, included in my selection! (I invite you to read about them in this article). To this list, this year I add these French books:
On 16 January 2018, the Eat Foundation published a report in the medical journal The Lancet that confirms what we had suspected for several years: for our health, to feed the world and the inhabitants of the planet, there is an urgent need to move to a plant-based diet. Do you find this dull, or […]
Whether in the vegetable or ornamental garden, having loose soil is essential for growing plants. In such soil, roots can easily penetrate to absorb the nutrients and water necessary for their growth. Conversely, hard, compacted, impermeable soil will undoubtedly lead to poor and stunted plant growth, even causing root asphyxiation during prolonged rainy periods. We know that roots primarily explore loose soil; they can bypass hard clumps. If loosening the soil is essential for optimal plant growth, should it be turned over?
To till or not to till the soil, a generational question...
Even today, in towns or the countryside, we can see vegetable gardens following the post-war cultural model. The two key words: productivity and cleanliness! Cleanliness through the eradication of adventive plants, the alignment of vegetables, and French-style pathways. Productivity through the use of manures and mineral fertilisers. In this type of garden, soil preparation is done with a rotavator or, if the size allows, with a spade. The soil, regarded as a mere growing medium, is thus turned over, and the fauna is ignored. It is worth noting that the use of manures has enriched the soil with humus.
The life of the soil, often unknown
However, the soil is alive; it is much more than just a growing medium and contains numerous organisms.
The visible fauna of the soil consists of hundreds of species of insects, mites, crustaceans (woodlice), and earthworms. It can be appreciated at three levels:
- The endogean fauna, which lives in the top few centimetres of soil, includes medium-sized worms that dig horizontal galleries and feed, among other things, on dead roots.
- The epigeous fauna, which lives on the surface, in the litter of plant debris, includes red worms and many other animals such as springtails, woodlice, millipedes, nematodes, etc.
- The anecic fauna, composed of large earthworms, which represent 80% of the weight of worms, creates long, permanent vertical galleries. They come to the surface to feed on organic matter and redistribute it, digested, in the form of turricules, both on the surface and throughout the profile of their gallery.
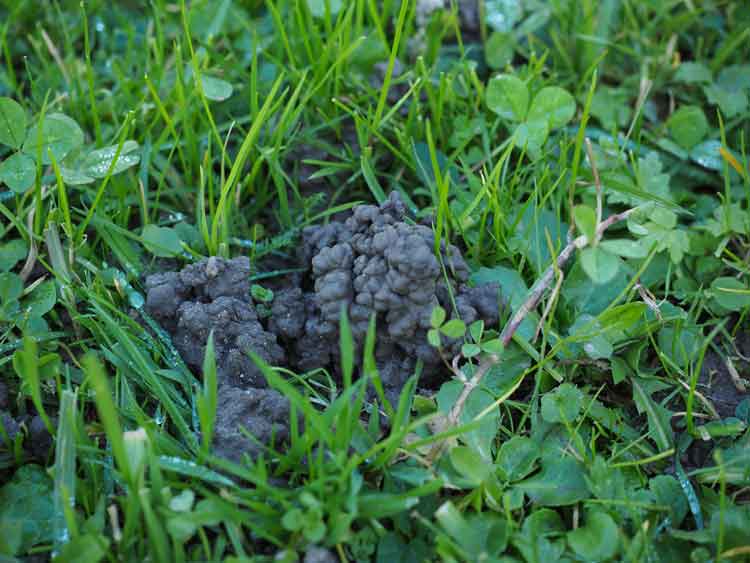
A turricule of earthworms
The effects of tilling with turning
When the soil is turned over, the habitat, galleries of animals, and earthworms are partially or completely destroyed. The epigeous fauna is simply destroyed and buried, and the galleries of the endogean fauna are disrupted. As for the anecic earthworms, their galleries extend below the ploughing zone, and their tunnels are severed, preventing access to the soil surface, up to what is known in agriculture as the "plough pan." Anecic and endogean earthworms will take 2 to 5 years to rebuild their habitat after ploughing, so by turning the soil every year, we give them no chance to reform their galleries.
Returning to the surface of the soil, let’s consider the invisible organisms: micro-organisms. The top layer of soil is the richest in humus and is the site of intense biological activity. Regarding micro-organisms, a simple gram of ordinary humus contains millions of bacteria, yeasts, algae, and fungi. The needs of these micro-organisms are very specific; for example, algae require light, and aerobic bacteria need a sufficient oxygen level. When the soil is turned over, these micro-organisms, deprived of their specific needs, die and disappear.
Let’s also consider the act of tilling itself: Tilling with a spade is tiring, laborious, and bad for the back. Tilling with a rotavator is costly in terms of equipment and fuel. Turned soil also promotes the systematic regrowth of adventive plants and requires more watering, weeding, and hoeing because the soil structure becomes unstable, and a simple rain can lead to surface crusting. Water runs off and no longer penetrates the soil. On an agricultural scale, this leads to the leaching of nutrients and pollution of watercourses.
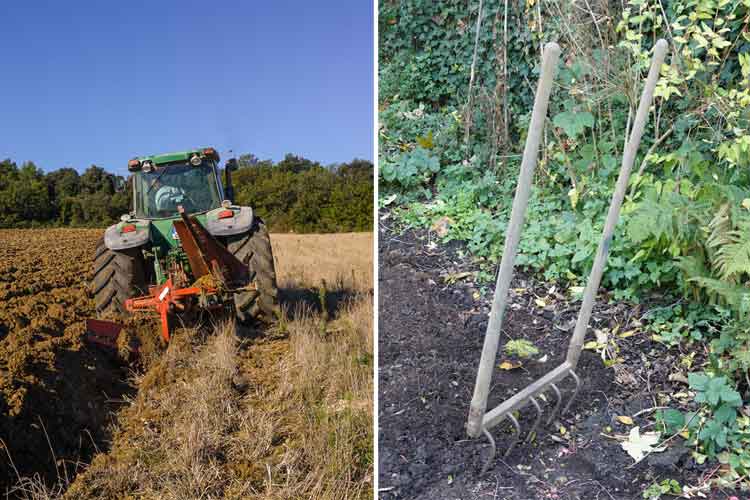 Whether in the field or the garden, tilling destroys soil life - Tools allow for loosening without turning the soil, such as the grelinette.
How to loosen without turning the soil?
You understand, turning the soil is a harmful practice. However, to grow vegetables and plants, loose soil is necessary. To achieve this, it must be decompacted. Two methods are generally used:
- gardening with a permanent soil cover: mulch and bark, cultivated plants, green manures, spontaneous vegetation, compost... (to read: "Mulching, why? How?" and "Green manures: why, how?")
- physically loosening the soil, only when necessary and with appropriate tools such as the grelinette and the fork spade.
A permanent and natural soil cover is a practice that mimics nature. Look, in the forest, leaves fall, forming a litter that gradually decomposes to nourish soil life! In the garden too, this practice will promote soil life and its natural aeration by fauna.
But before achieving naturally loose soil, it will take a few months or even several years! Indeed, going from a soil with little life to a well-fertile and well-loosened soil overnight is utopian and also depends on the original nature of the soil. In the first years, it will be necessary to continue loosening manually in depth but without turning the soil. In practice, in a small garden (around 10 m²), a simple fork spade is used. A larger vegetable garden requires a grelinette.
How to use the grelinette? The grelinette (as well as the fork spade) is planted into the soil, then the handles are pulled towards oneself to lift the soil, and then they are brought back to a vertical position (of course, one always works while stepping back; it would simply be foolish to walk on soil that has just been decompacted!). The soil is thus simply loosened without being turned over. If necessary, clumps are then broken up with a rake and levelled before sowing or planting.
In conclusion: be lazy, outsource soil work but feed your workers!
In summary, avoid turning the soil, trust in soil life while always ensuring it is provided with food to promote its work and natural loosening. It is the fauna that ploughs in place of the gardener. The gardener is simply there to support it; if necessary, one can occasionally use tools to loosen the soil, such as the grelinette. Over the years, you will need them less and less.
Whether in the vegetable or ornamental garden, having loose soil is essential for growing plants. In such soil, roots can easily penetrate to absorb the nutrients and water necessary for their growth. Conversely, hard, compacted, impermeable soil will undoubtedly lead to poor and stunted plant growth, even causing root asphyxiation during prolonged rainy periods. We […]
Imagine a meal among gardeners... and a conversation that starts to dwindle. It seems everything has been said and everyone agrees. Drowsiness creeps in, and the atmosphere begins to resemble a TV lounge in a retirement home. To liven things up a bit, I present you with a topic of choice: moles.
You’ll see, it’s fantastic: everyone will have something to say and, above all… no one will agree. If the guests are of good composition, that is to say, not too inclined towards consensus, the discussion will surely heat up, and the assembly will quickly form two distinct camps… which I propose to outline.
Anti-moles, Camp No. 1
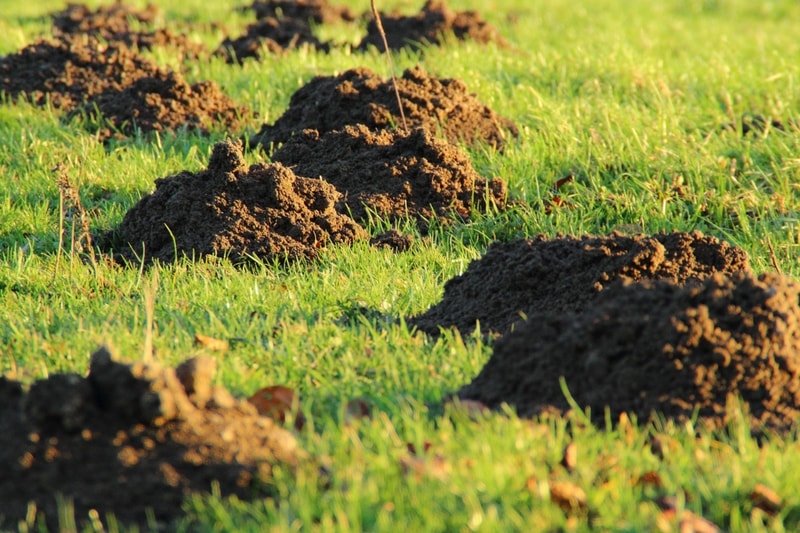
The anti-moles are easily identifiable: they are demanding gardeners, uncompromising about the aesthetic aspect of their garden, and they are not the type to be pushed around. A lawn riddled with mounds of earth? Indecent, intolerable! A freshly planted bed completely dug up? Nightmarish.
But they are also experts. For getting rid of or making this pest leave, they have tried everything. Pacifists by nature (naturally, they are gardeners), they started with repellents: a few plants of Euphorbia lathyris, some Fritillaries, some Incarvilles, all seasoned with castor cake. Some of them left, others stayed. So, they moved on to ultrasound. Clearly not loud enough, they invested in explosive solutions and bought mega firecrackers, ultimately resorting to vibrations and sticking about twenty sticks topped with beer bottles, considering that after all, the third half-time style could be a theme of decoration like any other. Eventually, they resigned themselves and bought traps. And while pinching their fingers, they couldn’t help but shout “cursed moles!” But they don’t boast about that.
Pro-moles, Camp No. 2
Let’s not exaggerate: the pro-moles wouldn’t go so far as to breed them, but, a bit fatalistic, they have come to terms with it. In their garden, throughout the year, they stoically rake or collect the fine soil from the molehills to make their sowings or fill their pots. At first, they weren’t particularly happy. Then, they got acquainted with the intruder when they instinctively (foolishly, others would say) freed it from the cat’s claws. What a lovely coat, what a charming face! So, they released it and watched it dig in the lawn as hard as concrete. Its power left them speechless. And then they thought: respect. These gardeners quickly realised that, after all, the mole, this unloved creature, was just as useful as the hedgehog since its menu does not include bulbs or roots but rather earthworms and especially pests like cockchafers, wireworms, and garden chafer larvae. Moreover, in compact soil, they improve drainage. Philosophical, the pro-moles continue to rake, reseed a bit of lawn, or take the opportunity to plant a few bulbs. In short, they remain zen, even if they sometimes disturb the sowings!

And you, which camp do you belong to? The fervent mole removers or the fatalists? A bit of both? Any tips to share? Feel free to leave a comment!
Imagine a meal among gardeners… and a conversation that starts to dwindle. It seems everything has been said and everyone agrees. Drowsiness creeps in, and the atmosphere begins to resemble a TV lounge in a retirement home. To liven things up a bit, I present you with a topic of choice: moles. You’ll see, it’s […]
But who devours cabbages in the vegetable patch? Do you know the Cabbage White?
Cabbage White, a butterfly with voracious caterpillars
Pieris brassicae, by its gentle Latin name, is a damned butterfly terribly common, rather dull cream-white. Its particularity, as you will have guessed, is to attack, at the caterpillar stage, cabbages and all crucifers or brassicas... including white mustard, very useful in the vegetable patch as a green manure.
Needless to say, although I like butterflies a lot, the Cabbage White gives me the creeps without even touching its caterpillars. Because the damage can be significant. It’s simple: in case of a massive invasion, you go to bed with nice, promising cabbages in the vegetable patch and, the next morning, all you have left are pitiful skeletons made up of the ribs. I am barely exaggerating.
How to prevent and control Cabbage White?
Knowing that Cabbage White is present throughout France (and has been since the Paleolithic, Wikipedia tells us ;-)) and that it is active from late spring to October, you will agree that control is legitimate.
As with Carrot Fly and Leek Leaf Miner, the best prevention, short of waving a butterfly net, is to install, tightly, insect netting.
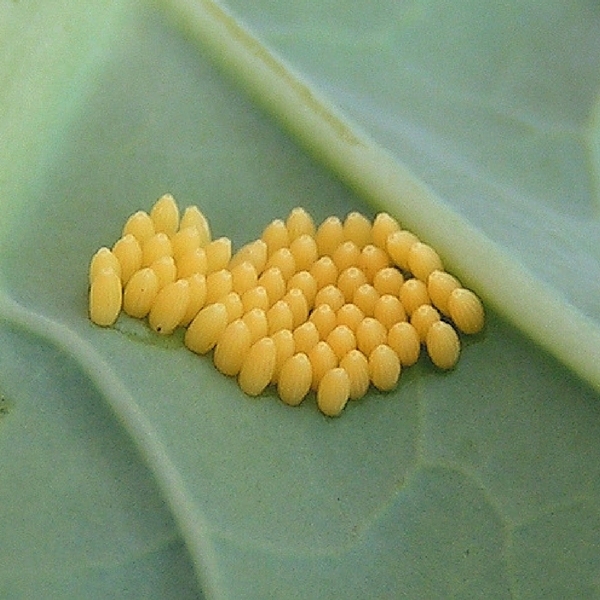


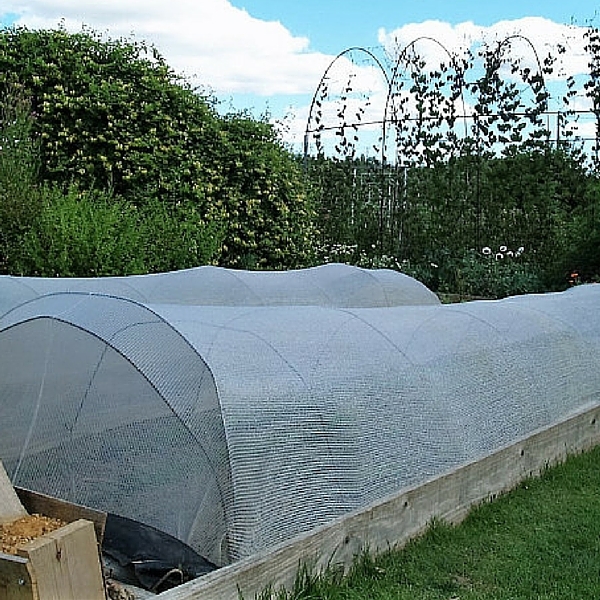
If that precaution has not been taken, here is how to proceed, step by step, to limit damage:
- Inspect your cabbages and carefully check the underside of leaves (that’s the basics!),
- Destroy the eggs systematically and without mercy,
- Carry out a spray of "Bt" or Bacillus thuringiensis (Bacillus thuringiensis): this bacterium, once ingested by the caterpillar, causes its death. It’s a biopesticide that can, of course, be used in organic farming. This treatment must be applied early to be effective.
- Pick caterpillars by hand (a pair of kitchen tongs is a tool of choice for those put off by touching caterpillars).
Finally, as always, remember to observe crop rotations in the vegetable patch, practise companion planting and use aromatic plants to confuse these unwanted visitors.
But who devours cabbages in the vegetable patch? Do you know the Cabbage White? Cabbage White, a butterfly with voracious caterpillars Pieris brassicae, by its gentle Latin name, is a damned butterfly terribly common, rather dull cream-white. Its particularity, as you will have guessed, is to attack, at the caterpillar stage, cabbages and all crucifers […]