


Bushy sages bring enchantment to the garden or terrace with their long flowering period, stretching from spring through to autumn. The flowers also add colourful accents, ranging from deep mauve to pure white, along with soft pink, red and salmon orange depending on the variety. Some cultivars even boast charming bicoloured blooms. Easy to grow, bushy sage is also simple to propagate by cuttings, whether to replace an ageing plant or expand a flowerbed.
Discover when and how to propagate bushy sage with ease, thanks to our illustrated guide!

When to take cuttings from sage?
Propagation by cuttings of sages is best done from June to August, as the summer warmth during this period encourages good root development. Cuttings from bushy sage will produce a new young plant identical to the parent. The new shoot can be planted out in the ground the following spring.
What will I need?
- One or more pots or buckets or a mini greenhouse or a tray.
- A pencil.
- Secateurs (remember to clean and disinfect them with alcohol before use to prevent the spread of disease between plants).
- A growth cloche or a plastic bottle with the bottom cut off or a plastic bag
- Seed and potting compost
- A spray bottle with water
- A rooting hormone (facultative)
How to propagate bushy sage using the 'enclosed' method?
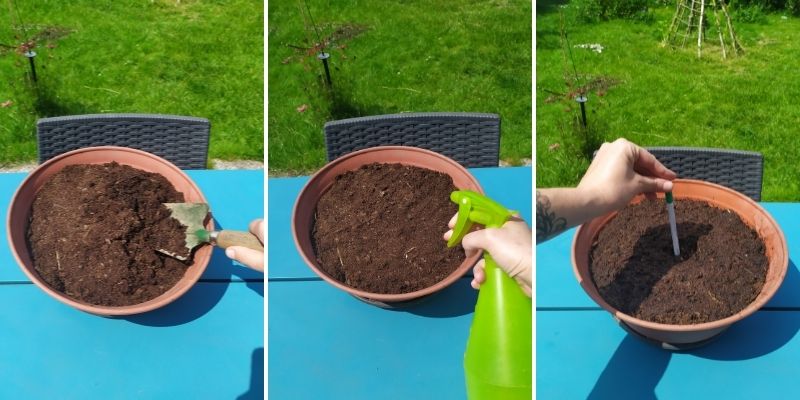
1- Fill the pot with seed compost, leaving 2 cm from the rim, then firm it down with your hands.
2- Moisten the compost, preferably with rainwater.
3- Use your pencil to make one or more holes 3 to 4 cm deep.
4- On your sage plant, identify healthy green shoot tips. If possible, choose branches without flowers. If the stem has flower buds or blooms, remove them.
Note: To increase your chances of success, we recommend taking 3 to 5 cuttings at the same time.
5- Using your secateurs, cut stems measuring between 5 to 10 cm, just below a node, i.e. the point where leaves attach.
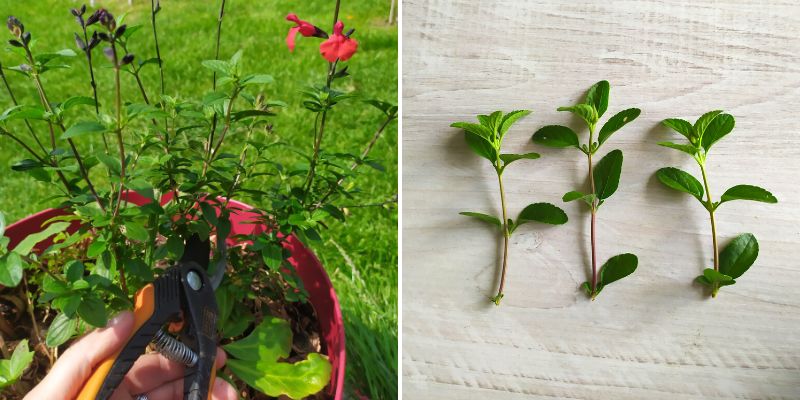
Take one or more shoot tips from your bushy sage for propagation by cuttings
6- Remove the lower leaves from your cutting to prevent the plant from exhausting itself through excessive transpiration.
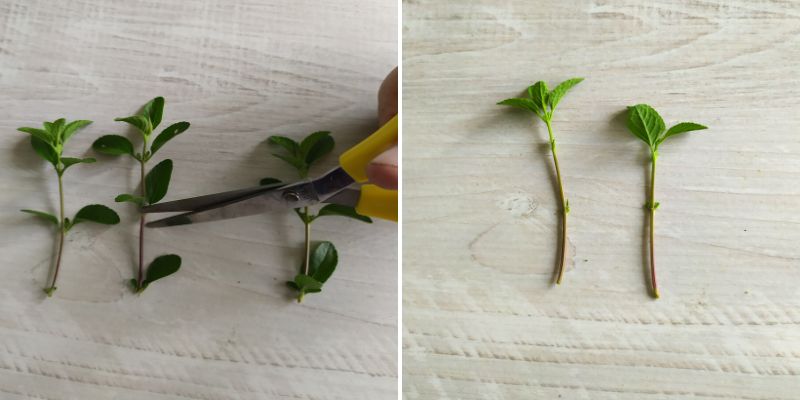
Remove lower leaves from the stems
7- You can also use plant hormone to boost root development. Simply tap the base of the stem gently into the hormone.
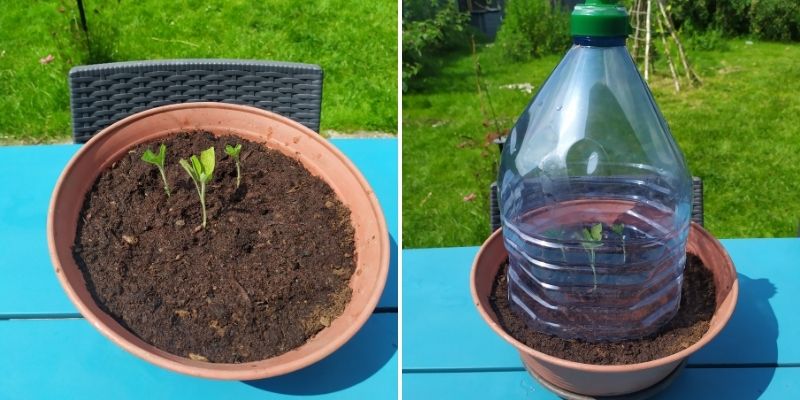
8- Plant the sage stems in the pot.
9- Firm the compost around the stems to keep them upright.
10- Place a growth cloche over your cuttings to saturate the atmosphere with humidity. This is known as the 'enclosed' method of propagation. If you don't have a growth cloche, use a plastic bottle with the bottom removed. Alternatively, place a translucent plastic bag over the cuttings, supported by bamboo canes. Caution: The stem and leaves of the cutting must not touch the cloche to prevent mould!
11- Position your pot in a bright spot, but out of direct sunlight.
12- Water the compost regularly to keep it moist but not waterlogged. Never let it dry out. Every 3 or 4 days, lift the cloche for 30 minutes to refresh the air.
13- Roots should be well developed after 2 to 3 months. You can then remove the cloche and repot your sage in a larger container.
14- During winter, move your sage to a greenhouse or a bright, unheated room.
15- Your young sage can be planted out in the ground the following spring.
To explore further:
- Discover our range of bushy sages.
- Find out all you need to know about sages: planting, pruning and care.
- Need help choosing? Explore our advice sheet on "Sages: which varieties to choose?"
- Discover our advice sheet: "Propagation by cuttings: all about different techniques and our tips for successful cuttings".


Comments