


Ceanothus are beautiful decorative bushes offering abundant spring or summer flowering, both melliferous and fragrant. Its nickname "California Lilac" comes from its blue, pink or white spike-shaped flowers reminiscent of lilacs. This ornamental bush comes in different forms and habits depending on the variety. For example, it can range from 40 cm in height for the Prostrate Ceanothus up to 4 m for the Ceanothus arboreus 'Trewithen Blue'. Being undemanding, it's easy to grow in any type of well-drained soil. These flowering bushes can be used in borders, as ground cover, in containers, as specimens or make stunning hedges. So why not multiply this beauty in your garden? Moreover, taking cuttings will allow you to obtain young plants easily.
Discover when and how to take Ceanothus cuttings with our illustrated tutorial.

Ceanothus thyrsiflorus 'repens'
When to take Ceanothus cuttings?
The best time to take your Ceanothus cuttings depends on its foliage. Deciduous varieties should be propagated by cuttings in June from herbaceous shoots. Evergreen cultivars should be propagated by cuttings in August by taking semi-lignified stems. In both cases, the method used is the same: propagation by cuttings under cover.
Note: Hardwood cuttings can also be taken in October for deciduous Ceanothus.
Required materials
For successful California Lilac cuttings, you will need:
- One or several pots or large buckets
- A spray bottle
- A pencil
- Clay pebbles
- Pruning secateurs cleaned with alcohol before use to avoid disease spread
- A cloche or plastic bottle or plastic bag or mini greenhouse to cover the cuttings.
- Seed and potting compost or a mixture of 2/3 turf and 1/3 horticultural sand
- Optional: a rooting hormone
How to take Ceanothus cuttings under cover?
1- Place a layer of clay pebbles at the bottom of your pot to facilitate water drainage.
2- Then add seed compost until 2 cm from the rim, then lightly firm with your hand.
3- Using a spray bottle, water the compost. The substrate should be moist but not waterlogged. Preferably use rainwater.
4- Make a 4 to 5 cm deep hole with the pencil.
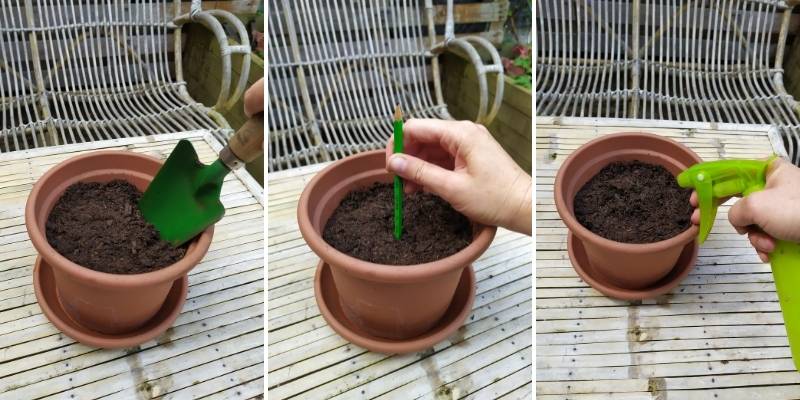
Make a 4 to 5 cm deep hole and moisten your compost
4- Examine your bush to select healthy stems, preferably without flowers. For deciduous varieties, choose a green, flexible stem. For evergreen Ceanothus, select a semi-lignified stem, meaning the soft wood is beginning to turn into hard wood.
5- Using secateurs, cut 5 or 6 stems measuring between 10 to 20 cm. Cut just below a node, that is below a leaf. The future roots will emerge from this same node. Remove any flowers.
6- Remove the lower leaves from the cutting and keep half of the upper leaves. This will prevent your cuttings from exhausting themselves due to excessive leaf transpiration.
7- Optional: you can gently tap the base of your cuttings in plant hormone to facilitate root development.
8- Plant your stem in the pot.
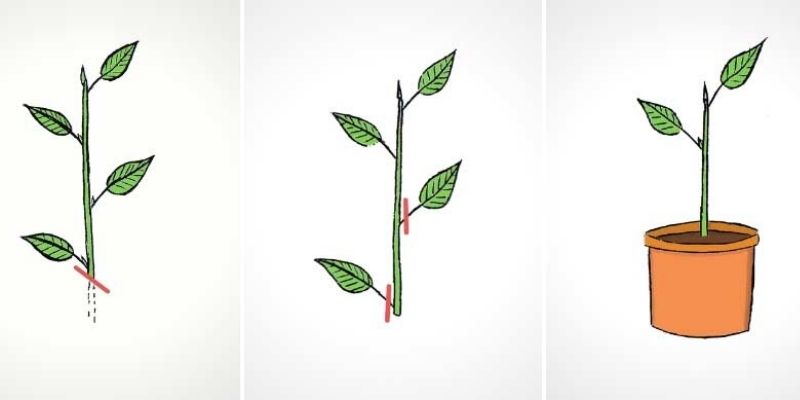
Cut the stem below a node, remove lower leaves and plant
9- Gently firm the compost around the cutting.
10- Place a cloche over your stem to saturate the cuttings' atmosphere with water (hence the term "under cover"). If you don't have a cloche, use a bottomless plastic bottle or a transparent bag held up by stakes. Be careful, the stem and its leaves must not touch the edge of the cloche to avoid mould formation!
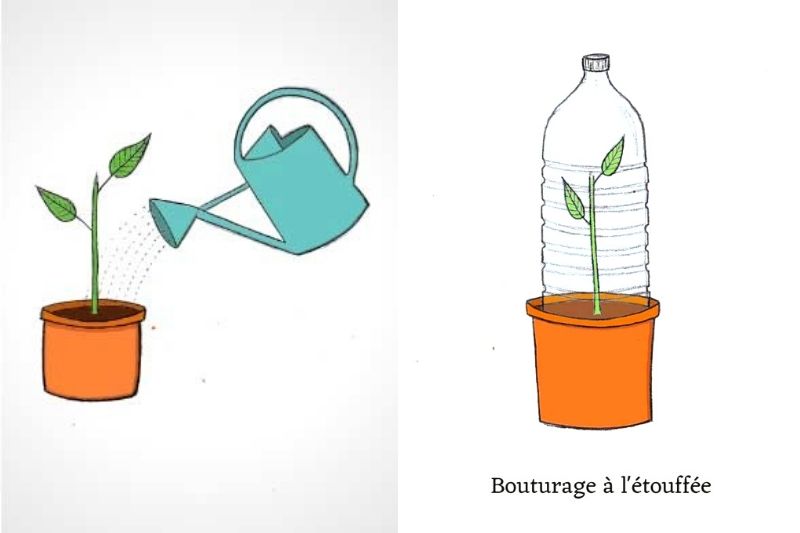
11- Keep the compost fresh, slightly moist, but not excessive. Remove the cloche for half an hour every 3-4 days to allow air renewal.
12- Place your pot in a bright spot, but not in direct sunlight.
13- After 2 to 3 months, your cutting's roots will have developed sufficiently. You can remove the cloche and repot your young plants into a larger pot.
14- Protect your young shoots during winter by storing them in a bright, unheated room or cold greenhouse. Reduce watering significantly, especially during frosts.
The following spring, you can plant your small bush directly in the ground. It will thrive in light, well-drained, not too chalky soil, in partial shade or full sun. Being undemanding, you can simply add a handful of well-rotted compost at the base when planting.
Water during heatwaves and severe drought for the first two years after planting. Once established, your Ceanothus will tolerate temporary drought.
To go further:
- Discover all our Ceanothus varieties.
- To learn all about Ceanothus, see our advice on California Lilac: planting, care and pruning.
- Discover our advice sheet: "Propagation by cuttings, everything about different techniques and our advice for successful cuttings".


Comments