


The hibiscus bush is a magnificent deciduous bush with beautifully coloured single or double flowers. The flowering period renews from July to October. Its stunning, exotic-looking flowers last only a day but are renewed daily. Hardy, the hibiscus can withstand temperatures as low as -15°C, making it suitable for planting in all regions, provided the soil remains moist. These bushes are perfect for flowering hedges, beds, or even as standalone plants. So, why not propagate them?
Note that the marsh hibiscus is a perennial plant that can be propagated by herbaceous cuttings or division.
Discover when and how to propagate hibiscus easily with our illustrated tutorial!
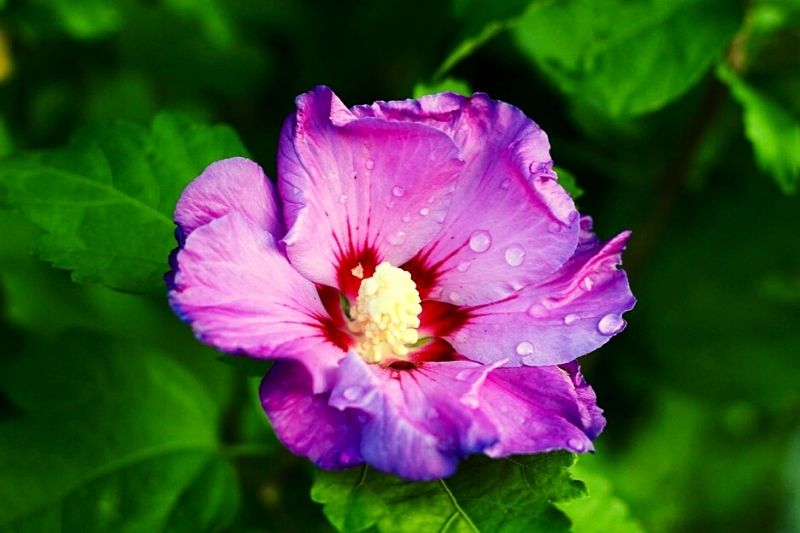
Stunning flower of Hibiscus syriacus
When to propagate hibiscus?
The best time to take hibiscus cuttings is in August and September. This period is ideal for "closed" cuttings, as the warmth of the season stimulates rooting.
Note: It is also possible to take hardwood cuttings in winter, but this method yields poorer results.
What do I need?
- One or more pots or a bucket, a tray, or a mini greenhouse.
- A pencil
- Seed and potting compost
- Garden sand
- Turf
- A pruning shear. Remember to clean and disinfect it before use to avoid disease transmission.
- A cloche, a plastic bottle, or a plastic bag
- A spray bottle
- Plant hormone for cuttings (optional)
How to propagate hibiscus?
We recommend taking 4 to 6 cuttings to ensure a viable result.
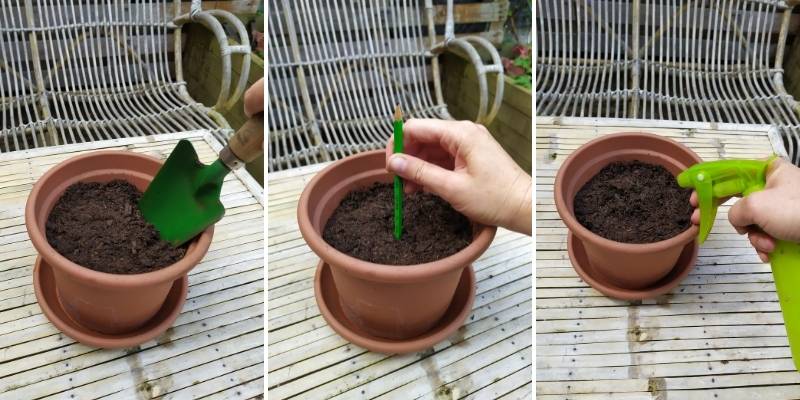
1- Mix equal parts seed compost, turf, and sand to create a well-draining substrate. Fill your pot and firm it down, leaving 2 cm from the top.
2- Moisten the compost. We recommend using a spray bottle to avoid compacting the soil.
3- Make a 2 to 3 cm deep hole using the pencil.
4- Choose vigorous, healthy, straight shoots without buds. If the stem has flower buds, remove them.
5- Using pruning shears, cut a stem about 10 to 15 cm long.
6- Cut just below a node on the stem. Remove the leaf from this node. Keep the leaf from the upper node, then cut the stem 1 cm above this leaf (this is called a heel cutting).
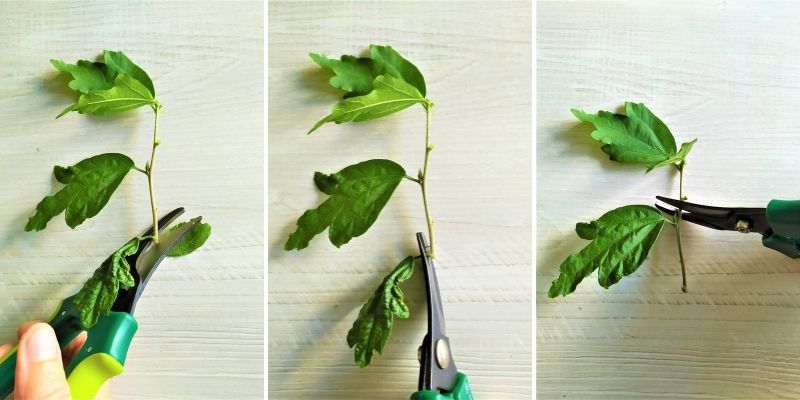
7- Trim the remaining leaf in half to reduce transpiration. Prepare 4 to 6 cuttings this way.

8- You can use plant hormone for cuttings. Dip the base of the stems in the hormone before planting.
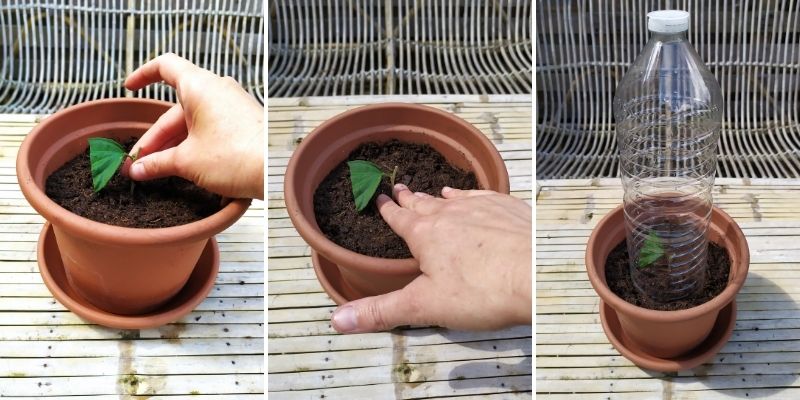
9- Plant each stem in a hole.
10- Firm the compost around the stem.
11- Place a growth cloche over the top to saturate the cutting's atmosphere with water. This is the principle of "closed" cuttings. Alternatively, you can use a bottomless plastic bottle, clear plastic, or a mini greenhouse.
Note: The stem and leaf must not touch the cloche to prevent mould!
12- Place your cutting in a bright, partially shaded spot. Avoid harsh afternoon sun.
13- Water regularly to keep the substrate moist. It should never dry out or become waterlogged. We recommend airing for a few minutes every 3 or 4 days to refresh the air.
14- Roots will begin to appear after 4 to 6 weeks. If desired, you can repot your young hibiscus shoots after 3 months.
15- Keep your young plants sheltered during winter, either in a greenhouse or a bright, unheated room. This protects them from frost. Reduce watering during this period.
16- Plant your young hibiscus in spring in a sheltered part of the garden with well-draining soil. Grow them like this for two years to allow new shoots and strength. Then transplant them to their final location in full sun for abundant flowering.
Further reading:
- Explore all our hibiscus varieties.
- Learn everything about hibiscus, Altheas: planting, growing, and care.
- Check out our guide: "Propagation by cuttings: everything you need to know about different techniques and tips for success."


Comments