The Pittosporum is an evergreen bush prized for its dense foliage and fragrant flowers reminiscent of orange blossoms, such as those of the Pittosporum tobira. Native to temperate and subtropical regions, it thrives in mild climates where it is often used for hedges or as a standalone specimen. The Pittosporum propagates easily by propagation by cuttings. This method ensures the young plants retain the characteristics of the parent plant. Discover the step-by-step guide to successfully propagate your Pittosporum and enrich your garden with new plantings!

When to propagate Pittosporum?
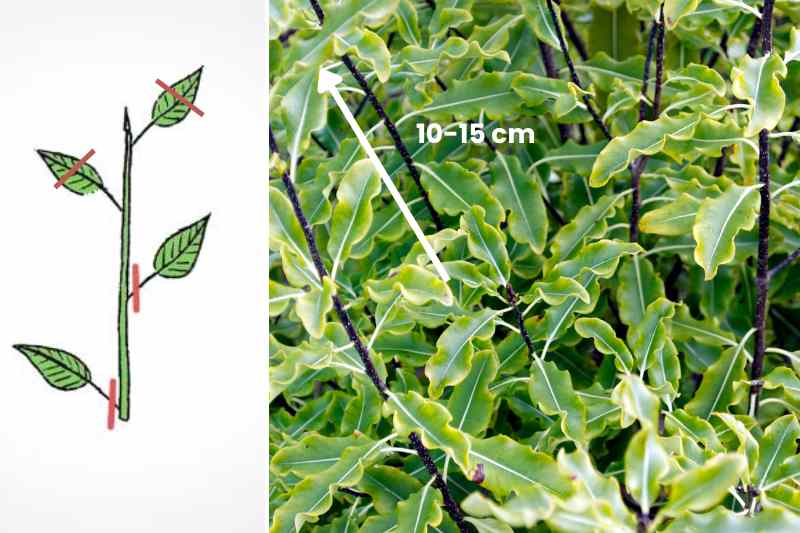
The ideal time to propagate Pittosporum is late summer, typically between late July and early September. At this time of year, the bush produces what are known as semi-hardened shoots: these are shoots that have begun to harden but are not yet fully lignified. In other words, they are transitioning between the tender green wood of spring and the hard wood of autumn. This intermediate stage is perfect for propagation by cuttings, as the shoots offer both enough flexibility for handling and sufficient resilience to encourage rooting.
What type of cutting for Pittosporum?
Pittosporum cuttings are best done under cover (placing the cuttings in a confined environment, usually under plastic or a cloche). This method maintains consistent humidity and warmth around the cutting, promoting rooting while preventing it from drying out.
How to propagate Pittosporum?
Required materials
- a sharp knife or pruning shear, previously disinfected with 70°C alcohol to avoid any risk of disease transmission
- pots or biodegradable buckets
- special sowing or propagation compost
- a pencil
- a spray bottle
- a mini greenhouse, plastic bottles cut in half, or a plastic bag
Step-by-step guide to propagating under cover
- In late summer, select semi-lignified shoot tips, about 15 cm long, just below a node.
- Remove the leaves from the lower half of the cutting to reduce transpiration and encourage rooting.

- Fill pots with the sowing compost. Lightly moisten the substrate before planting.
- Using the pencil, insert the stems 3 to 4 cm deep. Gently firm the substrate around the cuttings to ensure good contact.
- Cover the pots with a transparent device (half a plastic bottle, a plastic bag secured with an elastic band, or a small greenhouse) to create a warm, humid environment. Ensure the plastic does not touch the cuttings directly.
- Place the pots in a bright spot without direct sunlight.
- Keep the substrate moist but not waterlogged by spraying regularly.
- Ventilate occasionally to prevent mould.
- After 6 to 8 weeks, check for root formation by gently tugging the cutting. If you feel resistance, roots have developed.
What to do after propagation?
Once the Pittosporum cuttings have taken root, transplant them into individual pots to give them more space to grow. Keep them in a cool place over winter, ideally between 5 and 10°C, to respect their dormancy. In spring, gradually resume watering and monitor their growth.
The following autumn, plant your young Pittosporums in the ground or in larger pots, depending on your garden project.


Comments