


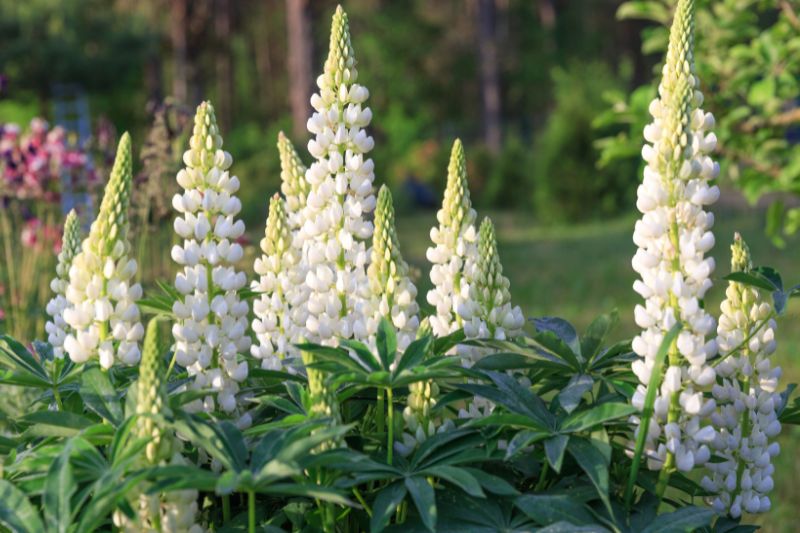
The lupin (Lupinus) is a perennial plant highly valued in the garden for its large, colourful flower spikes. Easy to grow, it adds a rustic and elegant touch to flower beds. While sowing seeds is a common method for propagation, it doesn’t always guarantee plants identical to the parent. This is why propagation by cuttings is an excellent alternative for faithfully reproducing a favourite variety.
Taking cuttings from a lupin also allows you to obtain new plants more quickly and easily. Discover how to propagate lupins, step by step, from selecting the stem to transplanting into the ground.
Why take cuttings from lupins?
- Obtain identical plants: Although lupins can be propagated by seed, sowing doesn’t always produce plants identical to the parent, especially with hybrid varieties. Propagation by cuttings ensures an exact copy of the parent plant.
- Preserve heritage varieties: Some older cultivars have become unavailable commercially over time. The only way to preserve the plant’s characteristics is through propagation by cuttings.
- Ensure better establishment: Easy to perform, this technique allows you to obtain a larger plant more quickly and promotes its growth.
- An economical method: You can quickly obtain new plants, whether to fill a flower bed, create a colourful border, or simply share plants with other gardening enthusiasts.
When to take cuttings from lupins?
The best time to take cuttings from a lupin is in spring, around May-June. You can also take cuttings as early as April in mild climates or in a greenhouse. At this time, the stems are young and in full growth, which encourages rooting.
Avoid frost or heatwave periods: The ideal temperature is between 15 and 20°C. Also, avoid flowering periods.
How to take cuttings from lupins?
Required materials
To succeed with propagation by cuttings, you will need:
- A spade or a fork to dig up the parent plant’s stump.
- A clean knife or pruning shear to cut the stem without damaging it.
- One or more pots or buckets.
- Light, well-draining compost (such as seed compost) or a mix of 1/3 compost, 1/3 turf, and 1/3 sand.
- Rooting hormone for cuttings (optional) to stimulate root growth.
- A water sprayer to keep the substrate moist.
- A mini greenhouse, a cloche, or a plastic bag to create a humid climate.
Tip: Remember to disinfect your cutting tools to avoid transmitting diseases from one plant to another.
Steps for taking cuttings from lupins
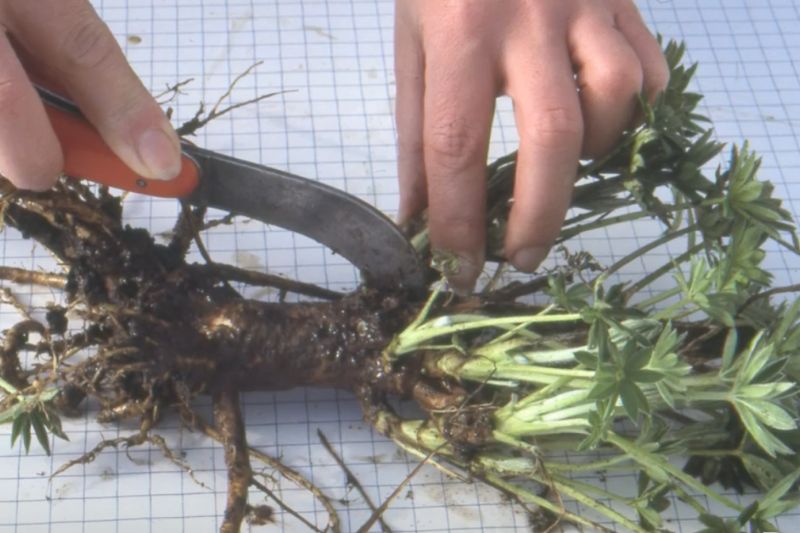
1- Propagation by cuttings is done using a parent plant at least 3 to 4 years old. Dig it up carefully with a fork or spade, or remove it from its pot if it’s container-grown. If necessary, remove some soil around the roots to better see the base of the young stems.
2- Selecting the stem for cutting: Choose a healthy, vigorous, non-flowering stem. Opt for this year’s shoots, which are still green and flexible.
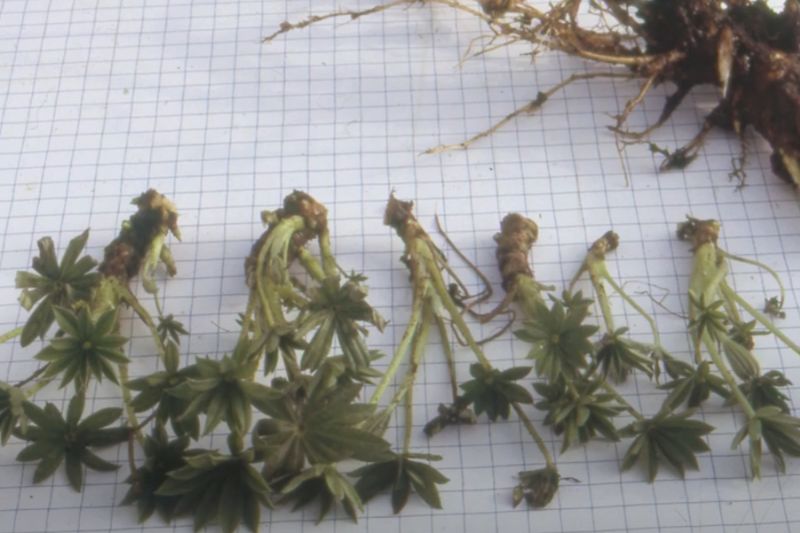
3- Preparing the cutting: Cut the stem cleanly at the junction between the young shoot and the parent plant’s main stem. You should take green stems with their brown base: this is where the roots will develop.
Tip: Ensure you leave at least a third of the buds on the parent plant so it can continue to grow.
4- Optional: Dip the base of the cuttings in rooting hormone.
5- Potting: Fill the pots with seed compost or a mix of 1/3 compost, 1/3 turf, and 1/3 sand to encourage drainage.
6- Use a pencil to make a hole in the pot and plant your cutting about 1 to 2 cm deep.
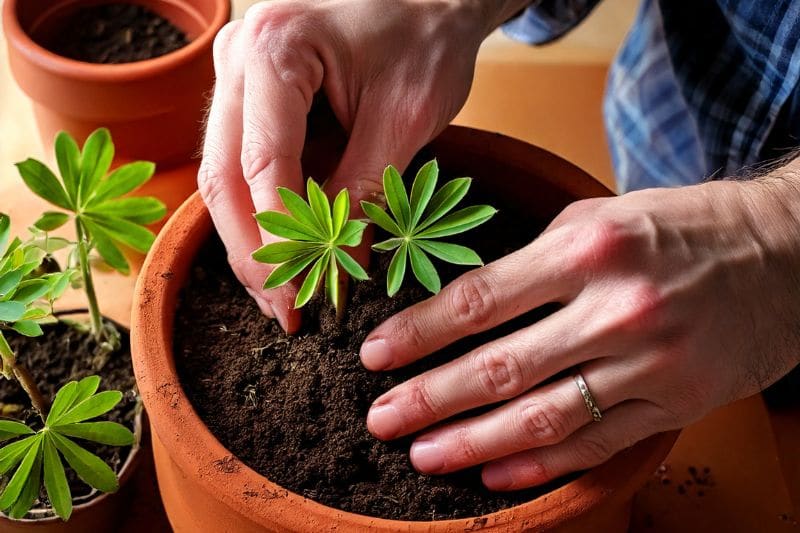
7- Gently firm the substrate around the stem to ensure good contact and water lightly to moisten without soaking.
Note: Don’t forget to replant the parent plant promptly in the ground or in a pot.
8- Creating a humid environment: Cover the pot with a cloche or transparent plastic bag to maintain constant humidity. This technique, called "cutting under cover," encourages rooting by limiting dehydration. Refresh the air every 3-4 days by lifting the cloche for half an hour.

9- Placement and care: Place the pot in a bright spot without direct sunlight. Keep the substrate slightly moist by watering moderately to avoid rot.
10- Rooting usually takes 6 to 8 weeks. You’ll then see young leaves appearing, a sign that roots have formed. You can check by gently tugging on the cutting; resistance means roots have developed. You can then remove the cloche.
After propagation: care and maintenance of lupins
- Hardening: If the plant is in a greenhouse or sheltered location, gradually expose your young lupins to outdoor conditions before planting them in the garden: start with an hour, then increase the duration day by day.
- Gradual exposure: Once rooting has begun, gradually expose the plant to more light.
- Moderate watering: Keep the substrate slightly moist, without overwatering to avoid root rot.
- Transplanting: You can transplant the lupin into the ground at the end of summer or into a larger pot. In the garden, choose a sunny spot with well-draining soil.
- Disease protection: Watch for signs of fungi or aphids, and beware of slugs, which love the tender young shoots of lupins.


Comments