


Whether it's a living willow hut to shelter children's play, a vegetal footbridge – more or less stylised – to provide some shade in your pathways or simply a decorative feature to accommodate garden lighting, willow can accompany all your creations, even the wildest ones!
The next step is to determine the most suitable willows for your project and the right time to start your living willow hut, before mastering the art of weaving and proper maintenance. Don’t worry, this tutorial is here to guide you through all the essential points!
When and with what to make a living willow hut?
Willow is prized by basket makers for its flexibility and the strength of its long strands: even when cut, transported and twisted, it can take root to become a living hedge or a vegetal hut.
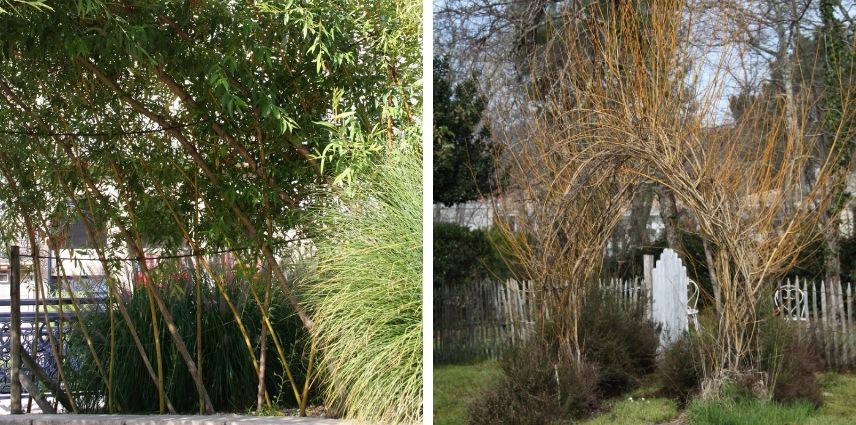
There are several varieties, differing mainly in colour and foliage. For an artistic creation project, it’s best to rely on:
- The Salix purpurea, also known as "purple willow" for its beautiful shoots, particularly highlighted in winter.
- The Salix alba Vitellina or "golden willow", with flexible shoots in a golden/coppery colour.
- The Salix viminalis, with very long shoots, also flexible and downy, grey-green in colour turning to yellowish-green or orange-yellow when mature.
- The Salix triandra or "brown willow", with its slender and very straight young branches.
- The Salix americana, with flexible mahogany-red shoots, turning brown with age.
The variety of willow chosen for your next living willow hut influences the weaving period: for example, while the first three varieties mentioned above are early, with growth in March, the penultimate one won’t start until mid-April. You also need to consider the exposure: while the americana thrives only in full sun, the others can tolerate partial shade.
Gardener’s tip: it’s entirely possible to mix willows (taking into account their growth requirements) to vary the colours, but it’s recommended to alternate them in distinct sections, so one doesn’t smother the other.
How to weave the living willow hut?
Materials needed
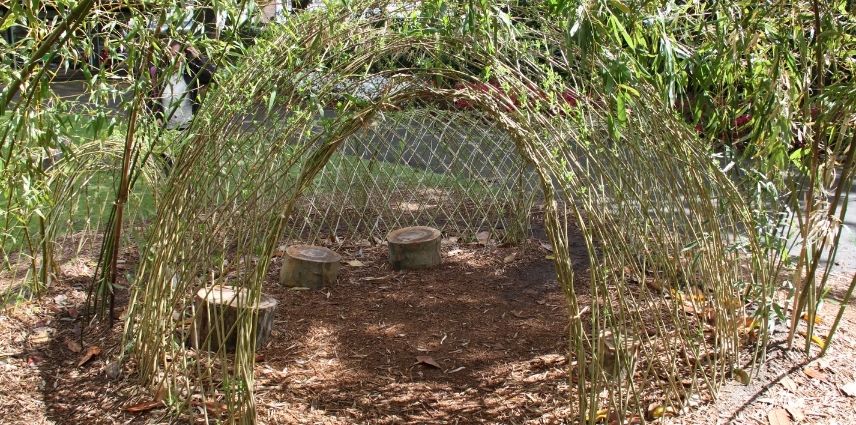
Round, square, crossed, woven, interlaced – your living willow hut can follow your every whim. For a structure 1.5 metres in diameter and 1.7 metres high, you’ll need about 130 willow stems, each 2.4 metres long. For a tipi hut 2 metres in diameter and 1.8 metres high, you’ll need 150 strands of 240 cm and 20 of 220 cm.
In terms of equipment, you’ll need:
- some string,
- ties for binding
- 1 metre of wire,
- a pair of wire cutters,
- a good shears,
- a 1-metre stick,
- a small rectangle of wood 5 cm wide and another 20 cm high.
Planting
After trimming the willow stems, plant them in groups of 4, spaced 5 cm apart (the small piece of wood serves as a gauge), ensuring they’re inserted 20 cm deep (the other piece of wood measures the correct depth). Finally, water the plantings.
Vegetal architect’s tip: don’t forget to leave space for the door!
Weaving
Before starting the weaving of the living willow, cut 100 binding ties, each 10 cm long, to secure the crossings. Then, begin to the left of the door: after leaving the first 2 willow stems, cross the next 2 with the following 2 and tie them with a binding tie.
After the first round, all right strands are crossed over the left ones. For the 2nd level, do the opposite: cross the left strands over the right ones, also including the 2 strands left on either side of the door. At the 3rd level, wrap a string around the living willow hut to round it and start closing it. Continue weaving on the same principles, adding a string every 2 rows until reaching the roof.
Finally, the string gathers the willow tops, which just need to be secured with wire without tightening too much.
Vegetal architect’s tip: don’t forget to close the top of the door once the opening height is satisfactory. Also, you can remove the lower ties to reuse them higher up. Lastly, you can wrap the willow at the top to hide the wire.
How to maintain this tipi hut?
Once the tipi hut is built, it’s essential to maintain soil moisture, crucial in the first few years. For this, daily (or nearly daily) watering from spring until late summer is required. Some also recommend using a hose or perforated pipe for continuous drip irrigation.
Ideally, install a mulch of willow bark to retain moisture, reduce water consumption and limit weed growth.
Pruning the vegetal hut should be done at least once in winter and once or twice in summer, to balance young shoots and encourage branching. Note that Salix Viminalis needs more frequent pruning. Specifically, lightly pinch the tips of young shoots during the growing season and cut back all summer twigs short in winter.


Comments