


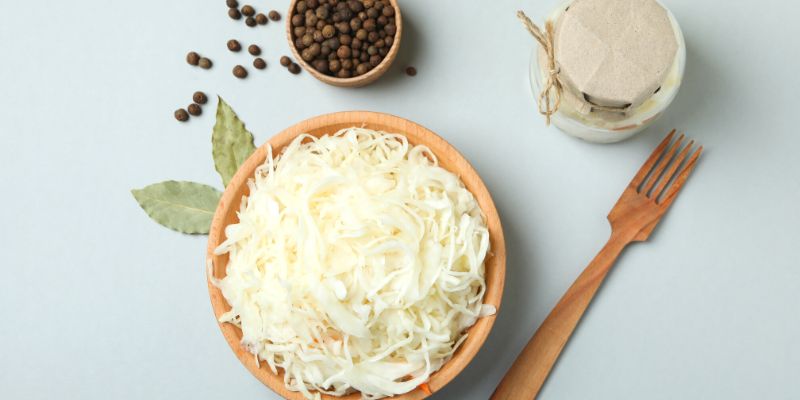
Sauerkraut is a culinary preparation made from raw cabbage that has been fermented, originating from Alsace. It is often served with fish, meat or sausages. This speciality is prized for its tangy flavour and crunchy texture. If you grow cabbages in your garden or on your balcony, you can use them to make your own homemade sauerkraut by following a few simple steps. In this tutorial we will explain, step by step, how to make homemade sauerkraut from cabbages you have grown yourself, using natural ingredients. So, if you are ready to try making sauerkraut at home, let’s get started!
Which cabbage to grow for sauerkraut?
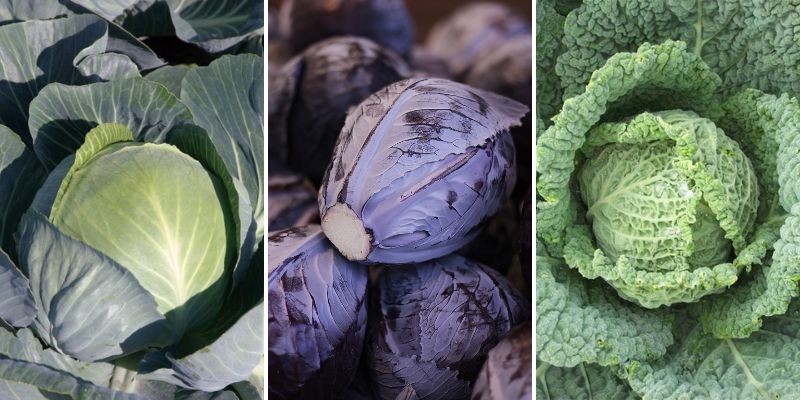
There are several varieties of cabbage that can be used to prepare sauerkraut. The most commonly used are head cabbages, which have a firm texture and a slightly sharp flavour. Head cabbage is also called white cabbage, green cabbage or drumhead cabbage.
Red cabbage is also part of the head cabbage group. It is also used to make sauerkraut, bringing a sweeter flavour than white or green head cabbage. During fermentation red cabbage turns a deep pink and becomes slightly translucent, which adds a colourful note to dishes.
Savoy cabbage or kale can also be used for sauerkraut, but they tend to be much stronger in flavour and produce a pronounced smell during fermentation, not always pleasant. Their crisper texture performs better in gratins, stuffed cabbage, soups or creamy smoothies.
Our favourite cabbages for sauerkraut
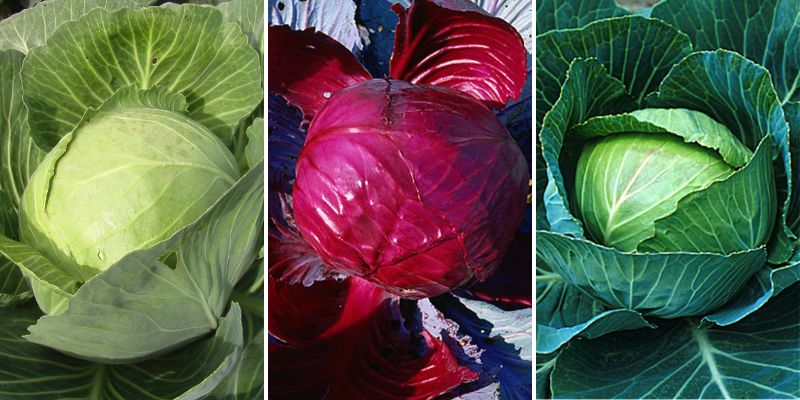
Quintal d'Alsace drumhead cabbage
Originating from Alsace, the Quintal d’Alsace cabbage is the variety used to make the traditional sauerkraut of that region. It is a firm, broad and large cabbage with a flattened shape and smooth, pale to grey-green leaves.
Filderkraut drumhead cabbage
The Filderkraut cabbage is an old German variety of head cabbage, widely appreciated for its conical, pointed and very compact heads. Its leaves are light green, smooth and tender. It is an excellent autumn cabbage for making sauerkraut or a hearty stew.
Large Red Drumhead Cabbage
With its deep purple leaves, the Large Red Drumhead Cabbage is a red cabbage variety with dense, round, compact heads and good productivity. Its vivid colour will brighten dishes and is ideal for preparing sauerkraut.
Brunswick drumhead cabbage
The Brunswick Drumhead Cabbage is a productive variety producing large, slightly flattened heads from autumn onwards. It is a head cabbage that is well suited to making sauerkraut.
→ Discover more head cabbages in Pascale’s advice sheet: 8 head cabbages to grow.
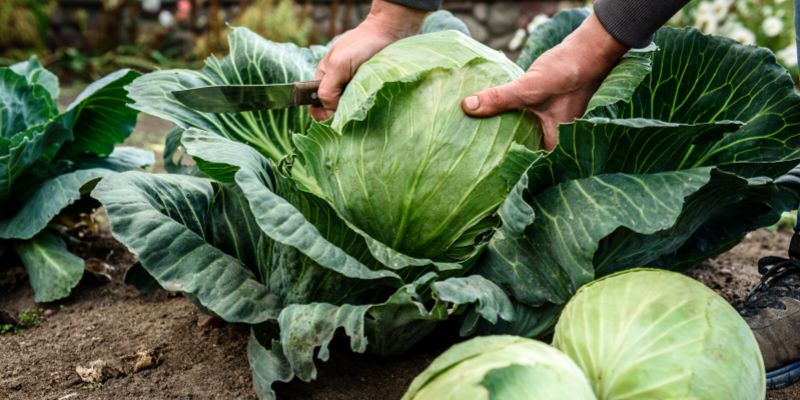
How to harvest your cabbages
To choose the cabbages best suited for sauerkraut, consider the following:
- Maturity of the cabbages: choose cabbages that are still young and firm, as they are easier to cut and are richer in water, which helps fermentation. Avoid cabbages that are soft or have wilted leaves. Overripe cabbages will also be less tender.
- Quality of the cabbage head: opt for heads that are compact and free of blemishes, with healthy, green leaves.
- As a rule, it is advisable to choose cabbages of the same size and variety to ensure even fermentation and a consistent sauerkraut.
Homemade sauerkraut recipe
What is sauerkraut fermentation?
Sauerkraut is essentially cabbage fermented with salt in a jar. In the presence of salt, lactic acid bacteria develop and consume the vegetable’s carbohydrates. These carbohydrates are converted into lactic acid, which prevents growth of harmful bacteria, fungi and moulds. This process is called lacto-fermentation (nothing to do with lactose). The cabbage ferments over time, gradually softening into sauerkraut and can be preserved naturally for several years.
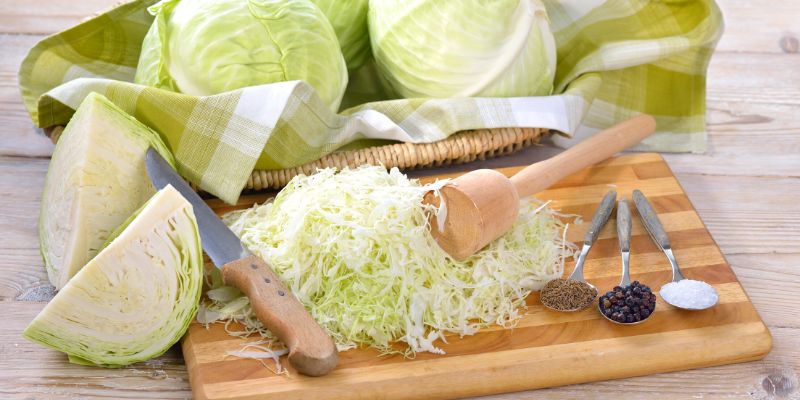
What you will need
Steps to make sauerkraut
1- After harvesting, remove any damaged or soiled outer leaves from the cabbage.
2- Rinse the cabbage briefly under cold running water to remove remaining dirt, without detaching the leaves.
3- Cut the cabbage and slice it thinly with a knife or mandoline.

4- Put the sliced cabbage in a bowl, add the salt and mix.
5- Knead the cabbage for 3 to 5 minutes to make it sweat (i.e. release some juice) in contact with the salt.
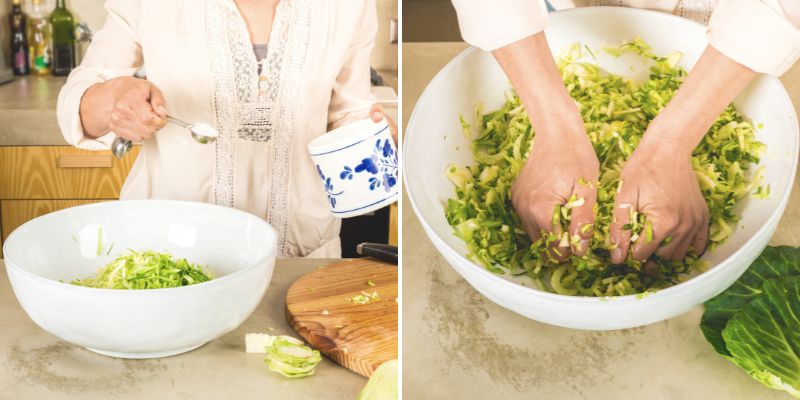
6- Cover the bowl with a cloth and let the cabbage release its juice for one hour.
7- Optional: add spices (caraway, juniper berries, etc.) and mix again.
8- Take your previously sterilised jar and add the cabbage with its juice in successive layers of 2 to 3 cm. It is important to press the cabbage firmly between each layer with a pestle to expel air and draw out the vegetable juice.
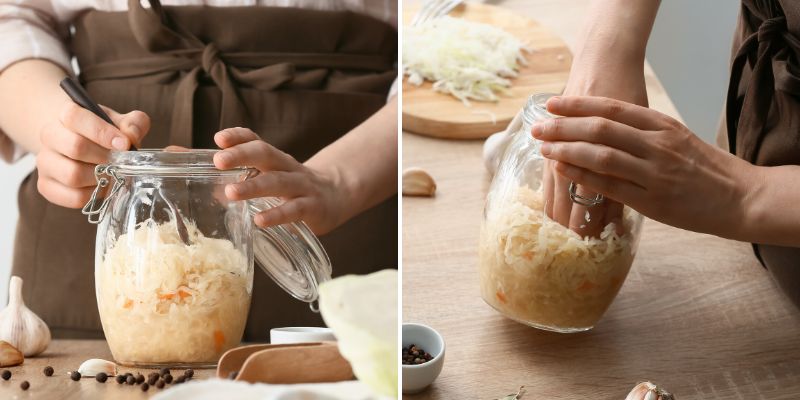
9- Continue filling the jar until it is 3 cm from the rim, then press down again.
10- Place the glass weight to fully submerge the cabbage. Note: you can place a whole cabbage leaf under the weight to stop shredded leaves from floating to the surface. If there is not enough juice to cover the cabbage, add a little water.
11- Close the jar and leave it to ferment at room temperature for 3 weeks.
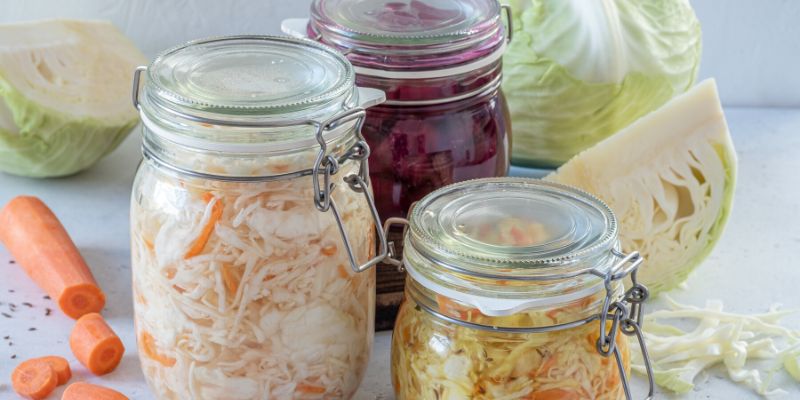
12- After these 3 weeks, your sauerkraut is ready to eat or to store in a cool, dry place (a cellar, for example) for several years.
Note:
- During the 3 weeks of fermentation, the contents of your jar will expand, which is perfectly normal. It may even overflow! Place a shallow dish under the jar to catch any spillover.
- Sauerkraut can be enjoyed straight from the jar, for example in a salad to preserve its crunch. You can also cook it after fermentation to serve with fish, cold cuts or sausages.
- Sometimes a light white film appears on top of the sauerkraut. This is not dangerous.
- By contrast, a strong, clearly foul smell that makes you feel sick, or a deposit of greenish (even bluish) colour is a sign that lacto-fermentation has failed. In that case, dispose of the jar contents in compost or rubbish.
Ingrid’s tips:
- Fermentation weights often come as glass food-safe rings. They keep vegetables underwater to prevent mould. I usually replace them with inverted glass lids from smaller jars to avoid air pockets.
- You can use a traditional sauerkraut crock made of ceramic or stoneware instead of a jar; it allows fermentation gases to escape.
- If you do not have a pestle, use a suitable utensil (a kitchen hammer, a glass bottle, etc.) or press down with your fist.
Further reading
- Find all our cabbage varieties.
- For everything you need to know, see our complete guide on cabbage: planting, sowing, harvesting.
Steps to make sauerkraut
1- After harvesting, remove any damaged or soiled outer leaves from the cabbage.
2- Rinse the cabbage briefly under cold running water to remove remaining dirt, without detaching the leaves.
3- Cut the cabbage and slice it thinly with a knife or mandoline.
4- Put the sliced cabbage in a bowl, add the salt and mix.
5- Knead the cabbage for 3 to 5 minutes to make it sweat (i.e. release some juice) in contact with the salt.
6- Cover the bowl with a cloth and let the cabbage release its juice for one hour.
7- Optional: add spices (caraway, juniper berries, etc.) and mix again.
8- Take your previously sterilised jar and add the cabbage with its juice in successive layers of 2 to 3 cm. It is important to press the cabbage firmly between each layer with a pestle to expel air and draw out the vegetable juice.
9- Continue filling the jar until it is 3 cm from the rim, then press down again.
10- Place the glass weight to fully submerge the cabbage. Note: you can place a whole cabbage leaf under the weight to stop shredded leaves from floating to the surface. If there is not enough juice to cover the cabbage, add a little water.
11- Close the jar and leave it to ferment at room temperature for 3 weeks.
12- After these 3 weeks, your sauerkraut is ready to eat or to store in a cool, dry place (a cellar, for example) for several years.
Note:
- During the 3 weeks of fermentation, the contents of your jar will expand, which is perfectly normal. It may even overflow! Place a shallow dish under the jar to catch any spillover.
- Sauerkraut can be enjoyed straight from the jar, for example in a salad to preserve its crunch. You can also cook it after fermentation to serve with fish, cold cuts or sausages.
- Sometimes a light white film appears on top of the sauerkraut. This is not dangerous.
- By contrast, a strong, clearly foul smell that makes you feel sick, or a deposit of greenish (even bluish) colour is a sign that lacto-fermentation has failed. In that case, dispose of the jar contents in compost or rubbish.
Ingrid’s tips:
- Fermentation weights often come as glass food-safe rings. They keep vegetables underwater to prevent mould. I usually replace them with inverted glass lids from smaller jars to avoid air pockets.
- You can use a traditional sauerkraut crock made of ceramic or stoneware instead of a jar; it allows fermentation gases to escape.
- If you do not have a pestle, use a suitable utensil (a kitchen hammer, a glass bottle, etc.) or press down with your fist.
Further reading
- Find all our cabbage varieties.
- For everything you need to know, see our complete guide on cabbage: planting, sowing, harvesting.
- Some juniper berries
- 1 tsp caraway seeds
- 1 tsp peppercorns
- A bay leaf
- A sprig of thyme
- Several cloves
Steps to make sauerkraut
1- After harvesting, remove any damaged or soiled outer leaves from the cabbage.
2- Rinse the cabbage briefly under cold running water to remove remaining dirt, without detaching the leaves.
3- Cut the cabbage and slice it thinly with a knife or mandoline.
4- Put the sliced cabbage in a bowl, add the salt and mix.
5- Knead the cabbage for 3 to 5 minutes to make it sweat (i.e. release some juice) in contact with the salt.
6- Cover the bowl with a cloth and let the cabbage release its juice for one hour.
7- Optional: add spices (caraway, juniper berries, etc.) and mix again.
8- Take your previously sterilised jar and add the cabbage with its juice in successive layers of 2 to 3 cm. It is important to press the cabbage firmly between each layer with a pestle to expel air and draw out the vegetable juice.
9- Continue filling the jar until it is 3 cm from the rim, then press down again.
10- Place the glass weight to fully submerge the cabbage. Note: you can place a whole cabbage leaf under the weight to stop shredded leaves from floating to the surface. If there is not enough juice to cover the cabbage, add a little water.
11- Close the jar and leave it to ferment at room temperature for 3 weeks.
12- After these 3 weeks, your sauerkraut is ready to eat or to store in a cool, dry place (a cellar, for example) for several years.
Note:
- During the 3 weeks of fermentation, the contents of your jar will expand, which is perfectly normal. It may even overflow! Place a shallow dish under the jar to catch any spillover.
- Sauerkraut can be enjoyed straight from the jar, for example in a salad to preserve its crunch. You can also cook it after fermentation to serve with fish, cold cuts or sausages.
- Sometimes a light white film appears on top of the sauerkraut. This is not dangerous.
- By contrast, a strong, clearly foul smell that makes you feel sick, or a deposit of greenish (even bluish) colour is a sign that lacto-fermentation has failed. In that case, dispose of the jar contents in compost or rubbish.
Ingrid’s tips:
- Fermentation weights often come as glass food-safe rings. They keep vegetables underwater to prevent mould. I usually replace them with inverted glass lids from smaller jars to avoid air pockets.
- You can use a traditional sauerkraut crock made of ceramic or stoneware instead of a jar; it allows fermentation gases to escape.
- If you do not have a pestle, use a suitable utensil (a kitchen hammer, a glass bottle, etc.) or press down with your fist.
Further reading
- Find all our cabbage varieties.
- For everything you need to know, see our complete guide on cabbage: planting, sowing, harvesting.
- 1 kg cabbage (head cabbage or red cabbage)
- A sealable, airtight glass jar with rubber seal and metal clips
- 10 g salt, unrefined and non-iodised (preferably coarse grey Guérande salt or Camargue pink salt)
- A glass weight to keep cabbage submerged
- A knife and chopping board or a mandoline
- A mixing bowl or large container
- A pestle
- Optional and to taste (non-exhaustive list):
- Some juniper berries
- 1 tsp caraway seeds
- 1 tsp peppercorns
- A bay leaf
- A sprig of thyme
- Several cloves
Steps to make sauerkraut
1- After harvesting, remove any damaged or soiled outer leaves from the cabbage.
2- Rinse the cabbage briefly under cold running water to remove remaining dirt, without detaching the leaves.
3- Cut the cabbage and slice it thinly with a knife or mandoline.
4- Put the sliced cabbage in a bowl, add the salt and mix.
5- Knead the cabbage for 3 to 5 minutes to make it sweat (i.e. release some juice) in contact with the salt.
6- Cover the bowl with a cloth and let the cabbage release its juice for one hour.
7- Optional: add spices (caraway, juniper berries, etc.) and mix again.
8- Take your previously sterilised jar and add the cabbage with its juice in successive layers of 2 to 3 cm. It is important to press the cabbage firmly between each layer with a pestle to expel air and draw out the vegetable juice.
9- Continue filling the jar until it is 3 cm from the rim, then press down again.
10- Place the glass weight to fully submerge the cabbage. Note: you can place a whole cabbage leaf under the weight to stop shredded leaves from floating to the surface. If there is not enough juice to cover the cabbage, add a little water.
11- Close the jar and leave it to ferment at room temperature for 3 weeks.
12- After these 3 weeks, your sauerkraut is ready to eat or to store in a cool, dry place (a cellar, for example) for several years.
Note:
- During the 3 weeks of fermentation, the contents of your jar will expand, which is perfectly normal. It may even overflow! Place a shallow dish under the jar to catch any spillover.
- Sauerkraut can be enjoyed straight from the jar, for example in a salad to preserve its crunch. You can also cook it after fermentation to serve with fish, cold cuts or sausages.
- Sometimes a light white film appears on top of the sauerkraut. This is not dangerous.
- By contrast, a strong, clearly foul smell that makes you feel sick, or a deposit of greenish (even bluish) colour is a sign that lacto-fermentation has failed. In that case, dispose of the jar contents in compost or rubbish.
Ingrid’s tips:
- Fermentation weights often come as glass food-safe rings. They keep vegetables underwater to prevent mould. I usually replace them with inverted glass lids from smaller jars to avoid air pockets.
- You can use a traditional sauerkraut crock made of ceramic or stoneware instead of a jar; it allows fermentation gases to escape.
- If you do not have a pestle, use a suitable utensil (a kitchen hammer, a glass bottle, etc.) or press down with your fist.
Further reading
- Find all our cabbage varieties.
- For everything you need to know, see our complete guide on cabbage: planting, sowing, harvesting.

![[recipe title="Homemade Sauerkraut"]
[ingredients]
- 1 white cabbage
- 2 tbsp {salt}
- Juniper berries
- Caraway seeds
- Bay leaves
[/ingredients]
[instructions]
1. Remove the outer leaves of the cabbage and set them aside.
2. Shred the cabbage finely.
3. In a large bowl, mix the shredded cabbage with salt, juniper berries, caraway seeds, and bay leaves.
4. Massage the mixture for about 10 minutes until the cabbage releases its juices.
5. Pack the cabbage tightly into a clean jar, pressing it down to submerge it in its own liquid.
6. Cover the cabbage with the reserved outer leaves.
7. Place a weight on top to keep the cabbage submerged.
8. Cover the jar with a clean cloth and secure it with a rubber band.
9. Let it ferment at room temperature for about 3-4 weeks, checking regularly.
10. Once fermented to your liking, store in the fridge.
Enjoy your homemade sauerkraut!
[/instructions]
[/recipe]](https://en.promessedefleurs.eu/blogwp/wp-content/uploads/2023/01/Comment-faire-de-la-choucroute-maison-.png "[plant_guide id=\"1234\" title=\"Cabbage\"]
To make homemade {glossary} sauerkraut, start by finely shredding a {glossary} cabbage. Then, mix the shredded cabbage with salt and massage it to release the juices. Pack the cabbage tightly into a clean glass jar, making sure the cabbage is submerged in its own liquid. Place a weight on top to keep the cabbage submerged, then cover the jar with a clean cloth and secure it with a rubber band. Let it ferment at room temperature for about 3-4 weeks, checking on it periodically. Once it reaches your desired level of tanginess, transfer it to the fridge to slow down the fermentation process. Enjoy your homemade sauerkraut as a delicious and probiotic-rich addition to your meals!")
Comments