


Gaura lindheimeri is an easy-to-grow perennial that gardeners particularly love. How can you not succumb to its delicate little flowers, in white and pink, that colour gardens from March to October? Gaura also has the advantage of thriving equally well in a border or in a pot. It brings lightness and volume to floral compositions. Try propagating it to increase flowering in your green space. How to propagate Gaura?

Gaura pairs perfectly with summer borders. © S.Chaillot
With this tutorial, discover the different methods of propagating Gauras, and when and how to carry them out.
How to propagate Gaura by sowing?
When to sow Gaura?
Gaura seeds are generally sown in spring, in March or April through to June, either directly in their final position or in buckets to be pricked out later. For gardeners in a hurry who are eager to see Gauras flowering, it is possible to sow them under cover from February to April and then harden them off once the last frosts have passed.
Equipment needed
- a packet of Gaura seeds
- one or more buckets
- potting compost
- a watering can
- a rake
- a spade
Steps for sowing Gaura
- Work the soil with a spade so it is well broken up, breaking up clods and removing any stones;
- Level the soil surface with a rake;
- For sowing in a pot, choose a fine seed compost;
- Place a few seeds on the surface;
- Cover them with 1 cm of soil or compost;
- Firm down the soil surface with your hand or a board;
- Water the young sowing with a watering can fitted with a rose for a fine spray;
- Whether in open ground or in buckets, keep the soil moist;
- Keep buckets in a room at 20–24°C.
Once young plants in buckets reach 10–15 cm in height, prick them out.
You will enjoy a first modest flowering in the year of sowing, then abundant flowering in subsequent years.
Stéphanie’s tip: If you leave a few faded flowers in place at the end of the season, you may get self-sown seedlings and be lucky enough to see little white Gaura seedlings appear. This does not work with pink Gauras because they are sterile. Finally, harvest seeds in October–November and dry them before storing for your own sowings.
How to propagate Gaura by division?
When to divide Gaura?
Once well established, this perennial Gaura can, over the years, develop a dense clump with declining flowering. After 3–4 years, spring is the ideal time to divide the clump. Note that its taproot does not make division easy. It is preferable to use propagation by cuttings, a very easy technique, rather than division, which is more delicate. Also note that only division and propagation by cuttings will preserve the pink colour of the parent plant. If you divide a Gaura plant, do so in spring, the ideal season for multiplying the plant.
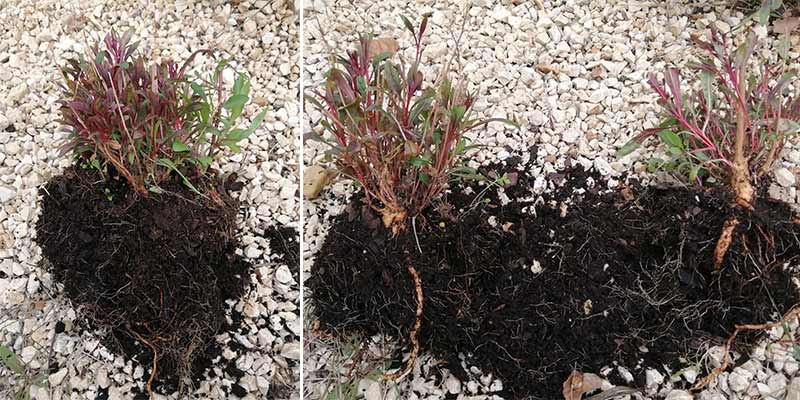
Divide a mother plant into two parts © S.Dionet
Equipment needed
- a knife
- a digging fork
- a watering can
- mulch
Steps for dividing Gaura
- Water the plant thoroughly to make division easier;
- Lift the entire stump;
- Using the digging fork or a knife, cut the stump into two parts, taking care of the root system;
- Transplant the two pieces into open ground or into a pot;
- Firm the soil surface, water generously then mulch with straw, flax fibre, woodchip (BRF) or a bed of dead leaves.
How to propagate Gaura by cuttings?
When to take cuttings?
Propagation by cuttings of Gaura can start in early March, before flowering, and at the end of summer, after flowering. It is the simplest method, suitable for all gardeners, which will preserve the flower colour true to the parent plant and allow you to enjoy Gaura’s blooms quickly, which seem to dance like a host of butterflies.
Equipment needed
- a pruning shear
- a bucket or a pot
- rooting hormone
- a pencil
- a spray bottle
Steps for taking Gaura cuttings
- Start from a healthy plant, free from disease;
- Fill a bucket with a special cutting compost placed on a layer of gravel or sand at the bottom;
- Moisten the compost;
- Select a cutting from a non-flowering plant;
- With the pruning shear, cut just above a node, a stem about 10 cm long;
- Remove 2–3 lower leaves to tidy the cutting;
- Lightly dip, or not, the end of the stem about ½ cm into rooting hormone;
- Insert the cutting into a hole made beforehand with a pencil, hormone side down into the bucket of compost;
- Firm the compost well around the cutting to ensure good contact;
Water gently so the compost adheres well to the cutting.
Place cuttings in a temperate room at 20°C and keep the compost moist. It is possible to take cuttings under cover, that is to surround the bucket or pot with transparent film or a glass cloche, airing regularly. This technique speeds up rooting. After 3 weeks to 1 month, the root system will be well developed and the cutting can be repotted into a larger pot if needed.
For further reading
White Gaura or Pink Gaura, discover our advice sheet: Gaura lindheimeri: when, where and how to plant it?


Comments