


Tree peony or Paeonia suffruticosa is a large peony with a bushy habit, valued for its large single or double flowers made up of crinkled petals in soft shades: pink, red, white, orange, or mauve. It also has attractive divided foliage. In this tutorial, we present the different techniques for propagating tree peony, namely grafting and layering. It is also possible to propagate by cuttings (heel cuttings), but we do not recommend this technique as the results are unpredictable, the success rate being quite low, and the plants take longer to develop and flower.
Grafting
Grafting is the technique used by nurserymen to propagate tree peonies. They are grafted onto herbaceous peony roots. We recommend performing several grafts to increase the chances of obtaining a plant, as the success rate is around 50%. Grafting can be done using either the insertion or cleft method.
When to graft a tree peony?
The ideal time to graft tree peony is in late summer or early autumn, from August to October.
How to do?
- Start by digging up a herbaceous peony that is at least 3 years old.
- Then cut sections of roots about 10 cm long: these will be the rootstocks.
- From the tree peony you wish to propagate, take sections of 10 to 15 cm long from the tips of the branches, from this year's shoots, ensuring they have at least 2 or 3 buds. These are the scions.
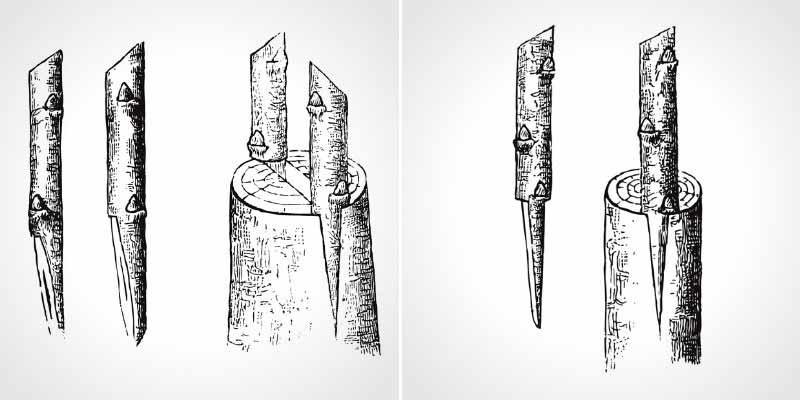
- Use the grafting knife to make a flat and clean cut at the top of the root (rootstock), ensuring the root is oriented correctly.
- Then cut the scion to a slant just below the lowest bud.
- Shape the same cut in the rootstock so that they fit together perfectly.
- Insert the scion into the cut of the rootstock.
- Use grafting tape or raffia to securely hold the grafting point. You can also use grafting wax.
- Then keep the graft in a warm and humid environment. You can place them in a plastic bag and keep them sheltered. The ideal temperature is between 20 and 25 °C.
- After 10 to 15 days, you can plant the scions in the ground, in well-drained soil. Ensure the grafting point is buried about 10 cm deep.
Necessary materials
- A spade or fork
- Sharp and disinfected pruning shears
- A grafting knife
- Grafting tape or raffia
- Optionally grafting wax
- Gardening gloves
Layering
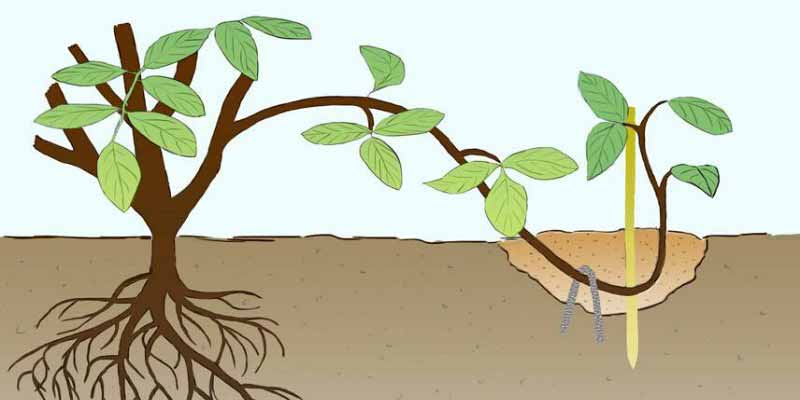
Layering is another effective method for propagating tree peony. This technique involves encouraging a branch to develop its own roots while remaining attached to the parent plant. Once the roots are sufficiently developed, the new plant can be separated and replanted elsewhere. Here’s how to proceed.
When to layer a tree peony?
The best time to perform layering on tree peony is in spring, when the plant is in full growth. At this time, the branches are more flexible and conditions are ideal for root development.
How to proceed?
- Choose a healthy, flexible branch from your tree peony that is from this year. It should be long enough to be bent down to the ground.
- Identify a spot near the parent plant where the branch can be bent to touch the ground. Dig a small trench at this spot and place potting soil in it.
- Using a sharp and disinfected knife, make a small incision on the underside of the branch where it will touch the ground. This will stimulate root growth in this area and thus increase the chances of success.
- Gently bend the incised branch to make contact with the ground. Use a hook or stone to hold it in place.
- Cover the incised section of the branch with potting soil, then firm it down to avoid air pockets. It should be buried under at least 5 cm of soil.
- Water generously.
- Continue to water regularly and monitor root development. It may take several weeks to a few months for sufficiently strong roots to develop.
- You can separate the layered branch from the parent plant in autumn, using pruning shears to cut the branch that connects them.
- Plant the new tree peony in its final location after preparing the soil and adding compost or manure to enrich it. Water thoroughly after planting.
Necessary materials
- A sharp and disinfected knife
- Pruning shears
- A hook
- Potting soil
- A watering can
- Gardening gloves


Comments