


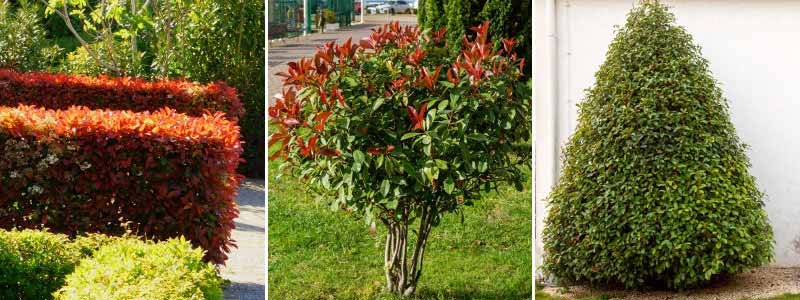
Photinia is a highly decorative evergreen bush with large glossy leaves and bright red or bronze young shoots in spring. It is ideal for creating dense, bushy hedges that serve as effective screens all year round, but it can also be planted as a standalone, at the back of a flowerbed, or even in a pot on the terrace for the more compact varieties. In spring, around May-June, Photinia also produces fragrant, melliferous cream-white flower umbels. This is a particularly easy-going bush! It thrives in full sun or partial shade, in light, humus-bearing soil that is not too chalky. In this tutorial, we will explore why it is important to prune Photinia, when to do it, and how to proceed step by step.
Why pruning Photinia?
Fast-growing and vigorous, Photinia tolerates pruning very well. This serves several purposes. It allows you to control the shape and size of the bush, which is particularly useful if you are using it to create a hedge. Pruning will thus result in a dense, homogeneous, and regular hedge. You can also choose to prune Photinia into topiary shapes, such as cones, balls, or columns. Similarly, if you are growing it in a pot or have limited space, this helps keep it to manageable dimensions, preventing it from taking up too much room (at maturity, it can reach up to 3 m in height and 2 m in spread).
Pruning also promotes healthy growth by removing dead or diseased branches, allowing the plant to breathe better. This aerates its branches and facilitates good air circulation, reducing the risk of diseases such as powdery mildew or entomosporiosis. By pruning regularly, you will encourage the bush to branch out, take on a bushier and more harmonious habit, and produce more colourful young shoots in spring! You can also take advantage of pruning to make cuttings and easily obtain new plants.
When to prune Photinia?
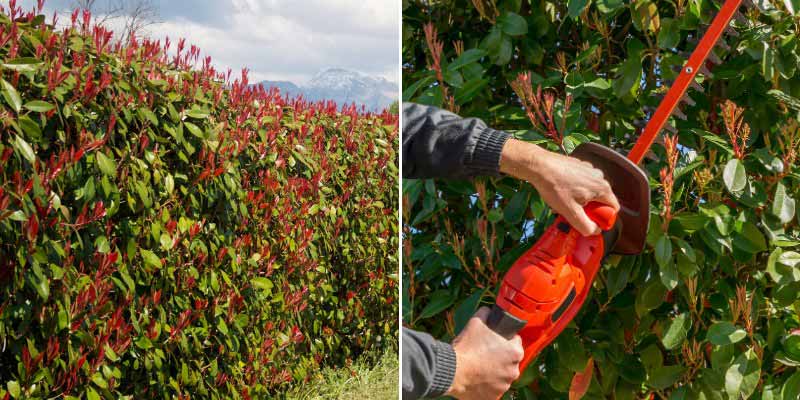
Photinia tolerates repeated pruning without any issues: it can be pruned between one and three times a year. The more you prune it, the more bright red new shoots it will produce! When planted as a hedge, a variety like ‘Red Robin’ should be pruned at least twice a year: in July, after flowering, and in autumn, with a lighter pruning. It is also possible to prune at the end of winter, around March. This will encourage the appearance of colourful young shoots but will limit flowering. For dwarf varieties, just a single annual pruning in August is sufficient to maintain a compact habit. Similarly, when they are young, the plants can simply be lightly pruned each year with pruning shears.
How to prune Photinia?
For a Photinia hedge:
- Disinfect your cutting tools with 90° alcohol to prevent the spread of diseases.
- If you see any, remove dead, diseased, or damaged branches using pruning shears or loppers. You can also remove branches that cross each other or are too close together.
- Optionally, place a string line, secured at each end of the hedge with stakes, to help you maintain a straight line.
- Use hedge trimmers or shears to cut the ends of the branches. Don’t hesitate to reduce the height of the bush by cutting the tallest branches. However, avoid removing more than a third of the plant mass in a single pruning session.
- Once pruning is complete, all that’s left is to collect and dispose of all the cut branches.
For a standalone Photinia:
- Decide on the shape you want to give the bush. You can even shape it into topiary, for example, into a sphere, cone, or column. In this case, it’s best to use a template. Check out our advice sheet on pruning and shaping topiary. You can also shape it on a stem by clearing the lower branches to highlight its silhouette.
- Remove dead, diseased, or damaged branches, as well as those that cross or seem poorly positioned, using pruning shears or loppers. Try to make clean, angled cuts to facilitate healing, and always prune above a node.
- Lightly aerate the centre of the bush to allow for good air circulation, thus limiting the risk of diseases.
- Then use shears to give the bush its overall shape by trimming the ends of the branches. You can reduce them by about fifteen centimetres.
- Remember to step back to appreciate the overall shape of the bush and adjust the pruning if necessary.
Necessary equipment
- A clean, sharp pair of pruning shears
- A lopper or branch cutter for cutting thicker branches
- Shears or a hedge trimmer
- 90° alcohol for disinfecting tools
- Cut-resistant gloves
- Depending on the height of the Photinia, use a step ladder or a ladder
- Optionally, a string line secured at each end of the hedge to achieve a straight cut


Comments