


How to sow fern spores?
Discover all our tips
Contents
With their decorative foliage, ferns bring a lot of graphic appeal to the garden. They elegantly unfurl their fronds in spring, creating a natural scene in borders or woodlands. Most of them thrive in cool, shaded soil. Others can be planted in rockeries or on walls, sometimes even in hot and dry conditions. Unlike the vast majority of plants, ferns do not have flowers or seeds, but reproduce through spores.
This is a time-consuming process, as the spores give rise to prothalli, small organisms that resemble moss and which, after fertilisation, will develop into ferns as we know them. Ferns therefore need to take an intermediate form before they can grow. To successfully sow spores, it is essential to maintain a humid atmosphere, as water is crucial for fertilisation.
Don’t hesitate to try sowing spores… Despite the technical aspect that may seem daunting, it is a fascinating experience to undertake! It is exciting to observe the spores germinating, covering the substrate with a green film, and finally catching sight of the first small fronds… What a reward to see them finally grow after months of waiting! The first ferns that appear have an extremely delicate and fragile quality, almost moving. Discover all our tips for successfully sowing spores!

Harvest the spores
Although this varies depending on the species, most spores are harvested in late summer or autumn. When the sores are mature, they turn a brown colour. You can then cut a part of the frond and place it in a paper bag. The spores will detach on their own. You can then collect them and sow them. The chances of successful sowing are higher with fresh spores. However, if you prefer to store them for later sowing, place them in the refrigerator in plastic bags to protect them from moisture. They do lose some of their seed viability over time.
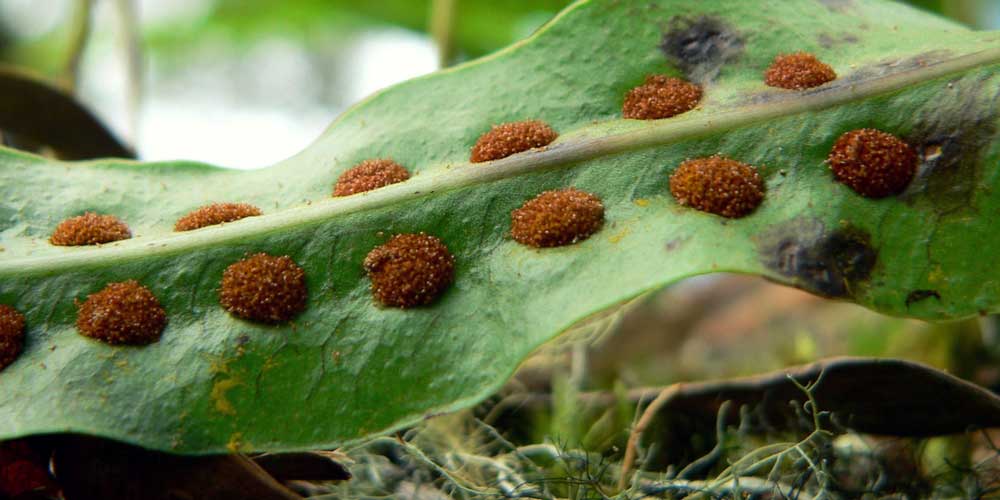
Fern spores are located on the underside of the leaves
Read also
Planting arborescent fernsSowing fern spores
To sow ferns:
- Mix potting soil and sand, then sieve to obtain a fine substrate. You can also add turf, which retains moisture.
- Moisten the substrate.
- Sterilise it by microwaving for 10 minutes to prevent the appearance of mosses or fungi.
- Choose a transparent plastic or glass container with a lid (to retain moisture). We recommend cleaning and sterilising it. Fill it with substrate, then lightly compact it.
- You can now sow the spores by spreading them on the surface. Do not cover them with soil!
- Place the transparent lid on the tray. This helps maintain a moist and sterile environment.
- Position your sowing in a bright location, out of direct sunlight.
Although the germination speed varies depending on the species, generally after about a month you will see a green film appear on the surface of the substrate. These are the prothalli, tiny organisms that bear the sexual organs and thus allow fertilisation. At this stage, the substrate must remain moist; you can mist it if it tends to dry out. Then, ferns as we know them will develop from these prothalli.

The first fronds of ferns emerge from the prothalli
When you see the first fronds appear, you can transplant your ferns into individual pots. You will need to wait a year before planting them in your garden.
Discover other Ferns
View all →
Available in 1 sizes

Available in 1 sizes

Available in 2 sizes

Available in 1 sizes

Available in 1 sizes

Available in 2 sizes

Available in 1 sizes

Available in 2 sizes

Available in 2 sizes

Available in 2 sizes
- Subscribe!
- Contents
Comments