


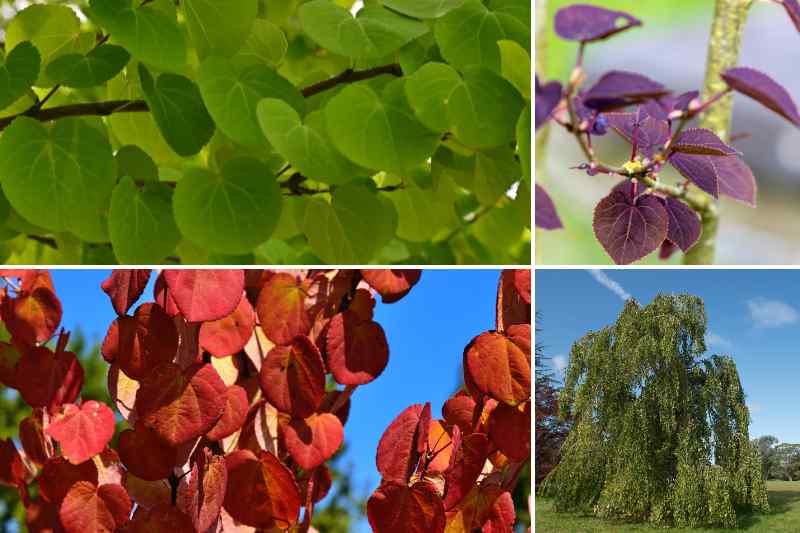
The katsura tree, also called caramel tree or Cercidiphyllum in Latin, is one of the most beautiful trees for autumn colour… and scent. Not only do we love the sublime colours it adopts with the first cold, but also the shape of its leaves, described as cordate, that is heart-shaped. It looks splendid in groups of 2 or 3 specimens in a hedge or a bush bed. Discover in this tutorial our tips to propagate it easily.
Cercidiphyllum, this remarkable tree
The katsura tree, sometimes encountered under the names Katsura tree or cake tree, has evocative nicknames that come from the scent its fallen leaves give off in autumn. A caramel scent is released when you walk on them!
This deciduous tree, native to Japan and China, is magnificent, with cordate leaves changing colour, ranging from green or purple in some varieties, to pale green, then yellowing and finally turning scarlet in autumn. Growing up to 15 m tall, it can also develop a weeping branch structure on the Cercidiphyllum japonicum 'Pendulum'.
For everything about Cercidiphyllum, read our full guide.
When to propagate the katsura tree?
That depends on the propagation method chosen.
If you carry out propagation by cuttings, do it in late summer, when shoots become lignified, that is when their shoots start to transform into wood.
If you prefer to try sowing, do it in late winter, ideally in February or March, bearing in mind that seeds are harvested from the tree in late summer.
How to propagate the katsura tree?
Propagation by cuttings from Cercidiphyllum stems
This is the method offering the best success rate for this tree.
Required equipment :
- Cuttings of Cercidiphyllum;
- Plant hormone for propagation by cuttings (facultative);
- Propagation or seed compost, or a mix of 2/3 compost and 1/3 sand;
- Pots or cutting trays;
- Plastic film or a mini greenhouse.
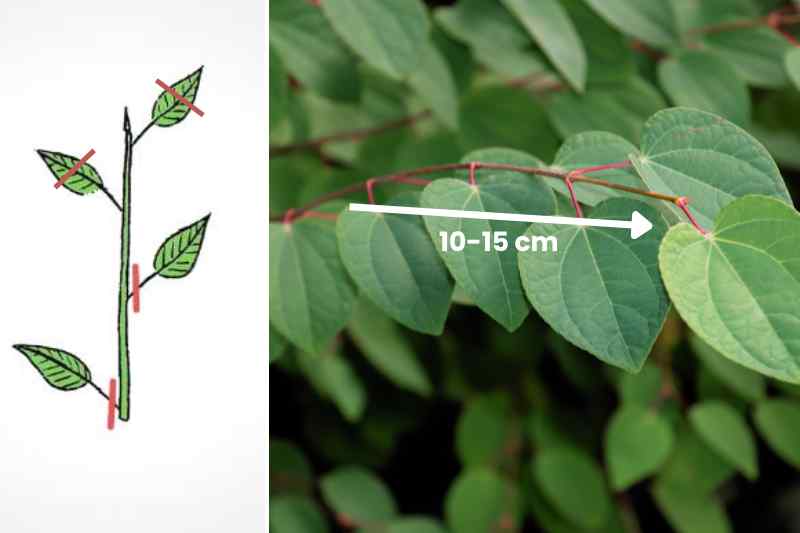
- Take cuttings about 15 cm long from semi-ripe shoots: these are current-year stems, partially lignified in late summer, in August or early September. Cut a long section where the colour changes, then trim a piece of stem 15–20 cm long, just below a node.
- Remove leaves near the base of the cutting leaving only a pair at the top, further reducing their surface by cutting them in half (see diagram).
- Optionally dip the bases of the cuttings in plant hormone for propagation by cuttings to encourage rooting, or in willow water if you have some.
- Insert the cuttings to two-thirds of their length into pots filled with propagation or seed compost, or into sieved soil mixed with a little sand.
- Firm down lightly around the stems to ensure contact with the compost, then water lightly.
- Cover the pots with transparent plastic film or a mini greenhouse to maintain steady humidity.
- Place pots in a bright spot outdoors, ideally under a cold frame and sheltered from direct sun. Rooting may take several weeks.
- Once cuttings have developed a sufficient root system (you will see new leaf growth), pot them on into larger pots filled with potting compost for young plants.
- Keep watering so the compost remains slightly moist but not waterlogged. In autumn or the following spring, you can plant young plants (depending on their development) in open ground.
Sowing
Sowing is also possible, but this method is more delicate than propagation by cuttings, knowing that a period of vernalisation (a cold period for seeds) is indispensable to ensure good germination of the katsura tree.
- Prepare the seeds: harvest seeds from inside the pods produced by female trees in late summer. These winged, flat seeds should be dry, then cold-stratified (the vernalisation) to "imitate" winter conditions. This cold treatment favours germination. To do this: place seeds in a plastic bag with damp sand and keep them in the refrigerator (between +3 and +5 °C) for about 2–3 months.
- In March, sow the seeds in pots or trays filled with seed compost that you have moistened beforehand. Cover with a thin layer of compost (1 cm) and mist lightly.
- Cover the pots or trays with plastic film or a mini greenhouse to keep humidity steady.
- Place the pots in a bright spot, ideally under a cold frame (night temperatures should not fall below 10 °C), or indoors at 15–20 °C, sheltered from direct sun. Germination can take between two weeks and several months.
- Water regularly, always by misting, to keep the substrate slightly moist (not too wet, not too dry).
- Once seedlings have developed their first true leaves, pot them up into individual pots filled with compost for young plants and gradually expose them to sun (for a few hours during the day).
- In spring or autumn, when young plants look well developed, plant them in open ground.


Comments