


How to create a defensive hedge?
Our tips for a deterrent barrier
Contents
Hedges are often planted to serve as a screen or windbreak. However, they can also primarily function to deter intrusions: this is known as a defensive hedge. There are many shrubs (for example, Berberis), which, due to their thorns, spiky leaves, or tangled branches, can make an excellent natural, impenetrable defensive plant barrier. Additionally, a thorny evergreen or deciduous bush can be very ornamental, showcasing beautiful flowering and colourful fruit, providing food for wildlife that can also take shelter there. To help you create your prickly hedge, check out our selection of defensive shrubs and our planting tips.
⇒ Discover our range of shrubs for defensive hedges on our website.

What is a defensive hedge?
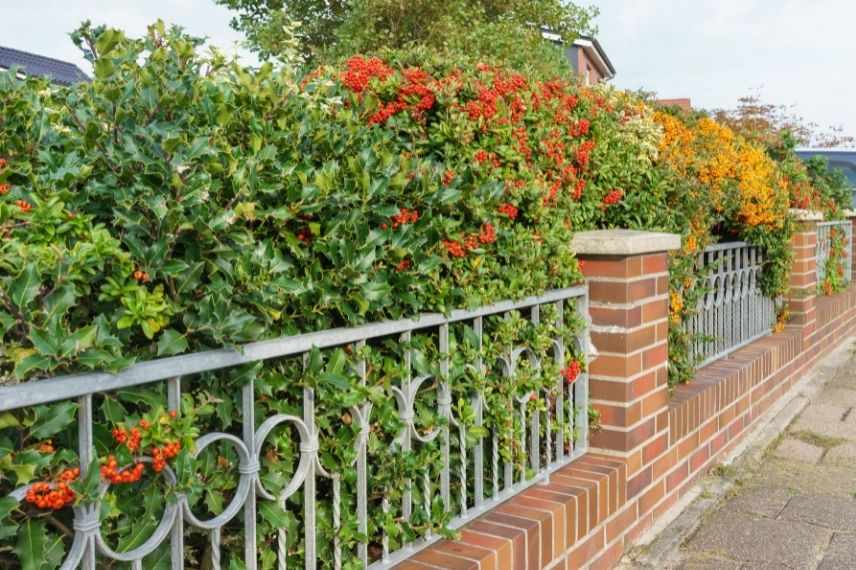
A defensive hedge serves to prevent intrusions into your property. Composed of thorny or sharp shrubs, it can cause injuries to anyone attempting to cross it. At full height, these dense and tall shrubs make the hedge impenetrable, while also protecting against prying eyes and wind. This vegetative barrier can also be very decorative throughout the seasons thanks to its colourful leaves, flowers, and berries. To be effective, a defensive hedge should rise to at least 1.5 m in height and about 1 m in width.
Advantages:
- The defensive hedge is less expensive than installing a fence.
- It serves as a refuge and larder for small wildlife (insects, birds, hedgehogs…) and contributes to biodiversity.
- In the countryside, the hedge acts as a barrier for large nocturnal animals that can cause significant damage to properties, such as deer and wild boar.
- It attenuates noise and serves as a screen or windbreak.
Disadvantages:
- It requires patience. It will fulfill its role once the plants have reached their full height.
- The thorny shrubs can be dangerous for children playing in the garden.
- The fruits in the form of berries are often toxic if ingested, so be cautious with children who may be tempted to taste them.
The planting of defensive hedges has both advantages and disadvantages
Read also
Hedge for birds: which shrubs to choose?When to plant a defensive hedge?
Planting a defensive hedge is generally done when the plants are in a dormant state, in autumn, when the soil is still warm. Shrubs with bare roots (deciduous species) or in clumps (often conifers and evergreen species) can be planted from late October to the end of March. The planting of container-grown shrubs can take place all year round, except during frost, heavy rain, and heatwaves. However, it is also preferable to plant between October and the end of winter, before the bud burst period of the leaves.
Discover other Deterrent hedges
View all →
Available in 0 sizes

Available in 2 sizes

Available in 0 sizes

Available in 4 sizes

Available in 2 sizes

Available in 3 sizes

Available in 3 sizes

Available in 2 sizes

Available in 3 sizes

Which shrubs to choose for a defensive hedge?
We advise you to create a mixed hedge comprising both deciduous and evergreen species. Ensure you adhere to the following proportions: ⅓ deciduous shrubs to ⅔ evergreen shrubs. This way, the hedge will not be completely bare in winter. Also, prefer well-developed specimens to save some time. Here are some perfect shrubs for a defensive hedge:
- firethorn or Pyracantha: evergreen green foliage, highly melliferous flowering from May to July, yellow, orange, or red berries in autumn, long branches armed with very sharp thorns;
- Mahonia or false holly: evergreen, thick, and spiky foliage, yellow or orange flowering from autumn to early spring, dark berries;
- barberry or Berberis: deciduous or evergreen foliage depending on the species and in various colours, flowering from March to June, small decorative berries in pink, red, or blue, entangled branches adorned with thorns;

Firethorn, Mahonia, and Barberry
- the rugosa rose (Rosa rugosa) or the burnet rose: dense vegetation, deciduous foliage, white or pink flowering from May to October, thorny stems;
- Japanese quince or Chaenomeles: deciduous green foliage turning yellow in autumn, red, pink, or white flowering from February to June, fragrant yellow fruits resembling quinces, twisted and thorny branches;
- common gorse or Ulex europaeus: evergreen spiny foliage in ash green, bright yellow flowering from February to June with a sweet almond or coconut scent, brown pod fruiting;
- holly or Ilex: evergreen, spiky, and robust leaves, insignificant but highly melliferous spring flowering, fruiting in red, yellow, or black drupes on female plants.
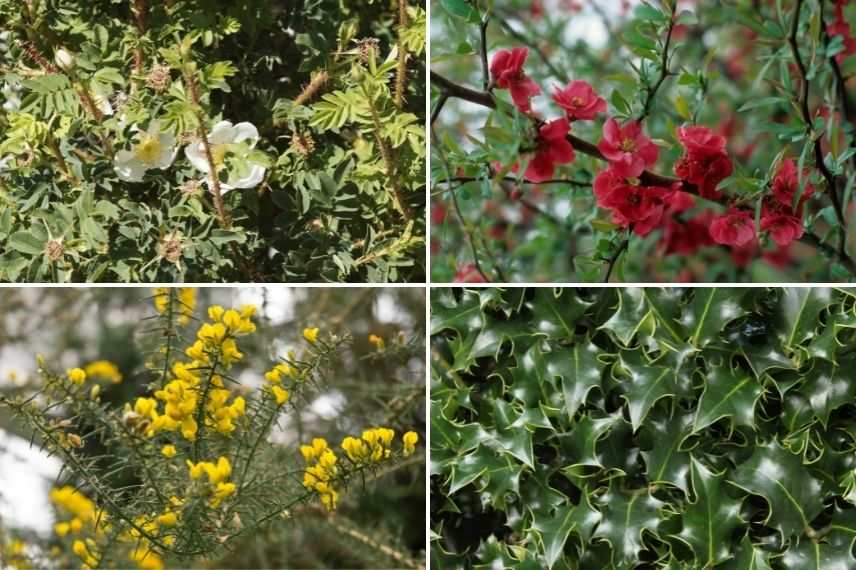
Burnet rose, Japanese quince, common gorse, and holly
Sea buckthorn (Hippophae) and hawthorn (Crataegus) are also excellent shrubs for a defensive hedge. In the Mediterranean region, the thorny lemon tree or Poncirus trifoliata and cacti such as Opuntia or Cylindropuntia imbricata can deter intrusions onto properties with their thorns.
→ Discover our article: 8 shrubs for a defensive hedge
How to plant a defensive hedge?
Preparation
- Think ahead about the arrangement of species in your hedge. You can prepare a planting plan to precisely define the location of each shrub. For a short hedge, space the shrubs randomly to make the hedge appear natural. For a long hedge (over twenty metres), create a planting sequence that you repeat consecutively. However, leave a few spaces free that you will fill randomly during planting, so you do not endlessly repeat the same sequence of shrubs.
- Adhere to the legislation regarding planting at property boundaries! You cannot plant a hedge just anywhere. If you choose to limit your hedge to 2 m in height, it must be at least 50 cm from the boundary of the neighbouring property. However, for hedges exceeding 2 m in height, you must maintain a planting distance of at least 2 m from the boundary of the neighbouring property. Check with your local council, as these rules can vary from one municipality to another.
- Before planting, it is essential to prepare the soil. Indeed, loosened, decompacted, and weeded soil encourages the establishment and growth of plants by facilitating the absorption of vital resources (water, trace elements). At this stage, add organic matter (well-decomposed compost or manure) to enrich the soil. If necessary, add sand for heavy soil or heather soil if your soil is too calcareous for the chosen plants.
- Plants with bare roots must be planted immediately or heeled in upon receipt. Additionally, the soaking of roots before planting is important to rehydrate and protect the roots (the soaking mixture consists of a blend of clay soil, manure, and water). Also remove any damaged roots and rebalance the root system by trimming excessively long roots with pruning shears (this is called dressing).
- For potted shrubs, soak the root ball about 1 hour before planting.
- Submerge container plants in a bucket of water to moisten the root ball. Then, gently untangle and decompact the root ball.
Caution: remember to wear gloves and long-sleeved clothing to avoid injury from thorns. Be aware that you can contract tetanus from a thorn scratch. Ensure that your tetanus booster is up to date.
Planting
You have the option to plant the shrubs in a staggered formation in two rows or in a single line depending on the space available.
- Stretch strings between stakes to mark out the planting line(s). If you opt for two rows, they should be spaced about 80 cm apart. The shrubs should be spaced 60 to 80 cm apart at most to achieve a dense hedge.
- For container or root ball shrubs, dig a planting hole for each young plant. Remember to remove the netting around the root balls. For bare root shrubs, dig a trench (or two trenches if planting in a staggered formation) that corresponds to the length of your hedge. The depth and width of the holes and trench should be twice the root volume.
- Spread crushed horn at the bottom of each hole or trench to promote rooting of the hedge.
- Place your shrubs so that the collar is level with the soil surface and keep them upright.
- Backfill the holes or trench with the excavated soil.
- Gently firm the soil by hand around the shrubs to avoid damaging the roots and create a watering basin.
- Water each young plant thoroughly.
- Apply organic mulch that you will renew regularly. This will prevent complicated and hazardous weeding around your thorny shrubs. Additionally, mulch keeps the soil cool in summer by limiting water evaporation and creates humus as it gradually decomposes.
During the first year after planting, remember to water regularly, especially during dry spells. Once a year, in autumn, add well-decomposed compost or manure by scratching it into the surface.

In a trench, young shrubs are planted in a staggered formation in two rows.
How to prune your defensive hedge?
One year after planting, you can cut back each shrub by a third of their height. This will stimulate the plant, causing it to ramify and become denser and fuller from the base.
For the next three years, you will only prune the young shoots to a third of their height. After that, the hedge will no longer need pruning, and you can let it grow freely. To avoid encroaching on your neighbour’s space, occasional and light pruning will be sufficient to remove any troublesome branches.
Don’t forget to equip yourself with protective gear when pruning these thorny shrubs: work clothes, thick gloves (clearing gloves, for example) and safety glasses. Use your tools (fork, rake, spade…) to collect the branches on the ground to avoid any scratches.
For further reading
- Discover our ready-to-plant kits Defensive hedge and Evergreen and defensive hedge
- Everything you need to know about Hedges, shrubs, trees: What are the planting distances?
- Check out Olivier’s sheet to learn how to plant a hedge?
- Subscribe!
- Contents
, Blackthorn (Prunus spinosa), and Holly (Ilex aquifolium). These plants not only have thorns that deter intruders but are also hardy and require minimal maintenance once established.
2. **Plan Your Layout**: Measure the area where you want to plant the hedge and plan the layout. Ensure there is enough space for the plants to grow both in height and width. Spacing between plants should be about 30-50 cm apart, depending on the species.
3. **Prepare the Soil**: Dig a trench along the line where the hedge will be planted. The trench should be deep and wide enough to accommodate the root system of the plants. Enrich the soil with compost to give your plants a healthy start.
4. **Planting**: Plant the shrubs in the trench and water them thoroughly. It’s best to plant during the dormant season (late autumn to early spring), as this gives the plants a better chance to establish roots before the growing season.
5. **Initial Care**: Keep the area around the plants weed-free and water regularly, especially during dry periods. Mulching can help retain moisture and suppress weeds.
6. **Pruning and Maintenance**: Start pruning early to encourage dense growth. Trim the hedge annually to shape it and promote thicker foliage. This not only enhances the hedge's defensive properties but also keeps it looking neat.
7. **Pest and Disease Management**: Keep an eye out for any signs of pests or diseases. Early detection and treatment can prevent more serious problems.
A well-planned defensive hedge not only secures your garden but also provides a habitat for wildlife and adds to the overall beauty of your landscape. Remember, patience is key – it may take several years for the hedge to fully mature and achieve the desired effect.")
Comments