


Growing cardoon, a vegetable with tasty midribs
How to grow cardoon or wild artichoke, from sowing to harvest and consumption
Contents
Cardoon gratin with white sauce is certainly no secret to those living in the wider Lyon region. Elsewhere, this traditional dish, served for Christmas dinner, may seem a little puzzling. For the cardoon (Cynara cardunculus), a perennial vegetable closely related to the artichoke, is still relatively uncommon in the territory’s gardens. This vegetable plant in the Asteraceae family deserves, however, a place in the vegetable garden, or even in a border where its cut, spiny blue-grey foliage and its flowering in large purple thistle-like heads make a stunning display.
Although closely related to the artichoke, cultivated for its edible flower buds, cardoon is included in the vegetable garden for its ribs or stalks that must be blanched before harvesting.
Discover how to successfully grow cardoon, from sowing to planting, from care to harvest. With a brief aside on how to cook it.
All you need to know : Cardoon: planting, growing, harvest

Cardoon, what exactly is this vegetable plant?
Very imposing, The cardoon (Cynara cardunculus) immediately stands out with its handsome, erect and spreading tuft, composed of large greyish leaves, deeply cut into pointed lobes, borne on broad, fleshy petioles. These petioles, called cardes, are highly prized in cooking, provided you blanch them to remove their natural bitterness. As for the flowering, it occurs in the second year, between June and July. It takes the form of large capitula that resemble both the flowers of the thistle and the artichoke.
The cardoon is primarily a perennial vegetable plant that establishes itself in the kitchen garden. Of Mediterranean origin, it belongs to the large family Asteraceae. There are two varieties of cardoon: the spiny cardoons, logically harder to peel, but which benefit from a more pronounced flavour, and the spineless cardoons, which offer hollower ribs, with a somewhat less pronounced flavour. It is essentially these inermous varieties that are found on the market today. Among the main varieties, one can cite:
- The ‘Silver Spiny Plainpalais’ with very decorative foliage that enjoys excellent flavour. But it remains difficult to peel because it is spiny…
- The cardoon ‘Full White inermous’ with a very large tuft, devoid of thorns and with fleshy ribs.
- The ‘Improved White‘ with fleshy and broad ribs that blanch easily.
- The ‘Green of Vaux-en-Velin’, non-spiny, adapts really well to regions with harsh winters.
- The ‘Red of Algiers’, a moderately spiny variety that thrives particularly in regions with hot summers.
- The ‘Giant of Romagna’, a vigorous variety that offers broad, thick ribs.
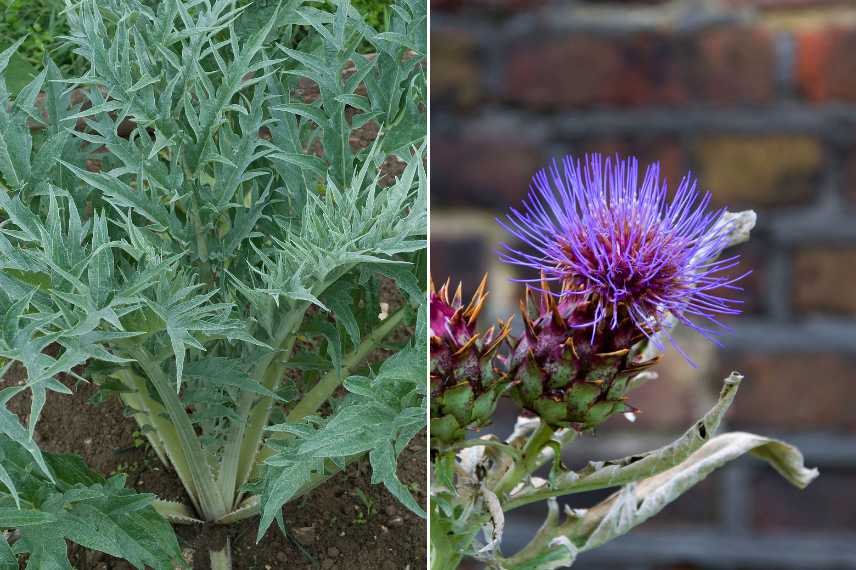
The leaves and inflorescences of cardoons are very decorative.
To have the chance to taste cardoon ribs, you will need to give it a good place in the vegetable garden. The clump of foliage can reach 1.50 m in height and up to 60 cm in width. Then, let it develop naturally and sustainably. It is therefore classed among (almost) perennial vegetables: the plants should be renewed every 3 to 4 years.
Read also
How to sow cardoons?When and how to sow cardoon?
Cardoon seeds germinate at temperatures of 12 to 20 °C. That said, it is best to sow directly outdoors in mid-May. Sowing in pots under cover is possible from April. But it has the drawback of hastening bolting. If you want to give yourself every chance, don’t hesitate to carry out both sowings—under cover, in pots, and in the ground. This way you can transplant seedlings sown in pots to restock the bed if needed.
Direct sowing
Cardoons thrive in sunny positions and soils rich in organic matter, cool and well-drained. That is why we recommend a good application of compost or manure in the autumn prior to sowing. If your soil drains poorly or is too wet, cardoons can be grown on a mound to ensure better drainage. A small amount of sand can also be added.
Soaking and refrigeration of the seeds are unnecessary.
To sow, start by digging holes 20 to 25 cm deep, spaced at least 50 to 60 cm apart. At the bottom of each cavity, place a good handful of well-decomposed compost or manure, then add about twenty centimetres of good garden soil, enriched in autumn. Sow 3 to 4 seeds per dug pocket and cover with 1–2 cm of soil. Lightly firm with the fingers and water with a fine spray.

Direct sowing of cardoon takes place in mid-May.
It is essential to keep the soil cool and moist until the seeds have germinated.
When the seedlings have a few leaves, thin out to keep only the strongest young plant per cavity.
Sowing under cover
- Fill pots with seed-starting compost, optionally mixed with a little sand.
- Plant 3 seeds per pot at a depth of 1 cm.
- Firm with the fingers and water with a very fine spray.
- Keep the compost moist until germination.
- Acclimatise your pots by placing them outside only during the day.
When the seedlings have a few small leaves, it is essential to thin out to keep the prettiest young plant per cavity.
Transplanting takes place mid-May, once all risk of frosts has passed. It is enough to proceed in the same way as for sowing in the ground, by digging holes.
As cardoon starts relatively slowly, don’t hesitate to grow intercrops of radishes, salad leaves, spinach, early carrots…
How to care for cardoons?
Cardoons do not require a great deal of care, but they still need minimal maintenance to develop their cardoon stalks.
Watering and mulching of cardoons
Starting with regular watering. Indeed, cardoons prefer moist soil, but not to the point of being waterlogged. That is why it is recommended to form a shallow basin around the plant to maximise water uptake. In parallel, we recommend mulching the soil, especially in summer, with dry mowing residues or dead leaves. Before the foliage, make sure to hoe and weed thoroughly to aerate the soil and remove weeds.
Between waterings, it may be wise to apply nettle manure every fortnight to support growth, provide the necessary nutrients and strengthen its defences against diseases and pests. Virginie shares her nettle manure recipe.
Another layer of mulch of dead leaves or straw, thicker, will be laid in autumn and winter to help the cardoons withstand the cold. Indeed, cardoons are relatively susceptible to cold and winter frosts. They have a hardiness of around -7 to -10 °C.
Cardoons have few enemies. Only aphids may venture there. A solution of water and black soap will flush them out. In spring, young shoots may fall prey to slugs and snails.
Late in summer, if you do not wish to harvest seeds, it is best to cut the flowers to prevent exhausting the plant. Otherwise, wait for them to brown before harvesting the flowers and dry them. The seeds will be sown the following spring.
The blanching of cardoon ribs
The most important care lies in blanching, essential for making the cardoon stalks edible. Without blanching, the cardoon ribs are bitter and tough. For reference, blanching involves placing the leaves in darkness for a period. To do this, one uses corrugated cardboard sheets, newspaper, hessian, straw…
This blanching begins from September–October, when the leaves have reached a height of about 1.5 m. To stagger the harvests, it is advised to spread this operation over 2–3 weeks, up to the frosts. Always carry out blanching on a dry day, or risk leaves rotting.
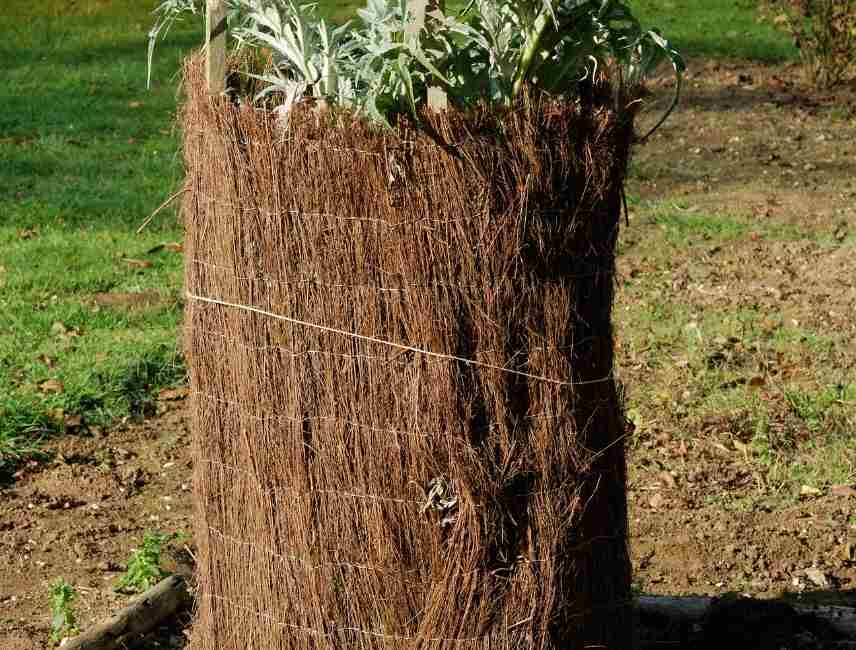
The blanching of cardoons
How to blanch cardoon ribs?
- Remove the leaves at the base, dry or damaged.
- Gather the leaves and tie them with string, not too tightly.
- Wrap the tied leaves in corrugated cardboard, newspaper, and hessian, and secure with string.
- Pile the bases of the cardoons to a height of about 20 cm.
The cardoons will stay like this for three weeks.
If you wish to enjoy cardoons at Christmas dinner or if winter is very early, you can store your cardoons. Simply uproot the cardoon plants and place them in sand, in a cellar or a dark room, at approximately 10 °C. From then, blanching will be more gradual. Cardoons can be stored in this way from October.
Read also
How to blanch cardoons?Cardoon harvest
Harvest occurs when cardoons are nicely white, as needed. Simply cut the clump of cardoons at the base with a large knife, as close to the soil as possible. In the fridge, they keep for a few days. You can keep them longer by placing the cardoons in a dark, cool room.
How do you cook cardoons?
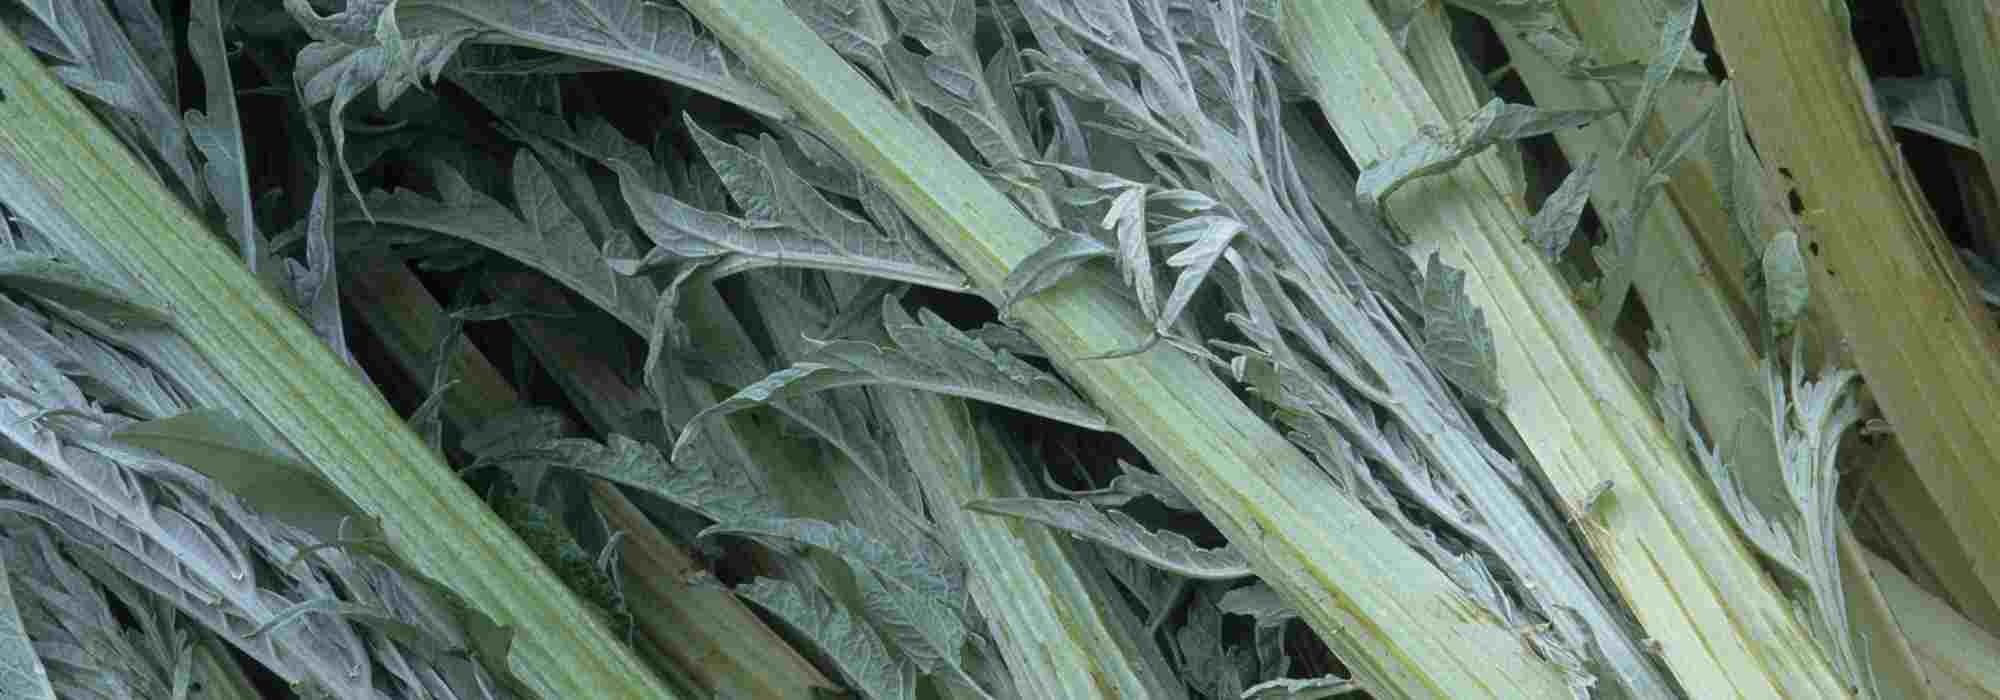
Before cooking them, they must be prepared! And it’s often the most delicate part. It is necessary to start by removing the remaining leaves and the somewhat thorny parts. You will also need to remove the stringy part that sometimes covers the midribs. It suffices to cut the base of the midrib and work up to the pointed end.
The midribs are then cut into pieces, then rinsed in lemon water to prevent them from discolouring. To tender them a little, the cardoons should be blanched for a few minutes in boiling lemon water.

Cardoon midribs should be blanched before preparation
The most traditional recipe is to prepare a cardoon gratin with béchamel. They can also be sautéed in a frying pan with potatoes, stirred into couscous or a tagine, or into a soup. Also try the velvety cardoon soup.
- Subscribe!
- Contents

Comments