


Growing Erythronium in pots
Enjoy its elegant flowering that heralds the return of spring
Contents
Erythronium or dog’s tooth is a bulbous plant with elegant flowering in small, lily-like flowers that appear from early spring, or even late winter. It is also called ‘dog’s tooth’ due to the shape of its bulb. It occurs naturally in France, but is rarely cultivated in gardens. This plant enjoys the cool atmosphere and humus-rich soils of woodland floors. For potting, therefore, you should aim to approximate these ideal conditions. Discover in this article how to grow this lovely little outdoor plant in a pot on patios or balconies.

Which varieties to choose?
All Erythronium varieties, these lovely spring bulbs, can be planted in pots. They typically reach 12 to 15 cm in height, but some reach up to 20 cm in height, such as the hybrids ‘White Beauty’ or ‘Pagoda’.
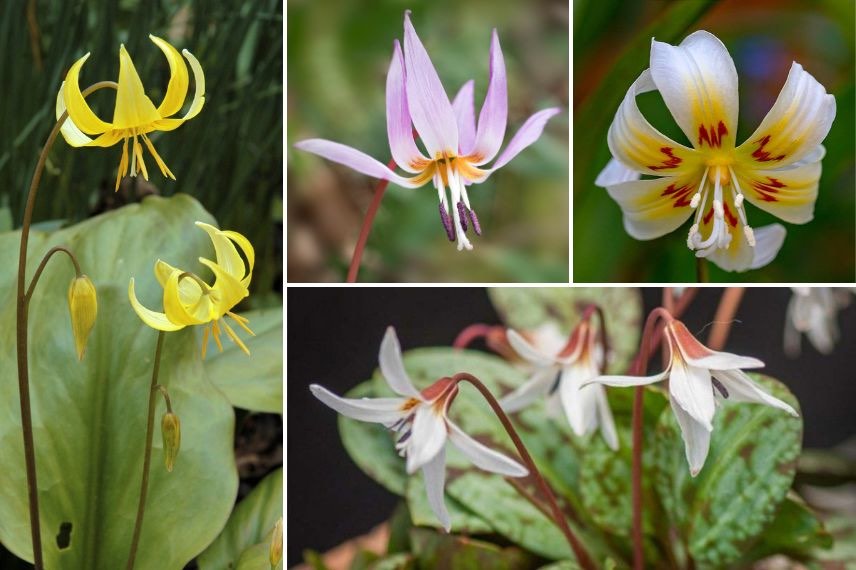
Erythronium ‘Pagoda’ on the left, followed by Erythronium dens-canis with pink flowers, Erythronium ‘White Beauty’ white with yellow markings, and Erythronium ‘Snowflake’ at the bottom
Read also
Erythronium : growing and careWhat type of pot? What size?
Choose a pot about 50 cm in diameter so you can plant around 5 bulbs, spaced roughly 8–10 cm apart, thus forming a harmonious clump. Ideally, the pot should be 25–30 cm deep, or more.
You can also plant three bulbs in a pot of smaller diameter.
Regarding the material: if you choose a terracotta pot, the bulbs are unlikely to rot, as the substrate will dry quickly in this porous material, but you will need to water more often, especially since Erythronium requires constant coolness.
In a plastic pot or another material, the substrate can stay moist at the bottom of the pot, without it being noticeable, because the surface of the substrate dries more quickly than the bottom. However, by using expanded clay balls at the bottom of the pot to drain excess watering and a fairly well-drained substrate, you can choose a plastic pot. You will water a little less often. In any case, the substrate of pots placed outdoors generally dries very quickly, except during periods of heavy and prolonged rainfall. In that case, shelter your pot to prevent bulb rot.
What substrate?
Pay close attention to the substrate for Erythronium: it must have very good water retention to keep the young plant cool without constant watering while providing adequate drainage to prevent bulb rot. Unlike most bulbs, this one does not tolerate drought even during dormancy (in summer). The substrate should also be rich.
With this in mind, choose a high-quality potting compost, with good water retention. This is indicated on the back of the bag or on the website. Take the highest percentage value. If you have well-decomposed compost available, add 30%. If you have leaf compost, it’s ideal for recreating forest-floor soil conditions. In this case, mix these three elements in a 1/3 each or add 30% leaf compost to your compost. You can also add 10% of perlite for drainage.
Plan drainage at the bottom of the pot using clay pebbles, of pozzolana or gravel. Also install a mulch for the top of the pot. Choose an organic mulch that will gradually decompose and enrich the substrate, such as the buckwheat husks.
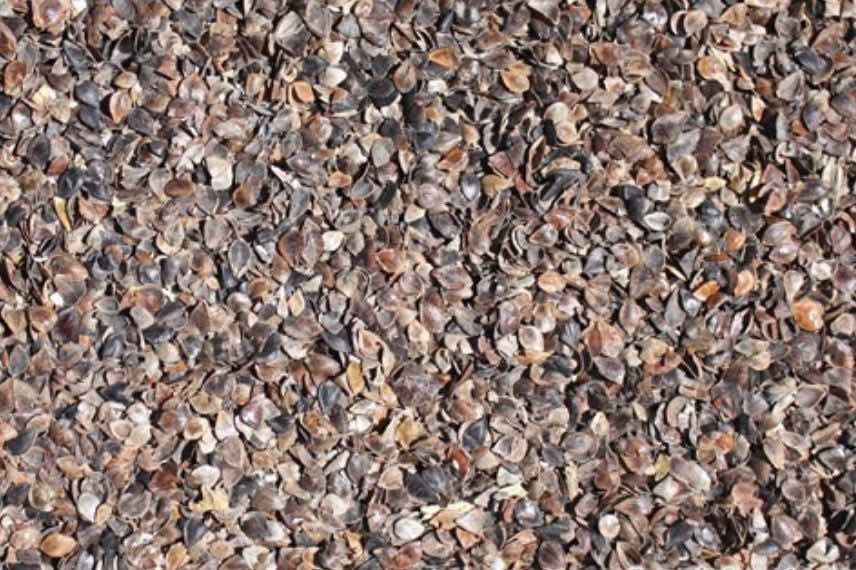
Buckwheat husks provide an interesting mulch, enriching humus as they decompose. They are also less palatable to slugs, the only potential enemy of Erythroniums
When and how to plant?
Plant your Erythroniums in autumn, between September and October. Plant them as soon as you receive them; they should not dry out or rot.
Proceed as follows:
- Pour a drainage layer of a few centimetres at the bottom of the pot in the form of clay balls, gravel or pozzolana.
- In a separate container, mix the different elements of the substrate.
- Add a little substrate to the pot.
- Place the bulbs at a depth of around 8–10 cm, spacing them 8–10 cm apart. They should be covered by soil to a depth of 2–3 times their height.
- Top up with the substrate, lightly firming it down evenly.
- Fill up to a few centimetres below the rim of the pot and tamp down once more.
- Water thoroughly.
- When the water has been absorbed, add a little more substrate if necessary, if gaps appear.
- After a few minutes, water again.
- Mulch to a depth of 3–5 cm.
Exposure
Install your pot in a half-shaded position, where the sun hours are not at their hottest. Ideally, it receives sun from morning through to noon, in an east to south-east exposure. Shade is provided by a wall, or by bushes that give shade that is neither too dense nor too sparse. As the potting mix dries out faster than garden soil, it’s better to have a little more shade than not enough.
In late winter and early spring, when the sun is mild, you can allow it a little more sun, which helps the plant start its vegetative growth well and to flower.
During hot summer spells, protect the plant further by placing the pot in the shade.
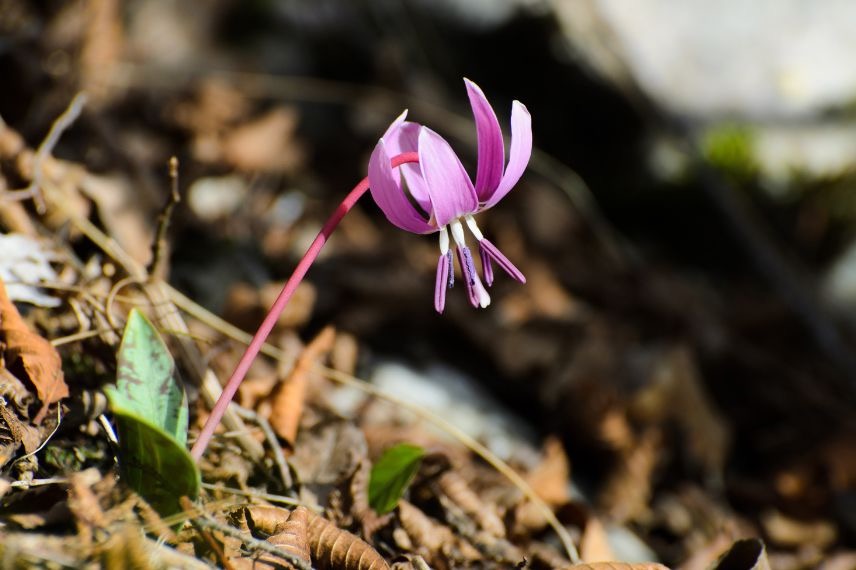
Erythronium enjoys partial shade and woodland soil rich in humus
Watering and fertilisers
After autumn planting, water sparingly, but enough to prevent the bulbs from drying out.
In wet weather, only heavy or regular rainfall will count towards watering. Regularly check the substrate moisture level.
From the start of growth, in late winter or early spring, water more often to keep the substrate cool and slightly moist.
During the summer dormancy period, continue to water to keep the substrate just moist.
Care
Your main maintenance task is to keep a close eye on watering and the right balance between moisture and drainage year-round.
Remove the flowers when they have withered to prevent seed formation, which would unnecessarily exhaust the plant.
Do not cut the foliage until it has withered to allow the bulb time to replenish its reserves during the summer dormancy.
In autumn, apply decomposed compost by raking it in at the base of the plants; this will help the bulbs bloom well the following spring.
In years when you do not repot your bulbs, add vermicompost on the surface and incorporate it also by raking.
After a few years, when the plant fills the pot, it is time to divide the bulbs to maintain good vigour. Dig up the bulbs and separate the bulblets before replanting.
- Subscribe!
- Contents

Comments