


A test of patience? A challenge? Depending on the gardener, sowing tiny seeds can be perceived differently. Nevertheless, this sowing requires a meticulous approach and well-mastered techniques to ensure optimal germination rates. The success of this sowing often relies on careful preparation, precision in the action, and controlled environmental conditions. We explain everything.
Preparing for Sowing
Meticulous preparation is the first step to maximise your chances of success. It concerns both the seeds themselves, the substrate, and the sowing equipment.
The Right Seed, Well Prepared
Before sowing, you must ensure the viability of the seeds. Micro-seeds often have a shorter lifespan than larger seeds. It is preferable to use seeds from the current year or to carefully check the expiry date.
If you have doubts about certain seeds, it is always possible to conduct a germination test.

Preparing the Substrate
The substrate is the immediate environment of the seed and plays a crucial role. It must meet three requirements: be sterile, fine, and well-draining.
- Either use a standard sowing compost that must be sifted to remove pieces of wood or bark that could hinder seedling emergence.
- Or create your mix with 50% blonde peat or coconut fibre for water retention and 50% perlite or vermiculite for drainage and aeration.
The substrate should be moistened before sowing with a light spray of water.
Sowing Equipment
Opt for shallow but wide containers, such as trays or terrines, to maximise the available surface area. The bottom must be pierced for proper drainage.
Sowing Techniques
The major challenge with micro-seeds is to distribute them evenly and not bury them.
Surface Sowing
By definition, tiny seeds have very little energy reserves. If they are buried, even by a thin layer of substrate, the seedling will not have the strength to reach the light, resulting in sowing failure. Therefore, these tiny seeds are almost always sown on the surface, exposed to light, or lightly pressed against the substrate. In this case, simply compact the substrate slightly with a board.
Technique for Spreading Seeds
The difficulty is to avoid sowing all the seeds in one spot and leaving others bare. Simply mix the seeds in a small bowl with fine sand, fine semolina, or sifted vermiculite. Then use a small salt shaker to sprinkle the mixture over the surface of the substrate.
Covering the Seeds
After sowing, do not cover the seeds with compost. If a cover is necessary, use:
- Fine vermiculite: This is the best choice. It is sterile, retains moisture, and allows light to pass through. A thickness of 1 to 2 mm is sufficient.
- Fine, sterile sand: A thin layer can help keep the seeds in place.
The Environment for Seeds
Micro-seeds require constant humidity, good ventilation, and often, regular warmth to germinate.
Maintaining Humidity
Maintaining stable humidity without ever over-saturating is the most challenging task. Even top watering with a sprayer is not suitable. It displaces the seeds and buries them. How to do it?
- Place the sowing tray on a capillary mat or in a shallow tray
- Pour water into the tray. The substrate will absorb the water by capillarity without disturbing the surface.
- Remove excess water after 30 minutes to avoid waterlogging.
- Cover the terrine with a transparent lid or plastic film (held by an elastic band) to create a greenhouse effect, which retains moisture.
Heat and Light
The germination temperature varies by species (often between 18 and 25 °C). This is why using a heating mat is recommended to provide gentle and constant warmth from below. A thermostat is advisable to prevent overheating.
From the moment of sowing, seeds need plenty of light. Placement under LED grow lights is often more effective than sunlight through a window, which is less intense and can lead to etiolation (seedlings stretch in search of light, becoming leggy).
Preventing Damping Off
The warm and very humid environment, while necessary for germination, is ideal for the development of pathogenic fungi.
- As soon as the first seedlings appear, it is imperative to start ventilating. Remove the lid for a few hours each day and gradually increase the ventilation time.
- Adding a bit of crushed charcoal to the substrate can help inhibit the growth of fungi and moulds.
Care After Sowing
Once the seed has germinated, the most delicate task remains: nurturing the young plant.
Hardening Off
Seedlings must be hardened off to prepare them for the dry air and temperature fluctuations of the outside environment or the room. Gradually expose them to longer periods without a lid over one to two weeks. Slightly reduce watering. You can also place them outside, if temperatures are sufficient, only during the day and in the shade.
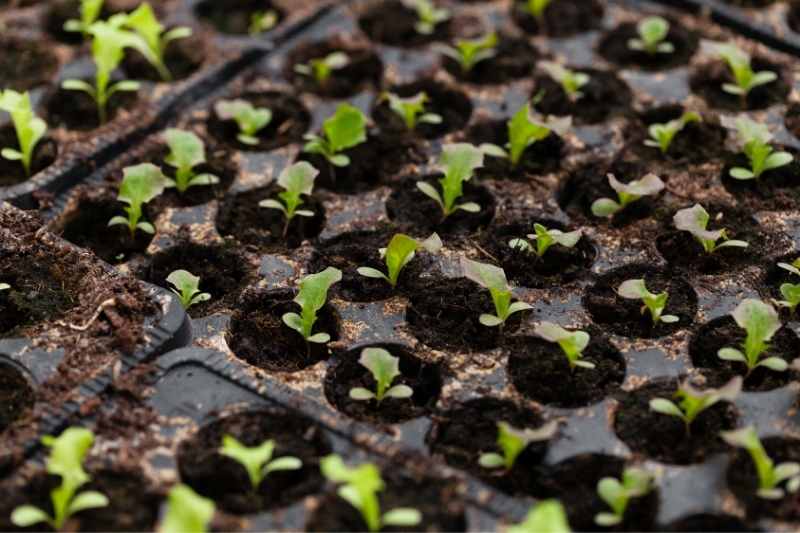
Transplanting
Transplanting seedlings is the riskiest moment due to the fragility of young roots. It should be done as early as possible, ideally when the seedlings have developed their first two true leaves (after the cotyledons).
- Use tweezers, a small dibber, or a cut plastic label to gently lift the seedlings. Always hold them by a leaf (never by the stem or root).
- Create a small hole in the new pot, plug, or plug plant, filled with special sowing compost.
- Place the seedling, ensuring that the roots do not curl.
- Gently firm the substrate around the stem.
- Water immediately from below with water, and you can add a very diluted fertiliser, at a quarter of the recommended dose.
- Stick to bottom watering, but space it out. Allow the surface of the substrate to dry slightly before watering again.

Comments