


How can you transform fallow land into a productive vegetable garden?
Step by step, discover how to create a vegetable garden on fallow land as efficiently as possible
Contents
To your great delight, you have bought a beautiful house built on a magnificent plot of land. And inevitably you soon fancy transforming this land with flower beds, hedges, and borders… and above all a vegetable garden to feed your family. But for now, your dreams of lavish harvests of colourful vegetables must face reality: your plot more closely resembles a virgin forest or a jungle than a lush, well-kept little vegetable garden.
Roll up your sleeves, sharpen your tools and steel yourself—you’ll need to get to work to create the vegetable garden of your dreams. There will be effort to put in, but it will be rewarded by the taste of vegetables and soft fruits with an unmistakable flavour.
Discover all our advice, tips and tricks to transform this neglected plot into a vast and productive vegetable garden.
Before you embark on the major works, be sure to read Aurélien’s article: Starting your first vegetable garden — A guide for beginners.

First step: observation and thinking
Yes indeed, before you start working the soil, you’ll need to put your little grey cells to work and, above all, observe carefully what you see on this fallow ground. Indeed, it can be a valuable source of learning if you examine its make‑up. At first glance, you may not notice much beyond weeds, tangled brambles, shaggy bushes, a carpet of moss… But behind this apparent disorder, which one might describe as fallow, lie wild species, native to the local flora that have grown spontaneously, or less wild species perhaps planted by the previous owners, and concealed by weeds and brambles.
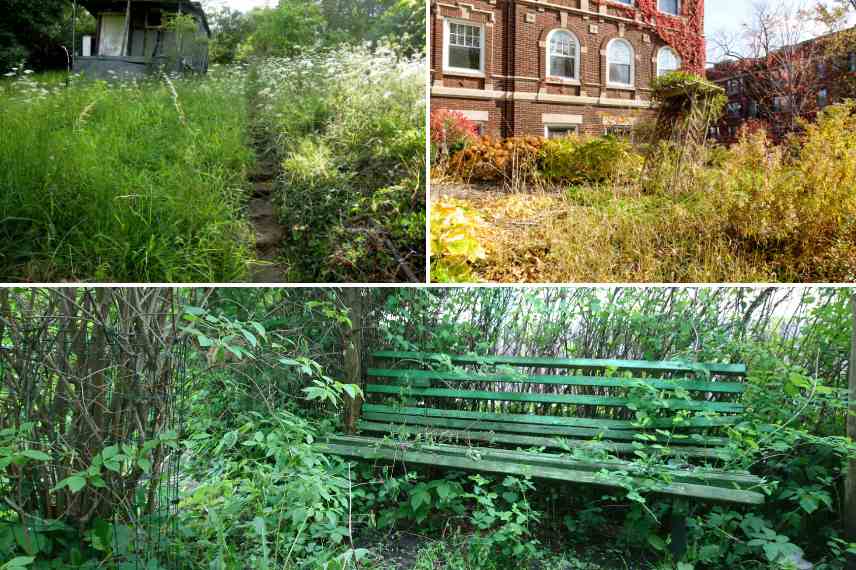
Before clearing a fallow patch to create a vegetable garden, it is essential to identify the plants, bushes and trees that grow there
That is where my first piece of advice comes in: before clearing at random, brandish your plant identification app (or your ten-volume encyclopaedia) to identify the species present on this fallow patch. They all may have their place. Thus, the weeds or adventives that seem to taunt you are not there by chance. We can indeed call them bio-indicators. If they have developed in your future vegetable garden, it’s because they found the ideal conditions there, including the soil. They indeed carry information about the nature of the soil, its texture, but also its health, its deficiencies… So listen to them; they reveal a few secrets about your site. To learn more about these plants, I invite you to read my article: Bio-indicator plants: what are they? These weeds that reveal a great deal about the soil in our garden. This does not preclude you from carrying out a Precise soil analysis. This soil analysis will also help detect signs of potential pollution from toxic substances, heavy metals…
If you also discover a few perennials, bushes or trees, it may be a good idea to keep them. Indeed, they have taken many years to establish themselves and grow. Some may harbour exquisite, fragrant and generous flowering, or even edible fruiting. Some bushes may even prove useful for providing a little shade in your vegetable garden.
Once this identification work is done, outline the concise boundaries of your future vegetable garden, taking into account the species you have kept. And do so in order to clear the area intelligently and efficiently.
Step two: clearing scrub
Now we get down to business. No more contemplation, time to act! You have selected the plants, shrubs and trees to keep, but you need to clear space to install your vegetable plot. And that’s when we’ll bring out motorised machinery or simply hand-cutting tools. The choice is yours. However, note that it’s not worth buying a full gardener’s kit right away; calling on a neighbour can be considered (it’s, by the way, an excellent way to introduce yourself by telling them you want to transform this fallow that spoils the landscape into a pretty garden), as well as renting equipment that might only be needed once.
To clear effectively your fallow land and tackle the tangled thickets, you logically need a brush cutter or hand tools such as the scythe, the hoe or the branch cutters. If the brush cutter, ideal for large areas, greatly reduces effort, it can be dangerous for those who do not know how to handle it. As for using manual tools, they are often chosen for environmental, ethical or ecological reasons. Again, choice is yours, but blisters on hands, backache, or thorns that scratch your arms are likely to tilt the balance in favour of the brush cutter. Moreover, it is the most effective for tackling bramble patches. Don’t hesitate to read Olivier’s article to learn more: Which tools to use for clearing brush?
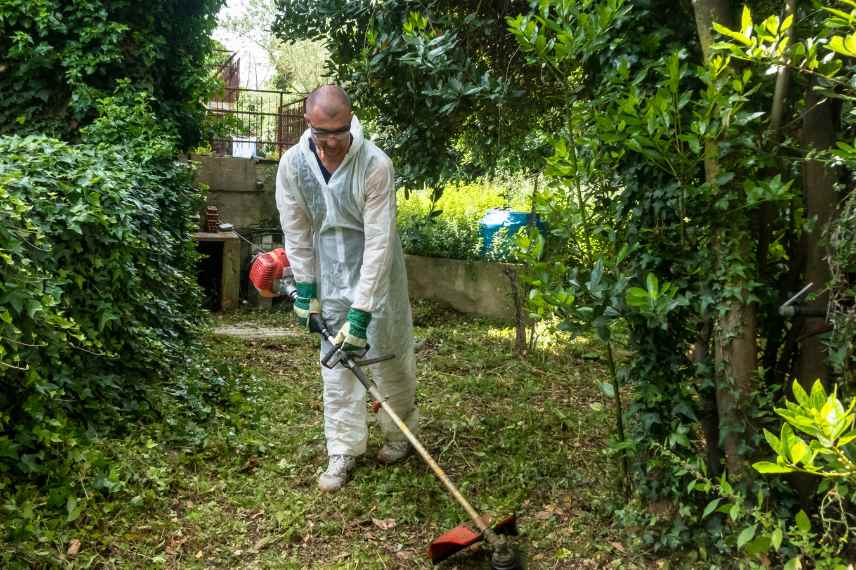
The brush cutter is ideal for clearing a fallow, but it must be handled with care
Once all unwanted weeds are cut, make several piles (gloves on!). The brambles will be taken to the tip, the weeds and nettles set aside to feed future compost, the small branches chipped with a shredder to produce RCW. If investing in a brush cutter isn’t mandatory, it may be for a shredder. Jean-Christophe explains everything: Wood chippers: usefulness, different models, choice.
The final step is simply to run the lawnmower to level the remaining meadow.
Obviously, I forgot to mention that any use of weedkillers, even natural ones, must be avoided to safeguard fertility in your future vegetable plot.
Step three: work the soil
-
- This time, we reach the key step which consists of removing the last traces of fallow and working the soil. In this regard, three options are available to you, to choose from depending on your ethics, your taste for hard graft or simply the season. The essential thing is to eliminate the last weeds and their root system and to prepare the soil to receive plantings:
- If you carried out your clearing work in autumn, the simplest way to weed is to cover your area for the whole winter, with cardboard, an opaque plastic sheet, an old floor covering, an old oilcloth… or better still, a thick layer of straw which will form a covering mulch. From then on the weeds die because they are deprived of air and light and decompose. And in spring, the soil is weed-free
- If you dread backache and twinges, or if your physical condition does not permit digging, the use of a rotavator is essential. It will turn the soil quickly and efficiently, and above all deeply (30 to 50 cm). However, it has non-negligible drawbacks for soil fertility. Indeed, the rotavator completely disturbs the soil structure and thus its balance, and by extension the micro-organisms such as earthworms. Moreover, it tends to shred and scatter roots, which can be a major drawback for couch grass or bindweed. Nevertheless, it remains indispensable for turning over large areas
- If you are motivated and full of courage, the third option is for you. You will need to dig manually this future vegetable garden. For this, again, there are different approaches. Some will use the traditional spade or the digging fork, recommended for heavy soils, and turn the soil directly. Others cut the surface of the grass to 5 to 10 cm with a hoe, then use the grelinette or the biofork to aerate the soil without turning it, and thus preserve its balance… and those who live in it.
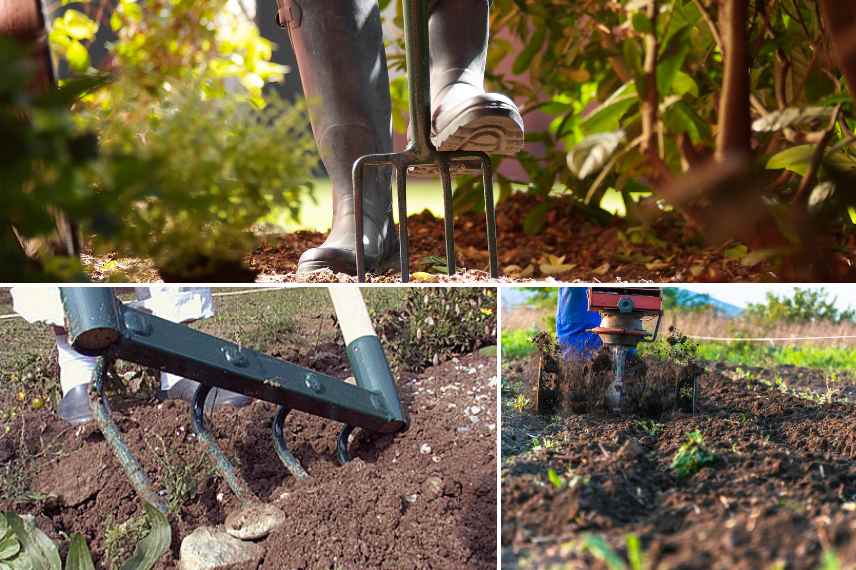
After clearing, onto soil work, with a digging fork, with a biofork (©Giradin Wikimedia) or a rotavator
Once this step achieved, you can start to breathe and get happy. You have done most of the job! We even recommend you rest at least two weeks before coming back to the kitchen garden. Take advantage of this resting time to:
- Draw up a final plan on paper for your vegetable garden, planning the pathways and taking into account companion planting in the vegetable garden
- Buy packets of vegetable seeds to sow, under cover or in the open ground, the vegetables that will brighten your summer
- Acquire the essential tools for the vegetable garden
- Prepare the manures and decoctions which should help you combat any diseases and pests
- Install your compost and your rainwater collectors (near the vegetable garden)
Fourth step: refine and fertilise the soil
After two to three weeks’ rest, it’s time to return for a look at your freshly turned soil. It’s high time to get back to work. By the way, a few (many) adventive weeds have appeared. So, the first thing to do is weed again to remove the most recalcitrant ones. Sure, it’s still hard work, but the more thorough this weeding is, the more productive the soil will be. Take this opportunity to remove the stones that can also hinder the growth of the smaller seeds.
Next, you’ll need to prepare this soil so that it can accommodate the first sowings and plantings. You’ll therefore break up the largest clumps, scratch and rake to level and refine the soil.
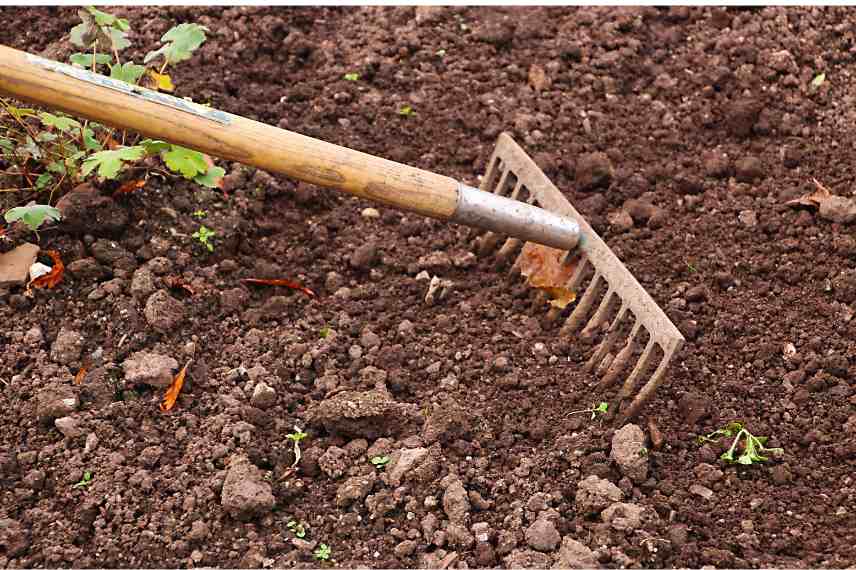
The final step is to weed, level and nourish the soil
Next comes the fertilisation of this soil. A good supply of compost or well-decomposed manure well-decomposed manure is important to enrich the soil and provide the nutrients necessary for the growth of vegetables. It is enough to spread it over the soil and give it a final pass with the rake to incorporate it into the surface layer of the soil. If you cannot obtain compost or decomposed manure, there is granulated manure granulated manure very easy to incorporate into the soil.
Once this work is done, you can take a deep breath… before sowing your first seeds and launching your first plantings.
- Subscribe!
- Contents

Comments