


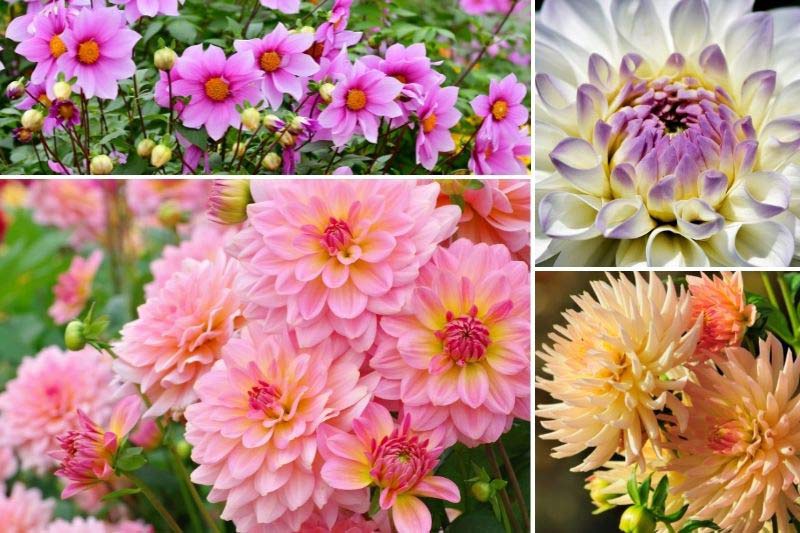
"Pompon and ball", "collarettes", "single-flowered", "giant" or "dwarf"... The Dahlias are garden staples, valued for their long flowering period (June–July to September–October) and for the range of shapes, colours and sizes they offer gardeners.
Offering a multitude of blooms and colours, Dahlias can be easily propagated
Dividing Dahlias
Dahlia is a perennial with tubercle roots, swollen and gathered in vascular bundles. Dahlia enthusiasts are well familiar with this root system, because this member of the family Asteraceae, native to warm regions of Central America, is frost-sensitive. In most areas, tubercles must therefore be lifted and stored for winter and the starches, sugars and minerals stored inside will help plant survive overwintering. They are replanted in early spring once frost risk has passed, possibly brought into cultivation under cover a month earlier to hasten growth. Division therefore takes place once tubercles have been lifted.
Dividing a dahlia stump has two advantages:
- it allows multiplication of number of plants
- it rejuvenates plants so they become more floriferous
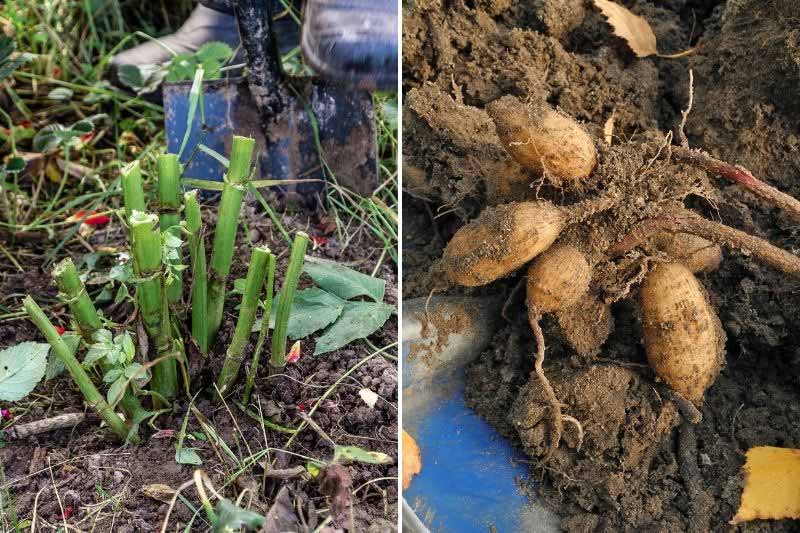
After flowering, Dahlias are lifted to spend winter sheltered from frost. Right: detail of tubercles
How to divide dahlia tubercles?
Be careful: this is not about separating individual tubercles to replant them later; Dahlias are not potatoes and eyes (buds) do not appear directly on these tubercles. They develop at the crown, the base of the stem just above. Make sure to leave a section of stem and dormant buds on each cut piece, because a tubercle cut without any bud at its base will not regrow.
When to divide dahlia tubercles?
You can divide Dahlias in autumn when you bring them in for winter, or in spring before replanting them.
- Divide dahlia in autumn
- Divide dahlia in spring
Tools needed to divide Dahlia
- a knife
- a pruning shear
- terracotta pots or sufficiently deep crates
- potting compost or soil mixed half with coarse sand to obtain a free-draining substrate
- a small hand trowel
- a pencil and labels
Steps to divide Dahlia
- If dividing in spring from March, take Dahlias out of winter storage. If working in autumn, lift them as you would when wintering them;
- Cut back faded stems with pruning shear;
- Using a previously disinfected knife, cut stump of Dahlia down the middle between two stems, ensuring pieces include eyes (buds);
- Separate pieces taking care not to damage tubercle roots;
- Divide as many times as possible according to number of plants desired, always ensuring pieces include eyes;
- Plant the resulting stumps directly in ground after last frosts or start them in pot or tray under cover, covering with potting compost or soil/sand mixture if dividing in spring. For autumn division, overwinter tubercles as usual;
- Note variety names on labels.
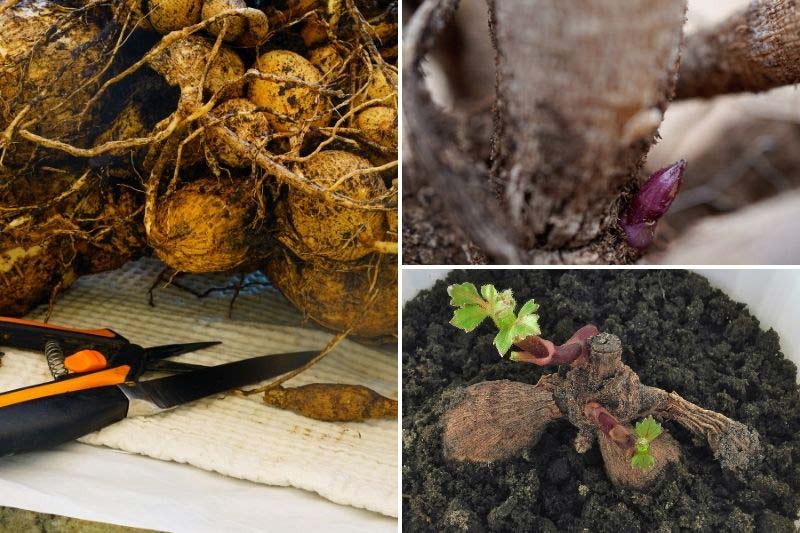
Tubercles lifted from ground should be divided keeping at least one eye on each section. Detail of an eye top right. Divided tubercle forming new buds bottom right
→ Find our tips to then plant Dahlias like a pro
Propagating Dahlias by cuttings
Propagation by cuttings is an excellent method to regenerate a stump and obtain new Dahlia plants which multiply easily this way. Propagation by cuttings produces more plants than division, as you get one plant per cutting. This method also avoids disease transmission, often harboured in tubercles.
When to take cuttings from Dahlia
Propagation by cuttings can be done in spring, when Dahlias produce first shoots, or later in summer.
Tools needed to take Dahlia cuttings
- knife or pair of scissors
- plastic pots about 20 cm
- a rooting activator (facultative)
- potting compost or soil mixed half with coarse sand to obtain a free-draining substrate
- a stick
- a pencil and labels
Steps to take Dahlia cuttings in spring
- Fill pot with light compost (seed and cutting mix);
- Using a knife, take cutting with a small piece of tubercle (as for a heel cutting);
- Trim cutting and cut all leaves in half with knife or scissors to limit evapotranspiration;
- Dip base of cutting in a little rooting activator powder;
- Make a hole with stick around pot edge and insert cutting;
- Firm slightly to ensure compost adheres to cutting, water;
- Repeat for remaining cuttings and don’t forget to label!
Steps to take Dahlia cuttings in summer
- Cut shoots about 10–15 cm at axil of flower stems;
- Cut all leaves in half;
- You can dip base of stems in rooting activator solution to encourage root development and increase success rate;
- Fill pots with compost;
- Plant cuttings around pot edge;
- Summer heat can dry cuttings; we recommend taking cuttings under cloche and keeping them in a shaded place;
- Water regularly; do not let compost dry out.
Rooting takes place after about 3 weeks, after which you can pot on cuttings individually for planting in garden the following spring.
Sowing Dahlias
There are two main types: large-flowered tubercle Dahlias and dwarf bedding Dahlias, easily reproduced by sowing. Although less commonly used, sowing is a very economical way to multiply Dahlias. We offer a fine selection of Dahlia seeds to try this technique. Varieties for sowing are less diverse, but flower as generously as tubercled types and remain about 50 cm tall, making them valuable for container growing or front of borders.
When to sow Dahlias
Tools needed to sow Dahlias
- Dahlia seeds
- pots or seed tray
- seed compost
- a small hand trowel
- a pencil and labels
Steps to sow Dahlias
- Fill pots or trays with compost;
- Sow seeds and cover with 1.5 mm of fine compost;
- Keep moist regularly, allowing to dry slightly between waterings;
- Transplant seedlings into larger pots when big enough, taking care not to damage roots;
- Harden off these seedlings gradually, and plant out in garden or in outdoor pots when all risk of frost has passed, spacing at 30 cm;
- Water thoroughly then continue regular watering for first 6 weeks to help rooting.
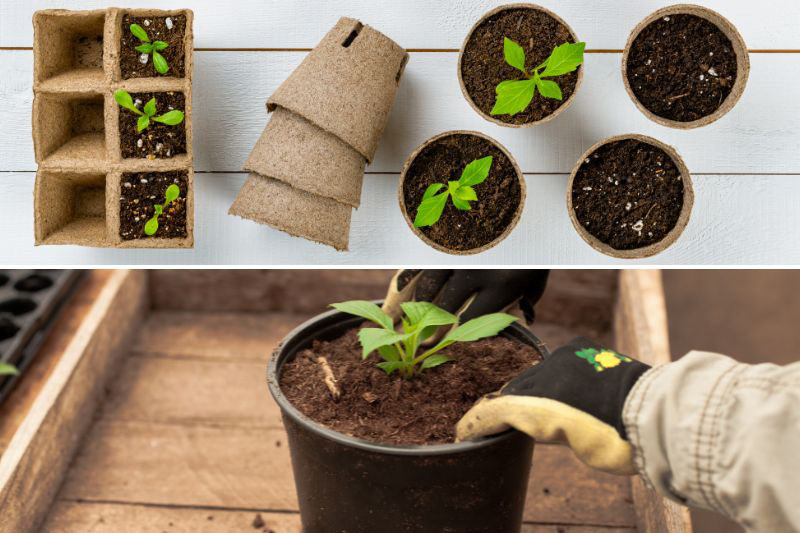
Young seedlings will be potted into larger pots then planted outdoors, in large containers or in ground.
Also read our tutorial How to sow dahlias?
→ Find all our sowing equipment


Comments