


Shield graft with a dormant eye: why and how?
An essential technique to successfully propagate your plants
Contents
Shield graft with a dormant eye is an indispensable graft technique for propagating plant varieties of plants while preserving their unique characteristics. Ideal for fruit trees such as apple trees, pear trees or plum trees, as well as for ornamental plants such as roses, this technique allows robustness to be combined with yield. Easier to perform than you might think, shield graft with a dormant eye offers a high success rate.
→ In this guide, discover all the steps, tips and mistakes to avoid to succeed with grafts and propagate your own preferred varieties and cultivars.

What is shield grafting with a dormant eye?
Dormant-eye shield grafting is a horticultural technique that involves inserting a bud (called an ‘eye’) taken from a variety of tree or plant (the scion) into an incision made on another tree or plant (the rootstock).
- The ‘dormant eye’ designates a bud that does not develop immediately after grafting, but remains inactive until the following season, usually in spring.
- This method takes its name from the shield-shaped appearance of the bark piece containing the grafted bud.
It is particularly valued for its precision and its adaptability to many species, notably fruit trees and certain ornamental plants.
Why using this grafting method?
Dormant-eye shield grafting is used to achieve several objectives, including:
- Reproduce a variety accurately: it allows multiplying plants or trees while preserving the scion’s specific genetic characteristics (size, fruit flavour, disease resistance).
- Strengthen a plant: by grafting onto a robust rootstock well suited to local soil or climate, vigour and yield of the grafted plant improve.
- Restore a tree: at times, grafts are performed on existing trees to change variety or to save a weakened tree.
- Experimentation and hybridisation: this method is used in horticultural research to test new combinations of scion and rootstock.
Dormant-eye shield grafting is ideal for fruit trees, such as apple trees, pear trees, plum trees or citrus trees. In ornamental use, one might consider roses, magnolias, flowering Cornus or ornamental cherry trees for this type of grafting.
Advantages: Why choosing this technique?
Dormant-eye shield grafting offers numerous advantages that explain its popularity among both amateur and professional gardeners:
- Simplicity: compared with other grafting techniques, it is relatively easy to master, even for a beginner.
- High success rate: when ideal conditions are met (season, clean equipment, plant compatibility), this technique provides excellent take.
- Respect for the plants: the ‘T’ incision and minimal handling of the scion reduce stress for both parties, increasing the chances of success.
- Economy of scions: a single shoot can provide several buds, making this method particularly economical.
- Versatility: suitable for a wide variety of species, whether fruit trees like apple, pear or peach, or ornamental plants like roses.
Historical context: origins of the technique and its evolution
Grafting is an ancient practice, used by human civilizations for thousands of years to improve crops. Earliest references to grafting date back to the time of the Babylonians and Egyptians, who already used rudimentary techniques to cultivate fruit trees. However, shield grafting became especially popular in monastic gardens and noble orchards, particularly in Europe, where it was used to cultivate desirable fruit varieties.
Then, with the rise of botanical sciences in the 18th and 19th centuries, the shield grafting technique was refined and better documented, becoming a standard method for orchardists. Today, this grafting method is widely used, both in commercial contexts (orchards and nurseries) and by amateur gardeners. Modern innovations in equipment and tools have further simplified the practice.

Read also
Buying a grafted tree: for or against?Understanding the basics of shield grafting
Definition and role of the dormant eye
A dormant eye is a bud located on a stem or branch that remains inactive for a period before developing. In shield budding, this eye is taken from a scion to be inserted into a rootstock.
- Natural dormancy: the dormant eye does not develop immediately after grafting, but remains on standby until the next season, usually in spring. This characteristic allows it to adapt to conditions and begin growth at an optimal moment.
- Role in grafting: it acts as the starting point for the development of the new plant. Once awakened, it gives rise to a shoot that will carry the characteristics of the grafted variety.
Difference from the vegetative eye
The vegetative eye, unlike the dormant eye, is active and develops immediately or shortly after its formation. Here are the main distinctions:
- Dormant eye:
- In dormancy after grafting.
- Reserved for long-term growth, typically in the following spring.
- Suitable for grafts carried out in late summer or early autumn.
- Vegetative eye:
- In active growth, forming shoots and leaves rapidly after appearance.
- Often used in other grafting types, such as shield budding with an actively developing eye.
Dormancy of the eye is crucial in shield budding, as it allows grafting to take place at a time when sap is still flowing, but the eye is not stimulated to grow immediately.
Fundamental principles of grafting
Graft success rests largely on optimal compatibility between the rootstock (the receiving plant) and the scion (the donor plant):
- Genetic compatibility:
- Both plants must belong to the same botanical family (for example, a pear tree grafted onto a quince in the Rosaceae family).
- A close compatibility within the same species improves the success rate (e.g.: two varieties of apple).
- Specific roles:
- Rootstock: provides a root system adapted to the soil or local climate, as well as potential disease resistance.
- Scion: bears the desired characteristics, such as fruit or flower quality.
Conditions for success
Several conditions must be met to maximise chances of success:
- Ideal season:
- Shield budding with a dormant eye is generally performed in late summer or early autumn (July to September depending on region).
- At this time sap is still flowing, making the rootstock bark easy to lift to insert the scion.
- Health status of the plants:
- Plants must be healthy, with no signs of disease or water stress.
- The scion must be taken from a vigorous tree.
- Clean, well-sharpened tools:
- A disinfected and well-sharpened grafting knife is essential for clean, precise cuts, reducing infection risks.
- Perfect cambial contact:
- The cambium (the thin layer of cells dividing just under the bark) of the scion must be in direct contact with that of the rootstock. This contact is essential for the graft to take and for the tissues to fuse properly.
- Protection of the graft:
- Proper binding and a supportive environment (protection against excessive heat or inclement weather) ensure graft success.
Materials and preparation of rootstock and scion
Equipment required
- Grafting knife : it must be sharp for clean, precise cuts. Regular maintenance (cleaning and sharpening) ensures its longevity and reduces the risk of contamination.
- Ligatures : natural raffia, grafting tapes or specialist elastic bands to hold the graft in place. Prefer biodegradable materials to avoid having to remove them later.
- Grafting wax: optional, but often useful to protect the graft from moisture or infection.
- Disinfectants : alcohol or specific solutions to sterilise tools and wash hands, thereby preventing the spread of disease.
Plant preparation
- Rootstock selection :
- Choose a species that is compatible and well-suited to the climate and soil conditions.
- The rootstock must be healthy, undamaged, and have a sufficient diameter (usually between 0.5 and 2 cm).
- Graft selection :
- Take from a vigorous, disease-free mother branch.
- The graft should have a well-formed eye, from the current year’s growth.
Read also
What is a grafting knife used for?Ideal timing and conditions for shield grafting
Best season for the dormant-eye graft
The optimal period lies between July and September, depending on the region. This period corresponds to a phase when sap is still flowing abundantly, facilitating the lifting of the bark. The dormant eye will have enough time to heal before the arrival of winter.
Optimal climatic conditions
- Temperature :
- A moderate temperature (20–25°C) promotes healing.
- Avoid heatwaves or early frosts.
- Humidity :
- Adequate ambient humidity (minimum 60%) prevents the graft from drying out.
- If necessary, water the soil lightly to maintain adequate moisture.
- Exposure :
- Carry out the graft on a side of the rootstock that is not directly exposed to the afternoon sun to prevent drying out.
The shield grafting process in detail
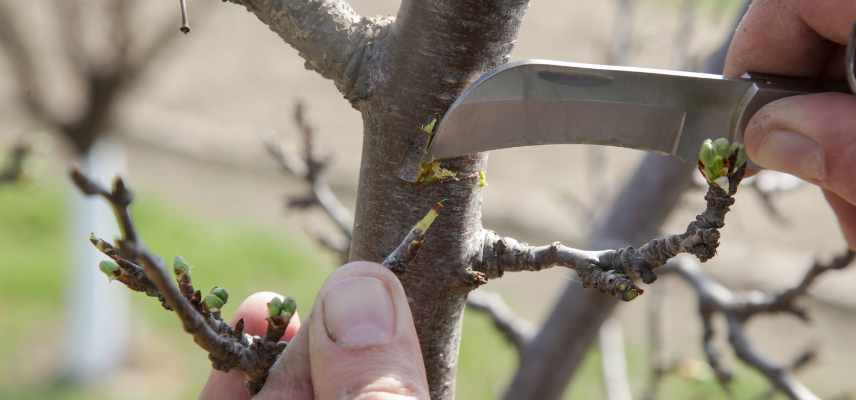
Step 1: prepare the rootstock
- Choose the ideal spot :
- Identify a smooth, knot-free area, usually on a young branch or on the trunk.
- The diameter of the rootstock should be between 0.5 and 2 cm for easy handling.
- Make the “T” cut :
- Using a grafting knife or grafting tool, make a vertical cut 2–3 cm long, then a short horizontal cut at the top to form a “T”.
- Gently lift the edges of the bark with the spatula to create a pocket, taking care not to damage it.
Step 2: take the graft
- Extract the eye with its shield :
- Cut a bud (eye) on a grafting branch with a thin layer of bark and wood underneath, forming a small lamella called a shield.
- Check the cambium :
- Ensure the cut portion is green, moist and healthy, indicating an active cambium.
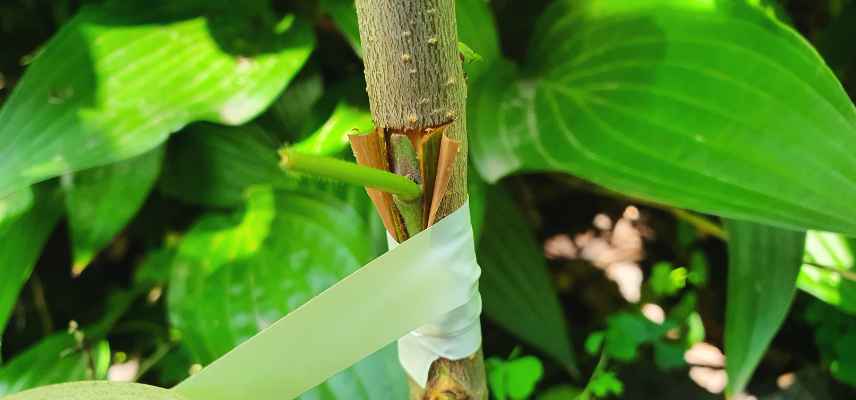
Step 3: insert the graft
- Position the graft :
- Slide the shield under the bark lifted by the “T” incision.
- Ensure the eye protrudes slightly above the top of the incision to avoid it being smothered.
- Ensure cambial contact :
- The cambium of the graft (the thin green layer under the bark) must be in direct contact with that of the rootstock for the graft to take.
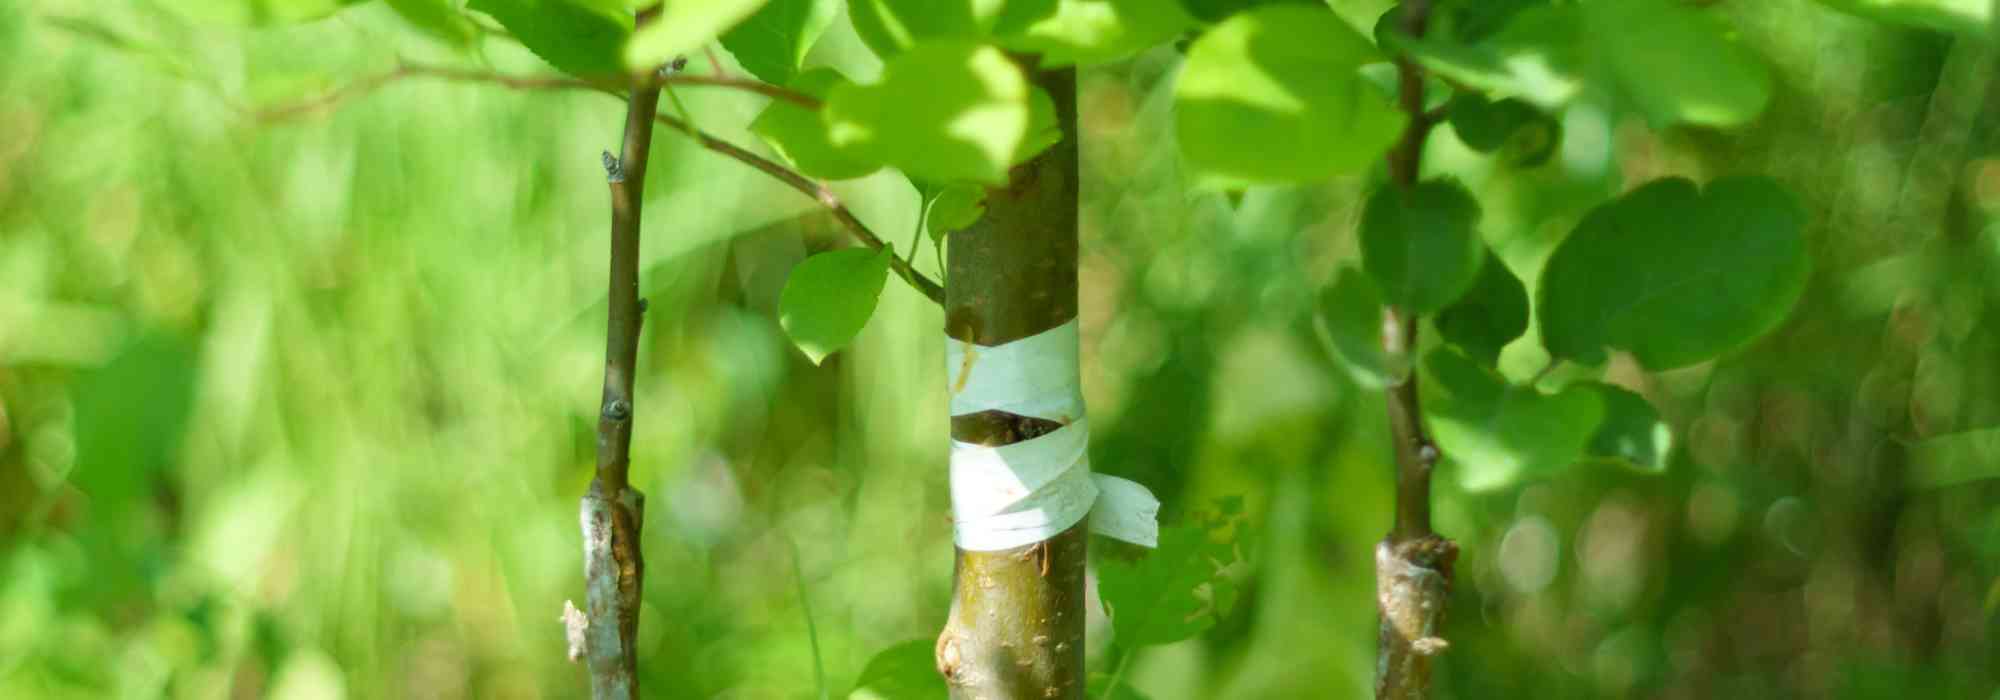
Step 4: tie
- Apply a ligature :
- Use raffia, a grafting tape or a rubber band to hold the graft in place.
- Wrap tightly without crushing, covering the entire incision to prevent air or water from seeping in.
- Ensure watertightness :
- The ligature should protect the area while allowing a slight sap flow in the rootstock.
Post-graft monitoring
Graft take check
The success of a shield graft with a dormant eye does not fully become apparent until several weeks or even months later. Here are the elements to monitor to assess graft take:
- Graft appearance: a living graft maintains a green and firm appearance. The dormant eye remains intact, does not dry out, and may even swell slightly.
- Healing: the incision made on the rootstock begins to close gradually around the shield, indicating that the tissues have fused.
- Spring development: when the following spring arrives, the dormant eye awakens and produces a new shoot, confirming the graft take.
If the graft dries out, turns brown or black, or if the incision does not heal properly, this indicates a failure. The graft can also detach easily. Ensure the tools used were clean and that the technique was carried out correctly. If the graft fails, you can retry on another part of the rootstock or wait for a more favourable period.
Care and maintenance
- When should the binding be removed? The binding should be removed about 2 to 3 weeks after grafting, once the shield is well secured.
- Why is it important? If it is forgotten, the binding can strangle the growth of the graft and the rootstock, causing irreversible damage.
- Pruning the rootstock to stimulate the graft: Pruning helps reduce competition between the graft and the other shoots on the rootstock, thereby redirecting the plant’s energy toward the graft. Prune the rootstock just above the graft as soon as the latter begins to develop in spring.
Common problems and solutions
Why was my graft rejected?
- Cause: graft failure usually occurs due to poor contact between the cambium of the scion (the thin green layer beneath the bark) and that of the rootstock. An incompatibility between the two plants may also be the cause.
- Solution: review your grafting technique to ensure optimal contact between the cambium layers. Also check that grafted plants belong to compatible species.
Why did my graft dry out?
- Cause: an environment that is too dry or an inadequately protected graft can lead to the graft drying out.
- Solution: protect the graft with a shade cloth or a perforated plastic bag to retain humidity. Also ensure the soil around the rootstock stays slightly moist.
What should I do if my graft is infected?
- Cause: infections are often due to unsterilised tools or exposure of the graft to pathogenous agents.
- Solution: Always disinfect your tools with alcohol or an appropriate solution before grafting. After grafting, apply a protective grafting sealant to the area to limit the intrusion of diseases or insects.
- Subscribe!
- Contents

Comments