Propagation by cuttings: everything you need to know about the different techniques and our advice
to propagate your plants easily
Contents
Propagation by cuttings is an effective, fairly simple and quick technique for multiplying plants. Unlike sowing, the resulting plant is exactly identical to the original plant… it is, in a way, a “clone”. This technique is therefore particularly useful for propagating horticultural varieties, which could otherwise lose their characteristics when reproduced by sowing (colours and forms may vary…). Propagation by cuttings makes use of one of the characteristics of plants: their exceptional ability to recreate a complete organism from a simple fragment (stem, root, leaf…)! Discover all our advice for successfully propagating your plants by cuttings: when to take cuttings, which technique to use, what conditions improve their establishment…? And to get started, do not hesitate to consult our selection of 15 very easy plants to propagate by cuttings!
When to take cuttings: the calendar
To take successful cuttings, you need to use the right technique at the right time, following this calendar:
- Herbaceous cuttings are taken in spring, usually in May-June, from young, tender green stems
- Semi-ripe cuttings are taken in mid to late summer, from July to the end of September,
- Hardwood cuttings are taken in late autumn and winter, between November and February
- Leaf cuttings can be taken throughout the year, but the most favourable times are spring and early summer
- Root cuttings are taken when the plant is dormant, in late autumn and winter.
Read also
15 very easy plants to propagateTaking cuttings: general information and preliminary advice
In all cases, before taking cuttings, make sure you use clean, sharp tools to avoid transmitting diseases. Likewise, it is important to make clean cuts.
Choose healthy, well-formed stems (or leaves, roots…) with no signs of disease. They must not bear flower buds, flowers or fruit (if they do, remove them, as they use up energy that the cutting needs to focus on root development rather than flowering or fruiting).
You can use a plant hormone for propagation by cuttings to encourage rooting. Simply dip the base of the cutting in the plant hormone.
It is important to use a free-draining, light, airy growing medium. It can consist, for example, of potting compost and sand, or potting compost and perlite. If you use a growing medium that is too heavy, compact or water-retentive, the cutting may rot.
Once propagation by cuttings is complete, make sure the growing medium remains slightly moist (it must not dry out), without becoming waterlogged, and that it is kept in a bright position. Cuttings need warmth, humidity and light. They must be protected from cold and direct sunlight. You should also avoid excessive humidity, as this can cause them to rot.
Cuttings are often placed in a humid environment by covering them with a plastic bottle or plastic bag to maintain a moisture-saturated atmosphere.
Propagation by stem cuttings
This is the simplest and most straightforward technique. Segments measuring between 10 and 15 cm in length are generally chosen (although this can vary depending on the plant selected!), and the plant is cut just below a node, then the stem is replanted in the soil.
Herbaceous cuttings
Herbaceous cuttings are taken in spring, usually in May-June, from green, young and tender stems. This is the simplest and most basic technique, allowing you to propagate many perennials. You can take cuttings in this way from Pelargonium and hardy geraniums (particularly G. macrorrhizum), asters, hybrid verbenas, clematis, penstemons, campanulas, salvias…
- Take a stem measuring 10 to 15 cm in length, cutting just below a node.
- Remove the basal leaves, leaving only two or three at the top of the stem (if they are very large, you can cut them back to reduce their surface area). Likewise, if there are flower buds, flowers or fruit, remove them.
- Prepare a pot with light potting compost. Water it so that it is moist.
- If desired, dip the base of the stem in rooting hormone.
- Make a small hole in the potting compost, using a pencil, for example.
- Plant the stem in the hole, then firm the compost well all around it to ensure good contact between the stem and the growing medium.
- Place the pot under cover, in a bright spot away from direct sunlight.
- You can place a transparent plastic bag or plastic bottle over the cutting to maintain a humid atmosphere.
… All that remains is to wait!
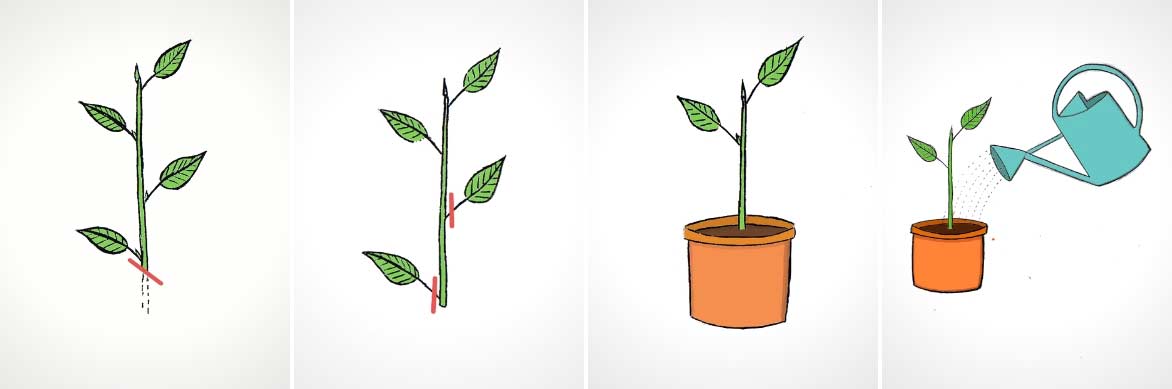
To take stem cuttings: 1/ Cut a stem just below a node. 2/ Remove the basal leaves. 3/ Place the cutting in the soil. 4/ Make sure that the growing medium remains slightly moist by watering from time to time.
Discover our video advice on propagating Pelargonium:
Semi-ripe cuttings
This technique is used in mid to late summer, around July-August, or even September. It is mainly used for shrubs and plants that become lignified (produce “wood”), by taking shoots from the current year that have begun to firm up and become lignified at the base. These are also known as semi-hardwood cuttings. You can take cuttings in this way from many shrubs, including hibiscus, hydrangeas, euonymus, trumpet vines, photinias, oleanders, honeysuckle, privets, buddleias and abelias…
- Take stems that are still tender at the tip and slightly lignified at the base (firm and brown). Cut below a node to obtain segments measuring between 10 and 15 cm in length. You can optionally take the cutting with a heel, the base of the branch on which it grows. If there are leaves on the lower part of the stem, remove them.
- Dip the base of the stem in rooting hormone.
- Plant it in a pot filled with a light growing medium.
- Place the pot under cover, in a bright spot away from direct sunlight. You can use the propagating-with-a-plastic-cover method.
Hardwood cuttings
This technique allows you to propagate trees and shrubs. It is carried out when the plant is dormant and has lost its leaves, between November and February.
- We recommend starting by preparing the ground. Choose a spot sheltered from wind and direct sunlight (for example, in front of a north-facing wall), then dig a trench and add a little sand for drainage.
- Then take cuttings measuring 15 to 20 cm in length from well-formed, disease-free shoots from the current year. Cut the base at an angle just below a node, and the top of the cutting just above a node as well.
- Plant the cuttings in the trench (you can plant them individually or group them into small bundles).
- Replace the growing medium and firm it all around.
- Towards the end of March, you can replant the cuttings in a nursery bed or place them in pots.
Instead of planting the cuttings outdoors in the ground, you can plant them in pots and place them under a cold frame.
Discover our video tutorial and Olivier’s advice:
Read also
10 tips for gardening on a budgetPropagation by leaf cuttings
This technique is well suited to succulent plants with fleshy leaves (sedums, kalanchoes, crassulae, echeverias…), as well as many houseplants: Peperomia, Saintpaulia, Begonia rex, Sansevieria… Eucomis can also be propagated by leaf cuttings. This can be done throughout the year, but the most favourable periods are spring and early summer.
- Prepare a pot by filling it with a light, free-draining growing medium (a mixture of potting compost and sand). Water it.
- Take a leaf, keeping its petiole. Choose a young, healthy leaf, unaffected by diseases or pests.
- Then make a hole in the potting compost and plant the petiole, up to the base of the lamina.
- Firm the compost well all around it.
- Place the pot in a heated sheltered position, at around 20 °C, away from direct sunlight.
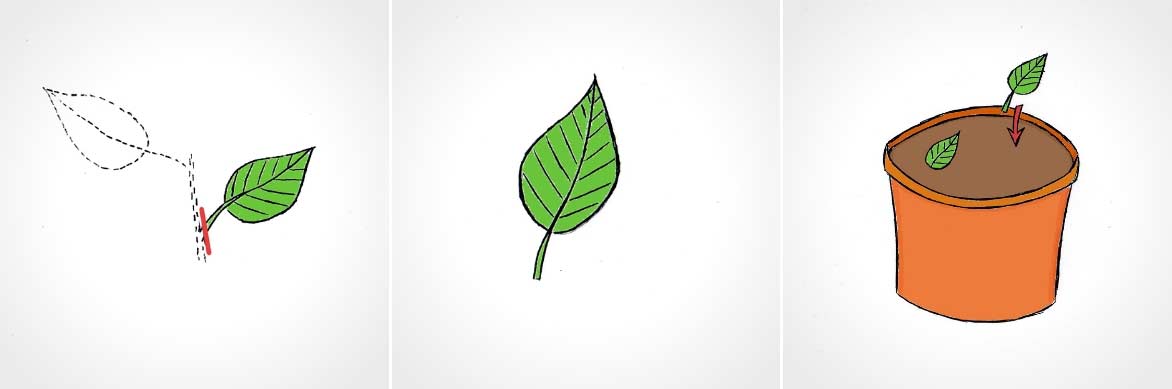
To propagate leaves by cuttings: take a leaf by cutting its petiole at the base, then insert it into a free-draining growing medium.
For some plants, only a leaf segment is used (Sansevieria, Eucomis, Begonia, Streptocarpus…), rather than the entire leaf with its petiole. The section is then planted vertically in the growing medium.
For succulent plants, leave the leaf to dry for two or three days before potting it.
Finally, for some plants (Begonia, Gloxinia…), you can make incisions on the underside of the leaf, along the veins, then place the leaf on the potting compost. The leaf should produce new roots at the incision points.
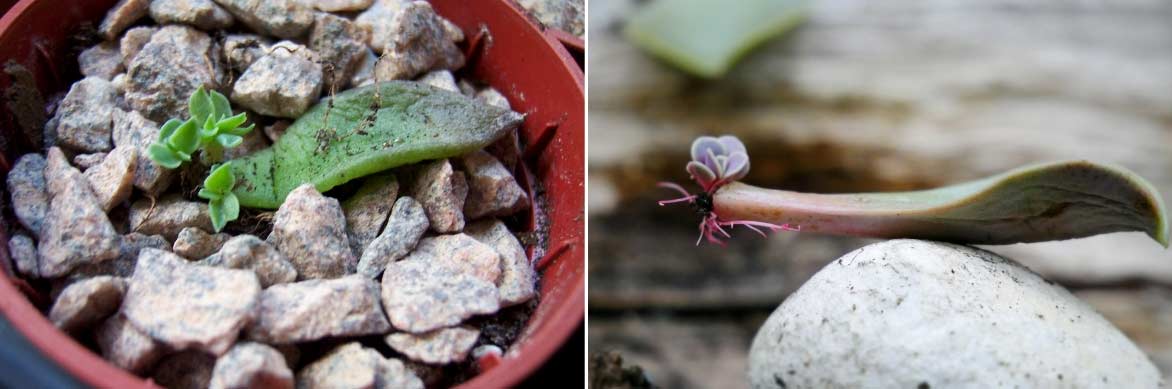
Leaf propagation by cuttings works well with succulent plants. Here, an Echeveria setosa (stephen boisvert), and another Echeveria species, producing seedlings at the base of a leaf.
Propagation by root cuttings
Some plants can be propagated by root cuttings. Take the roots while the plant is dormant and resting, in late autumn and winter. This technique works well for plants that naturally produce suckers, and for those with thick roots. You can propagate Phlox, Oriental poppies, Acanthus, Echinops, Eryngium, Japanese anemones, Verbascum, Kerria japonica, Aralia, Virginia creeper, Lilac, Raspberries and blackberries in this way…
- To take root cuttings, start by choosing a healthy, vigorous clump. Removing some of its roots may weaken it slightly. Avoid choosing diseased or unhealthy plants, and also avoid taking too many roots from the same plant…
- Dig around the original plant to lift it and expose the root system.
- Identify young, thick roots, then cut sections measuring between 6 and 12cm long (thick roots can be cut shorter than thinner ones), using a sharp, disinfected knife.
- Replant the original plant immediately.
- Prepare a pot with a mixture of potting compost and sand.
- Place the root sections in the pot. If the roots are thin, lay them horizontally and cover them with around 1cm of substrate. If they are thick, place them vertically instead, with the top of the root level with the surface of the soil.
- Water lightly.
- Place the pot in a cold frame, out of direct sunlight.
- Make sure the substrate stays slightly moist, watering from time to time if necessary.
The cuttings should begin growing in spring.
For example, discover our video advice on propagating Oriental poppies from their roots:
A few specific techniques and additional tips
- Propagate by cuttings in a humid atmosphere?
Propagation by cuttings in a humid atmosphere simply involves placing a plastic bag or plastic bottle (or another transparent glass or plastic object) around the cutting to create an atmosphere saturated with moisture. This encourages the plant to recover by creating genuinely favourable conditions and preventing it from drying out. However, we recommend airing it from time to time (for example, every three days), and making sure that the plant does not touch the wall, to prevent it from rotting. Also avoid placing it in full sun!
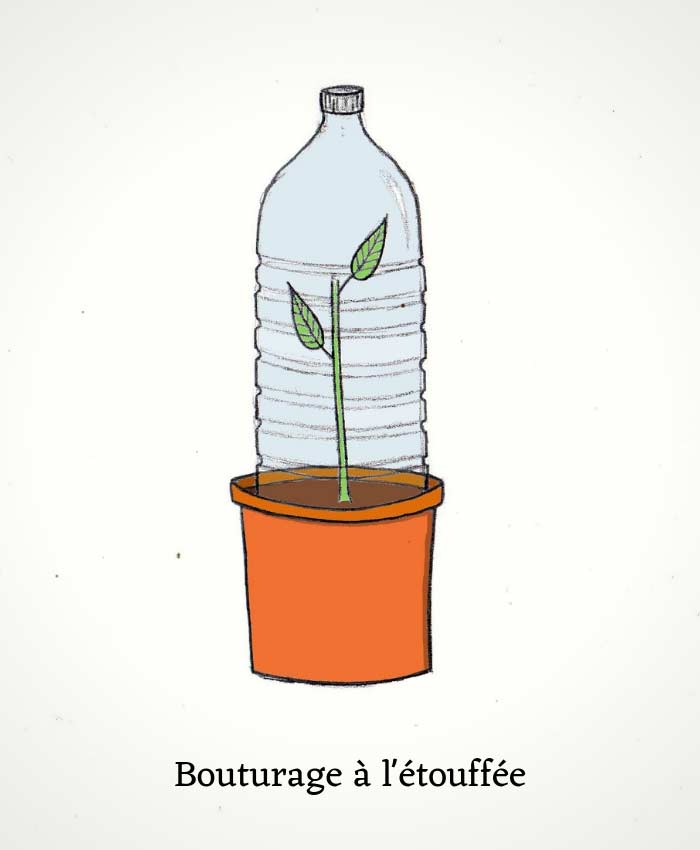
To place a cutting in a humid atmosphere, you can use a bottle, but also a plastic bag or any other transparent object that helps retain moisture
- Propagate cuttings in water?
This technique has the advantage of being very simple, as it simply involves placing the stem in water and waiting for it to produce roots before potting it on. The drawback is that the plant often has more difficulty recovering once it is planted in a pot, in potting compost. Its roots have had time to become accustomed to water and are less well adapted to soil. Nevertheless, this technique works well for papyrus, willow, mint and oleander… Apart from these species, and for most plants, we recommend propagating directly in potting compost instead.
As a general rule, if you use this technique, avoid leaving the plant in water for too long… It is also preferable to place a piece of charcoal in the water (this helps keep the water clear and prevents the stem from rotting).
Find out more in our articles: How to propagate plants in water easily? and Which plants can be propagated in water?
- Should you use rooting hormones?
Rooting hormone encourages rooting, while also promoting better healing and limiting the appearance of diseases. Far from being essential, many plants can be propagated without rooting hormone, but its use remains worthwhile for certain plants that are difficult to propagate. You can also make a natural substitute called ‘willow water’ by placing willow branches in water for several weeks.
- Heel cuttings?
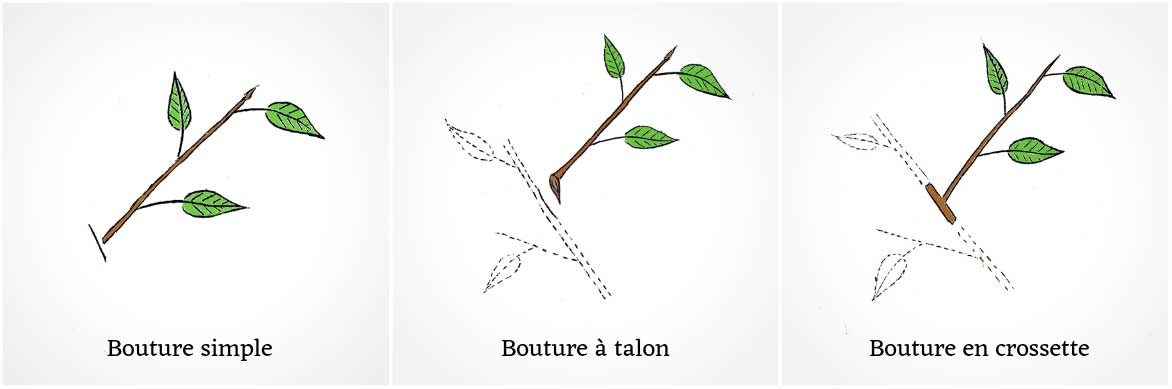
This is an alternative technique to taking simple stem cuttings, and is used to propagate trees and shrubs. A stem is taken along with a small section of the branch on which it was inserted. It is worth keeping the base of this stem, as it contains meristems which encourage root formation and therefore improve the plant’s recovery.
Another alternative technique, which is quite similar, is crozier cutting. Here, a stem is taken with a real section (between 1 and 2cm long) of the branch on which it was inserted, giving it a T-shape. This technique works well for rock roses, elders, olive trees, fig trees, grapevines, barberries and strawberry trees…
Find out more in our tutorials: How to take a heel cutting and How to take crozier cuttings successfully
Discover
Discover all our other advice on propagation by cuttings:
- Subscribe!
- Contents
This form is protected by reCAPTCHA - the Google Privacy Policy and Terms of Service apply.

































Comments